Use Screen2Screen with your organization’s trusted support team. Review who is connecting, close sensitive content before sharing, and keep passwords, authenticator codes, banking details, and payment information out of the session.
Updated November 9, 2026. Select a screenshot to open it at full size. Public examples use fictional names and emails. Android permission screens and button wording can vary with your device and app version.
Install the app and review the introduction
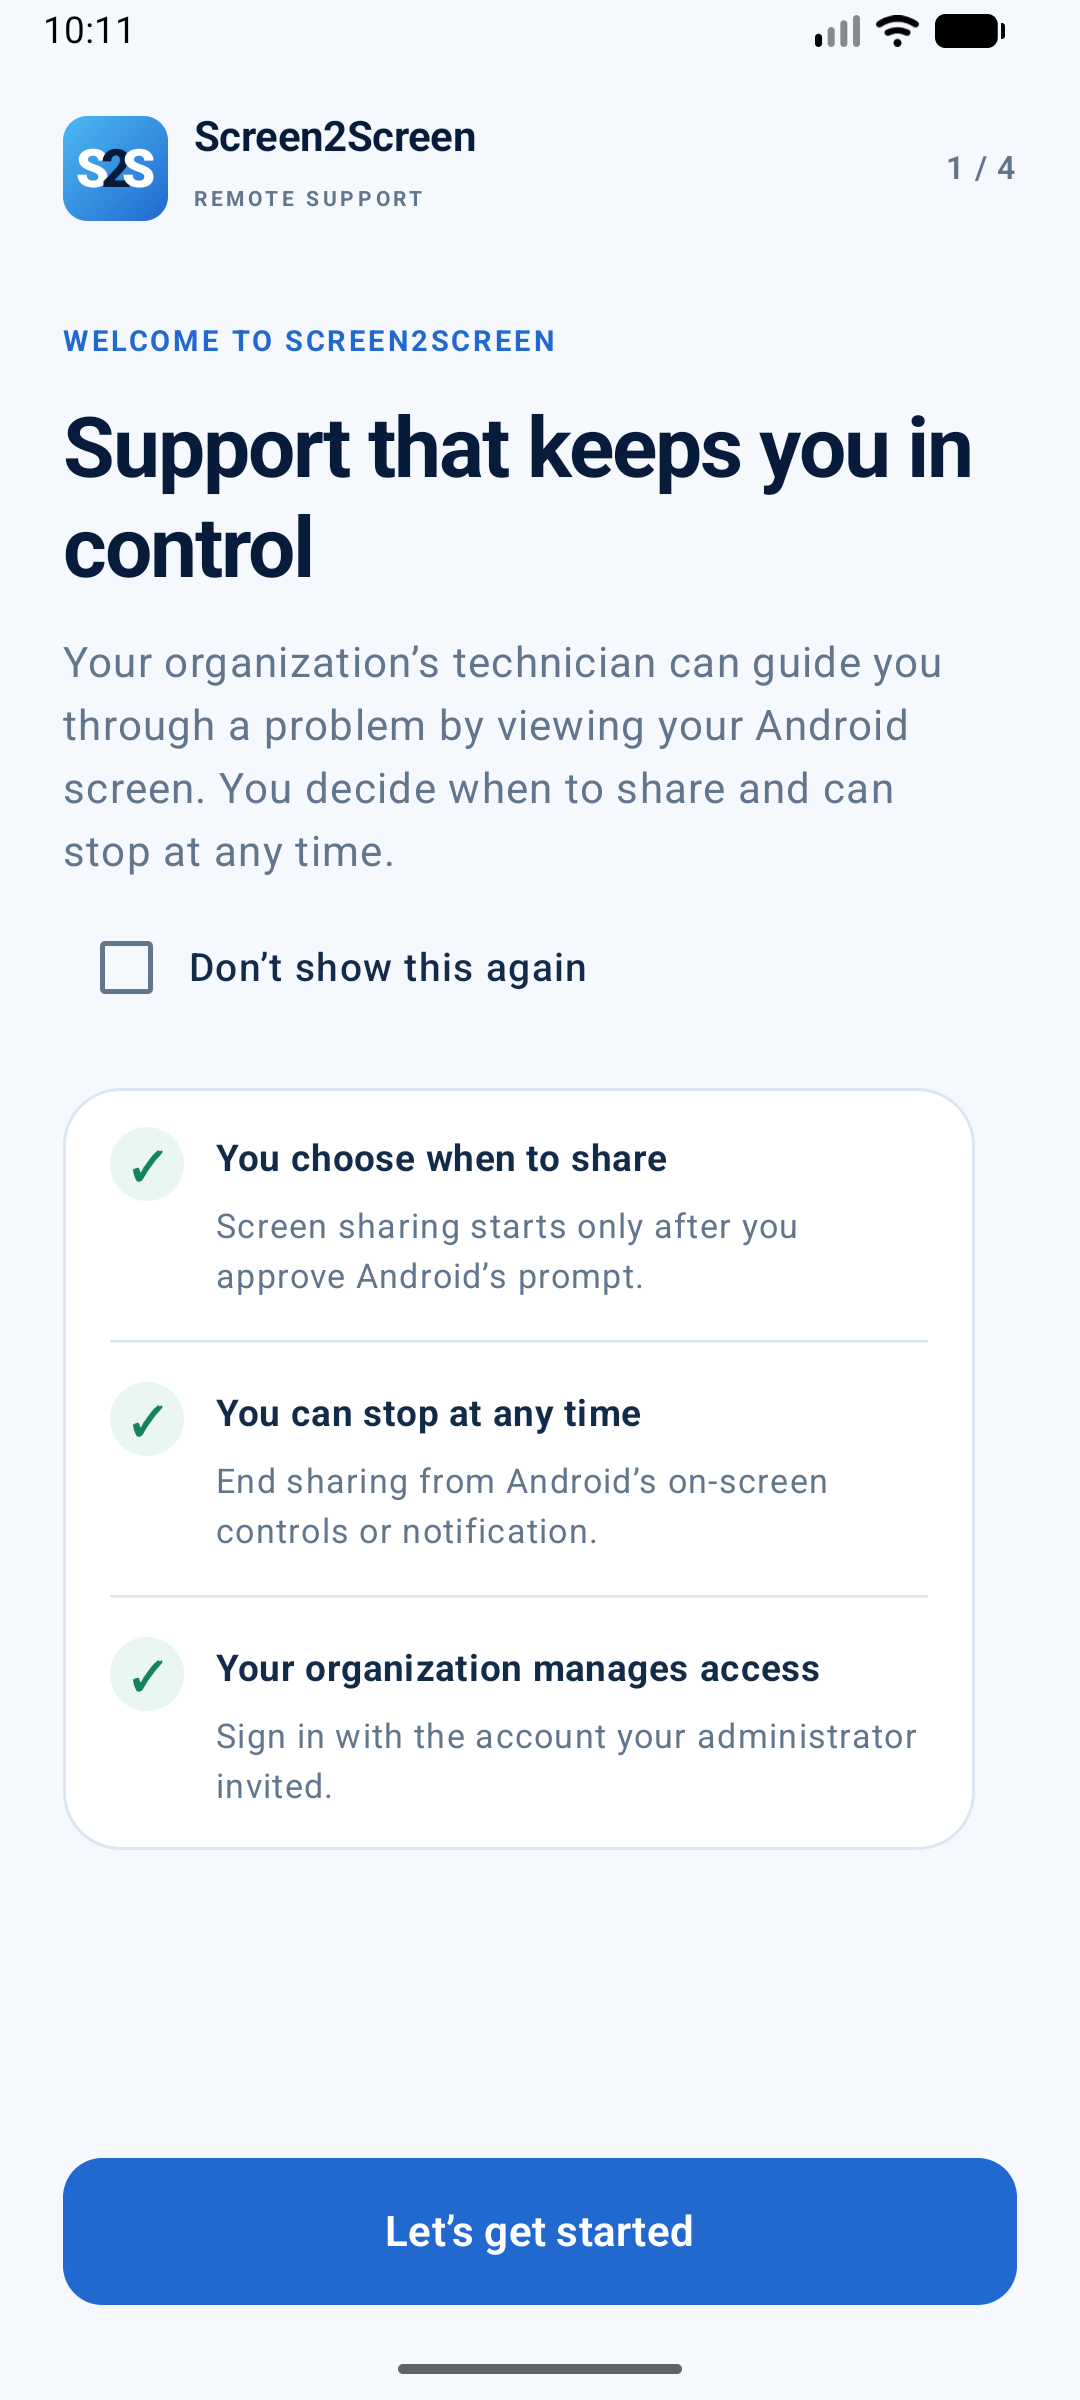
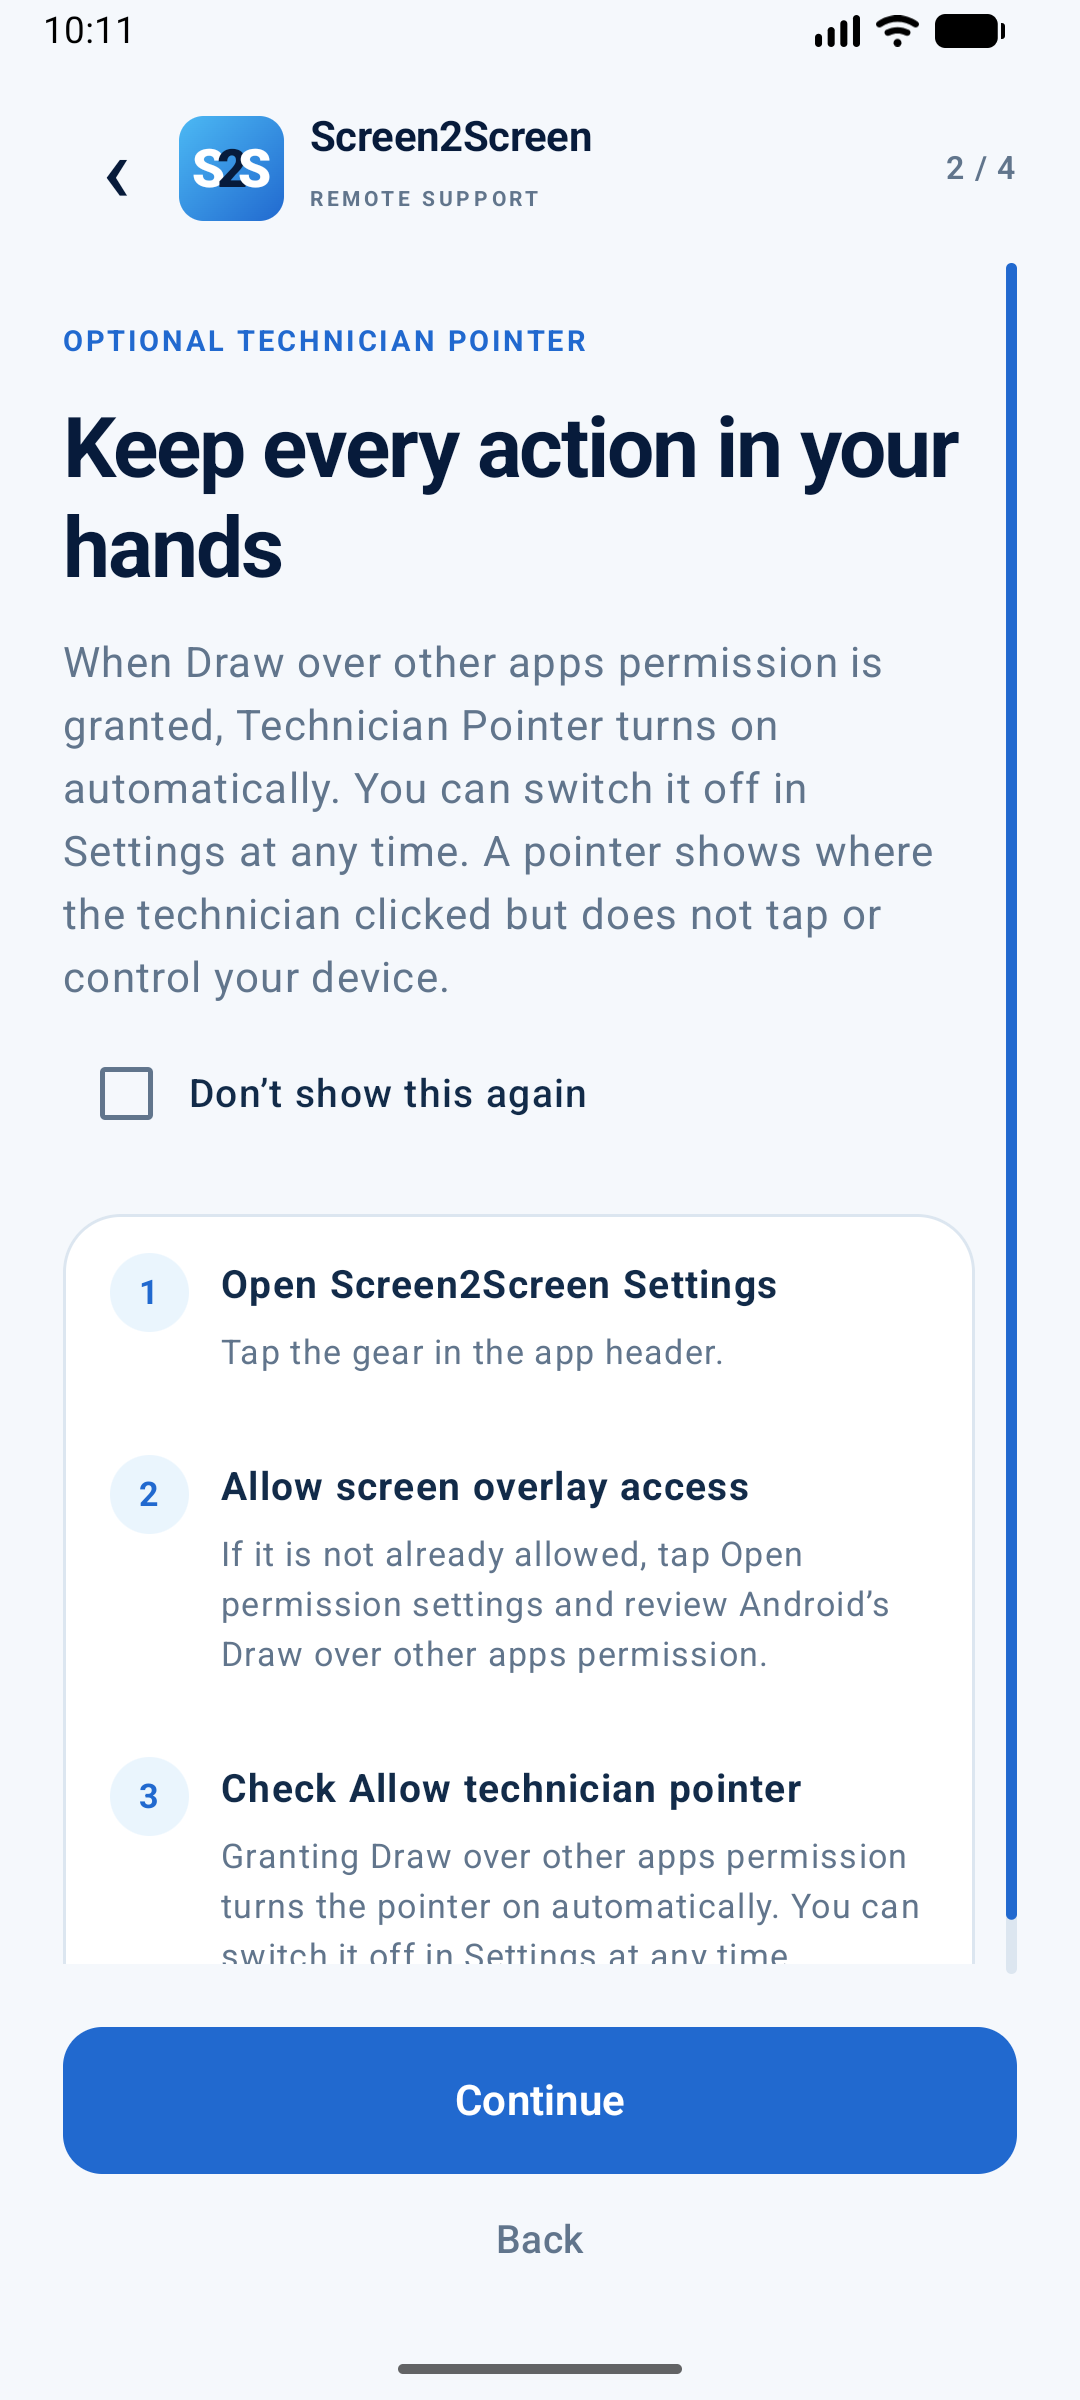
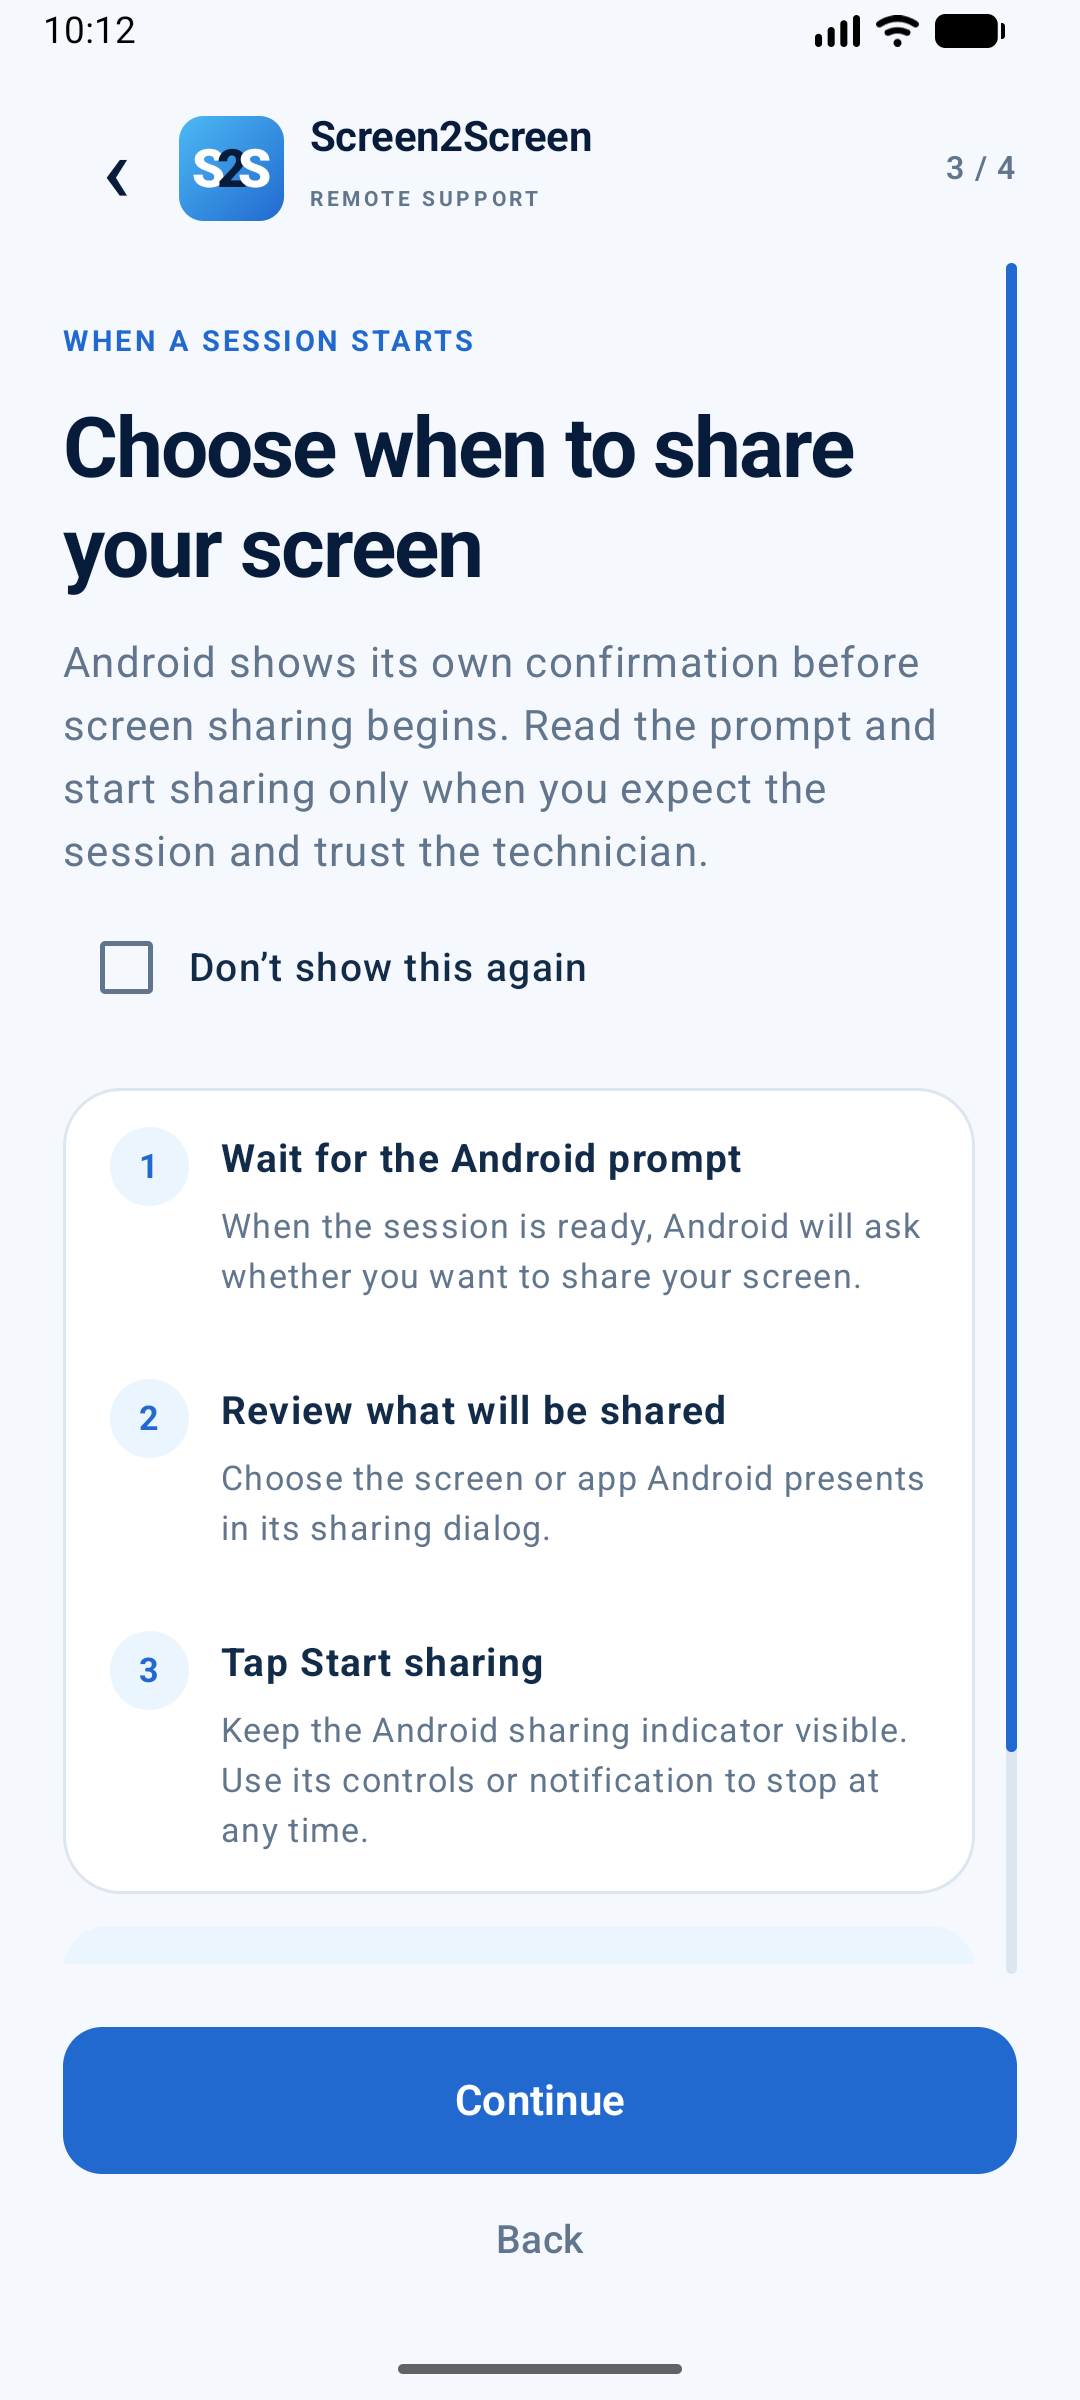
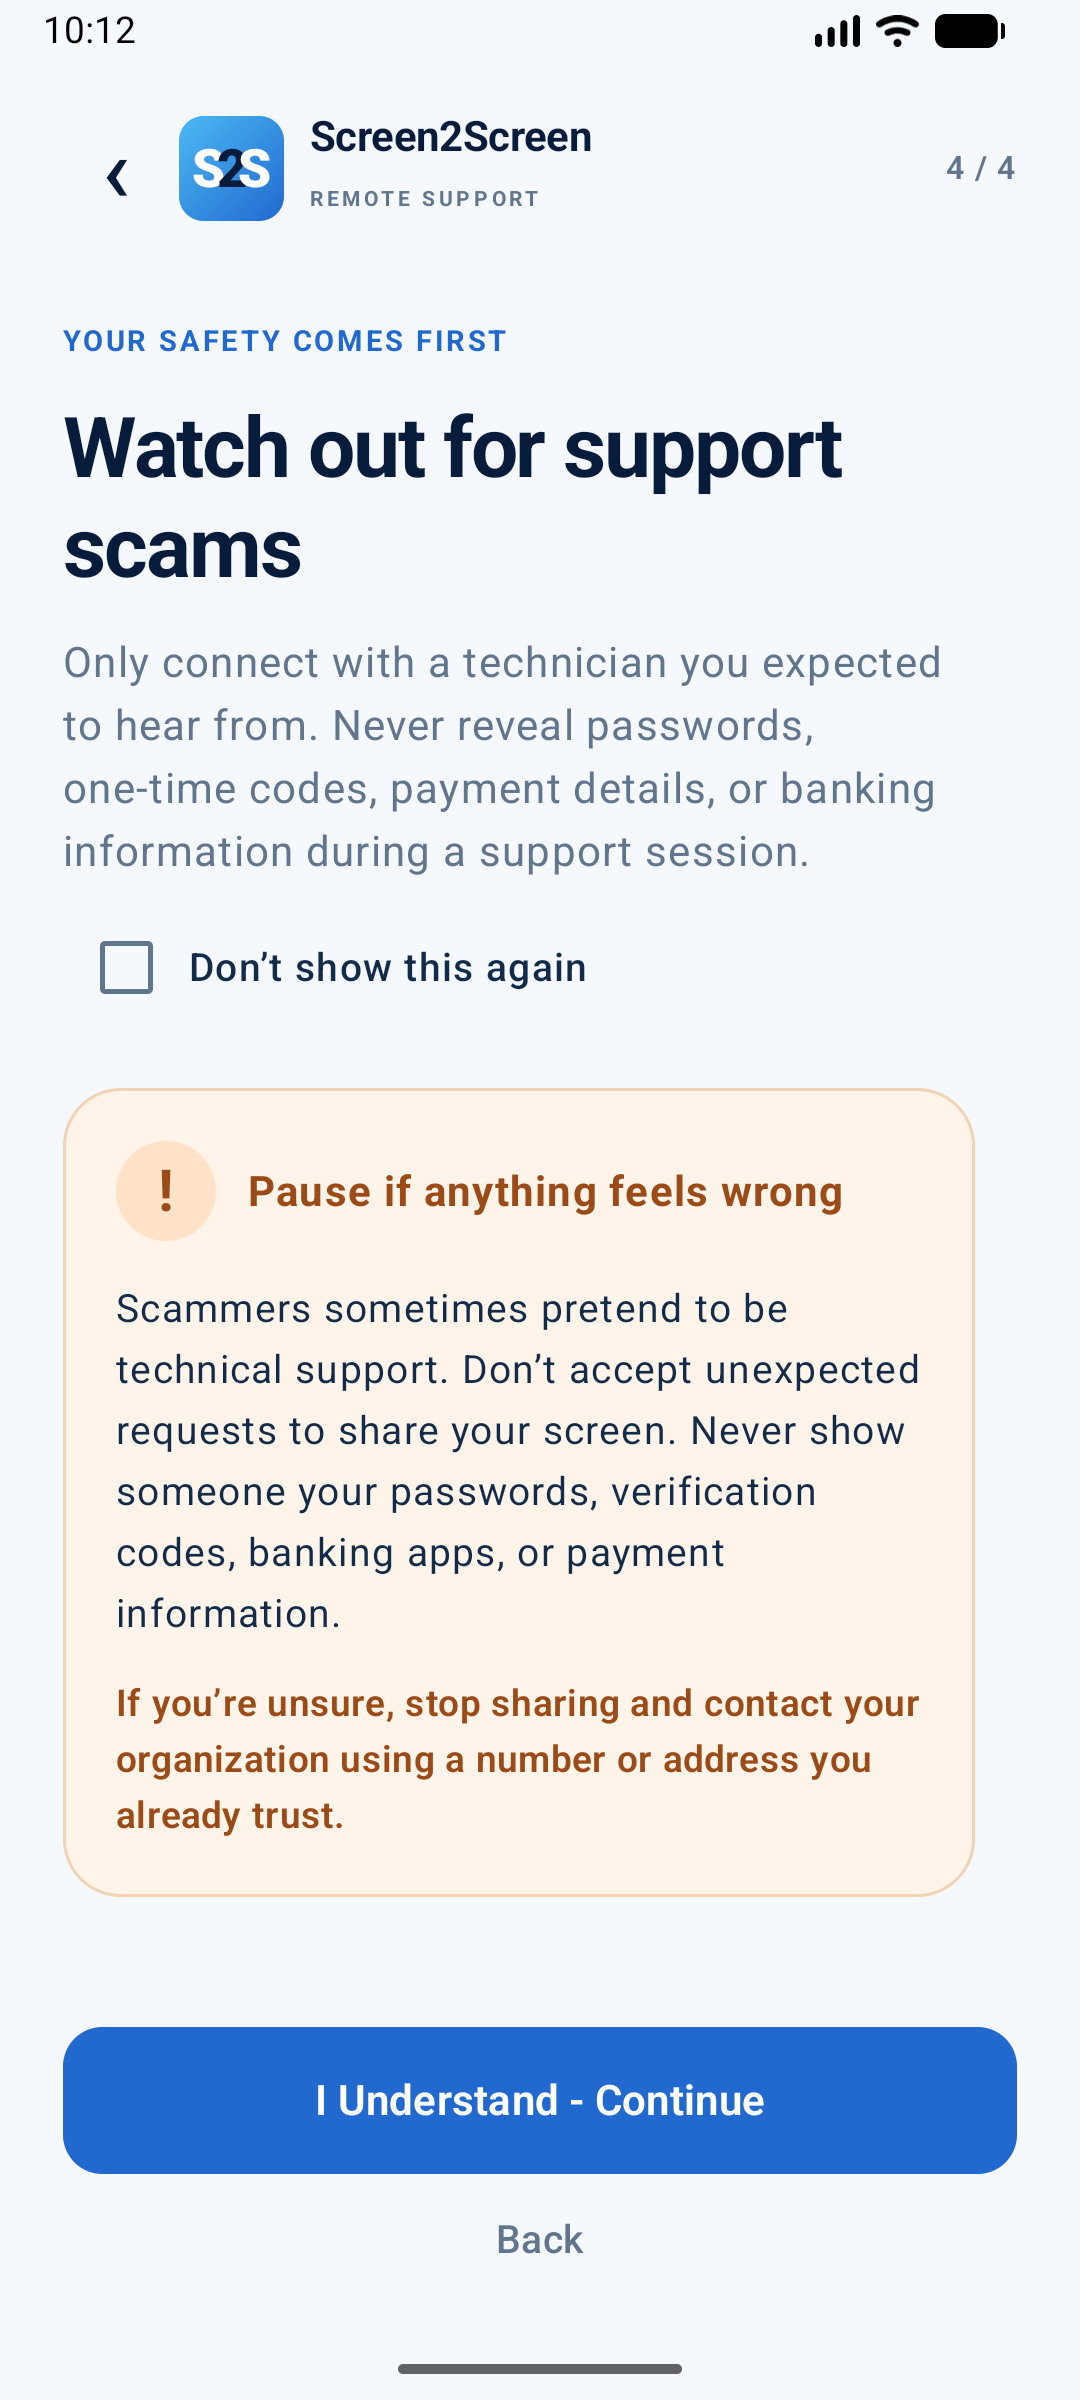
Install Screen2Screen from the Google Play link provided by your organization. Have your invited email address ready and use a working internet connection. The app’s first-launch introduction explains screen sharing, the optional pointer, Android approval, and support safety.
View the four introduction screens
Open full-size screenshot ↗
Open full-size screenshot ↗
Open full-size screenshot ↗
Open full-size screenshot ↗
You can choose Don’t show this again after reviewing the introduction. To see it on a later launch, turn on Show introduction screens in Settings.
Use your organization account
- Open Screen2Screen and choose Sign in with Google or Use Screen2Screen credentials.
- For Google sign-in, select the account matching your invitation. For Screen2Screen credentials, enter that invited email and your password.
- If you need an email/password account, create one with the invited address and verify it using the email Screen2Screen sends. Then sign in again. Use the password-reset option if you have forgotten your password.
- If prompted, enter the current six-digit code from your authenticator app. Complete authenticator enrollment if your organization requires it.
- Select the organization where you need support. Check the signed-in email and organization before requesting help.
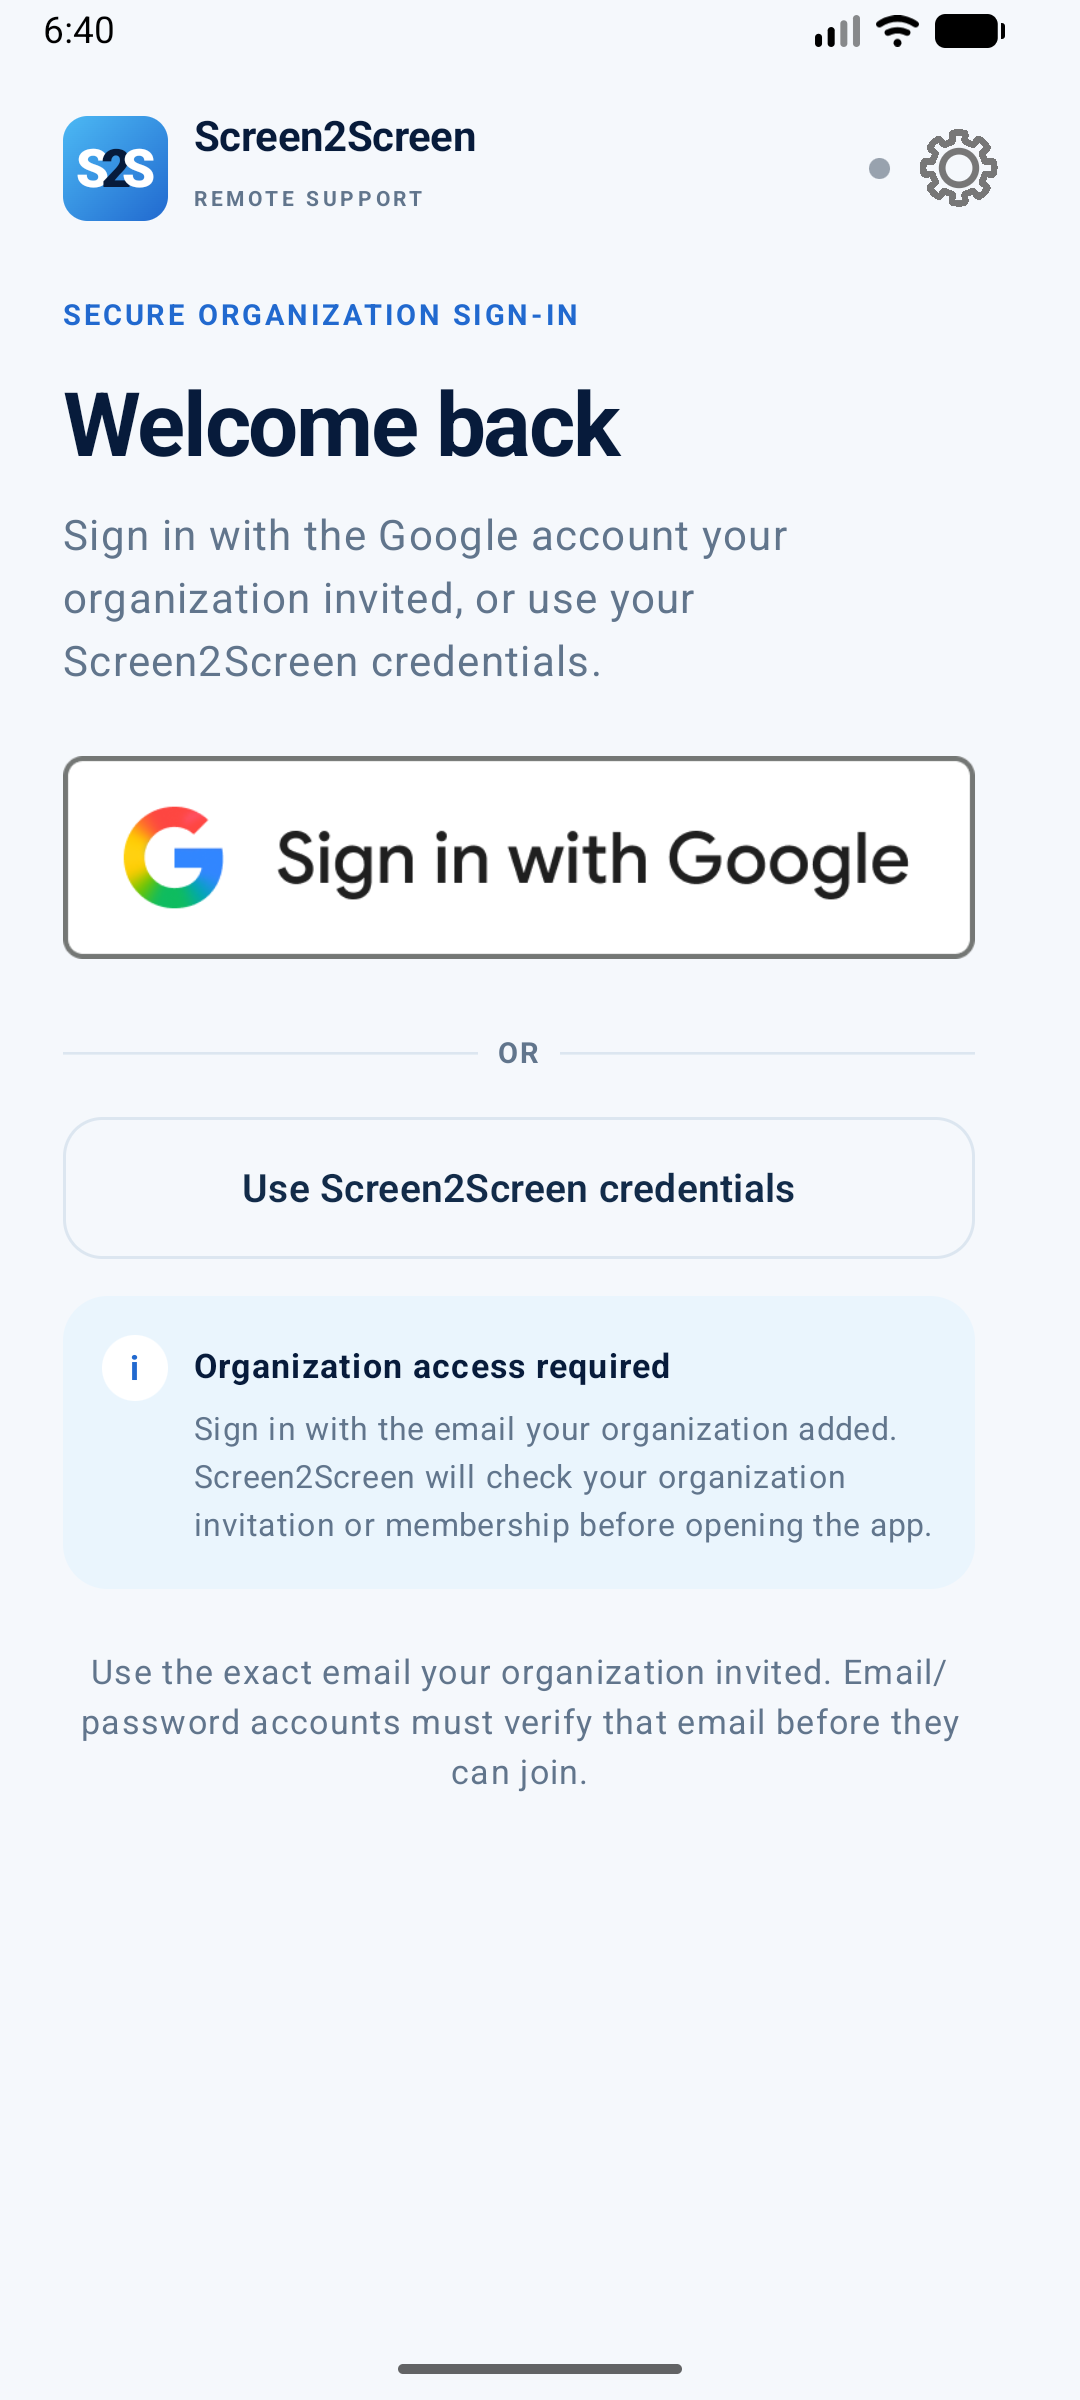
Open full-size screenshot ↗
The app can restore a valid sign-in when reopened. To deliberately leave the account on this device, use Sign Out at the bottom of Settings.
Request a technician from the ready screen
- Confirm the email shown under Signed in as.
- Choose the correct organization if you have access to more than one.
- Tap the blue Request a technician button at the bottom.
- Keep Screen2Screen open while it shows Waiting for a technician. A technician must join before screen sharing can begin.
Your screen stays private while the request is waiting. Cancel the request if you no longer need help.
The What the technician can see card explains the screen and device information available during an approved session. Scroll to review it before continuing.
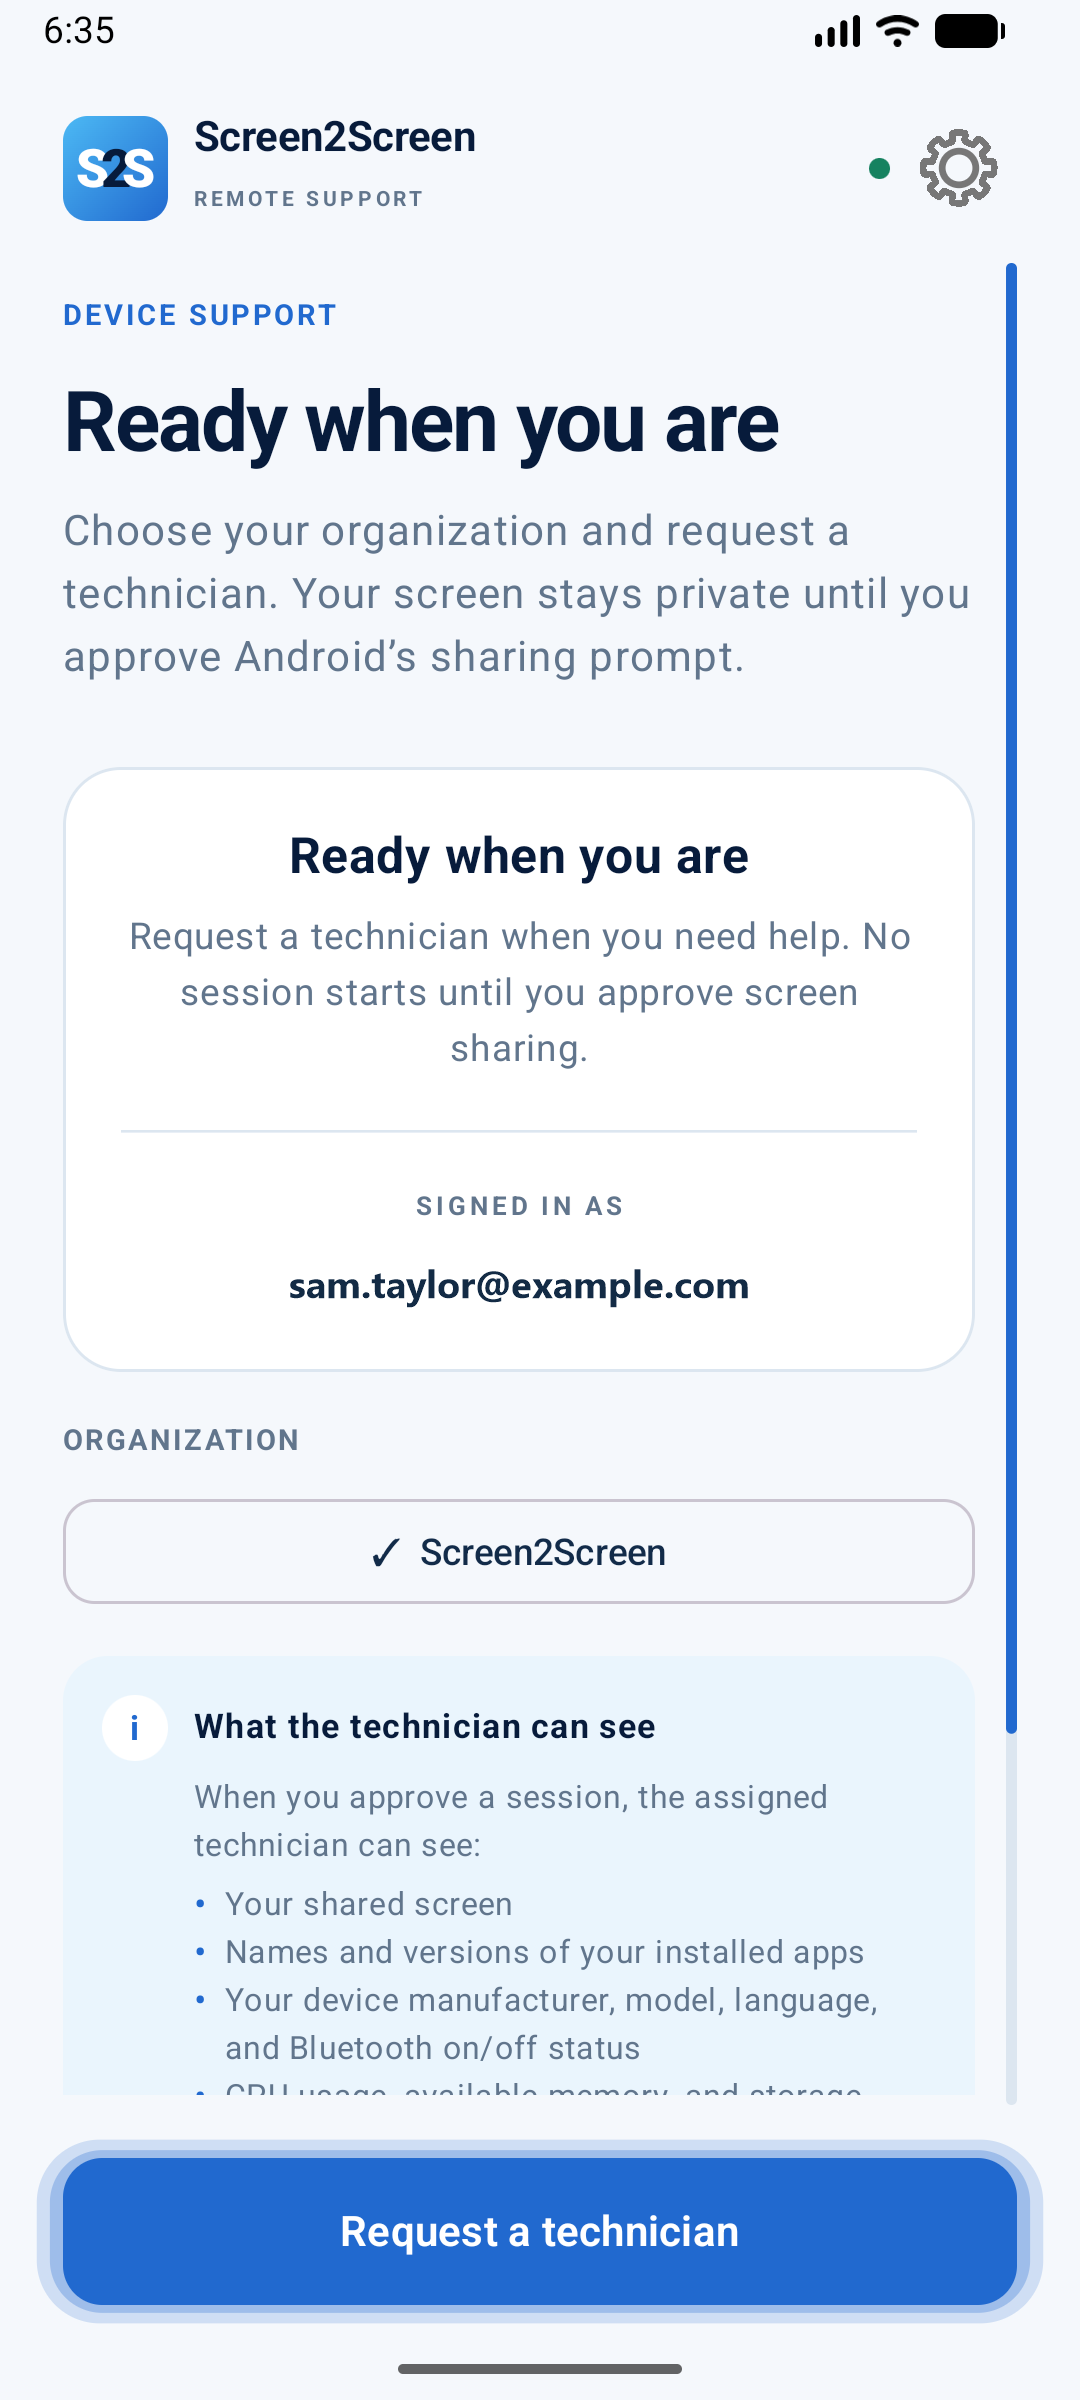
Open full-size screenshot ↗
Check the technician, then approve Android sharing
The technician name may be the display name assigned by your organization’s admin. Approve only a technician and support request you expect; contact your organization through your usual channel if you are unsure.
- Read the technician’s name in A technician wants to connect. The example shows Jordan Lee.
- If you expect and trust this connection, tap Review and approve connection. Otherwise choose Decline invitation and contact your organization through your usual support channel.
- Review Android’s separate screen-sharing confirmation. Start sharing only when you are ready.
Close private messages and sensitive apps first. While your screen is shared, visible content can be seen by the technician. Android displays an ongoing sharing indicator while capture is active.
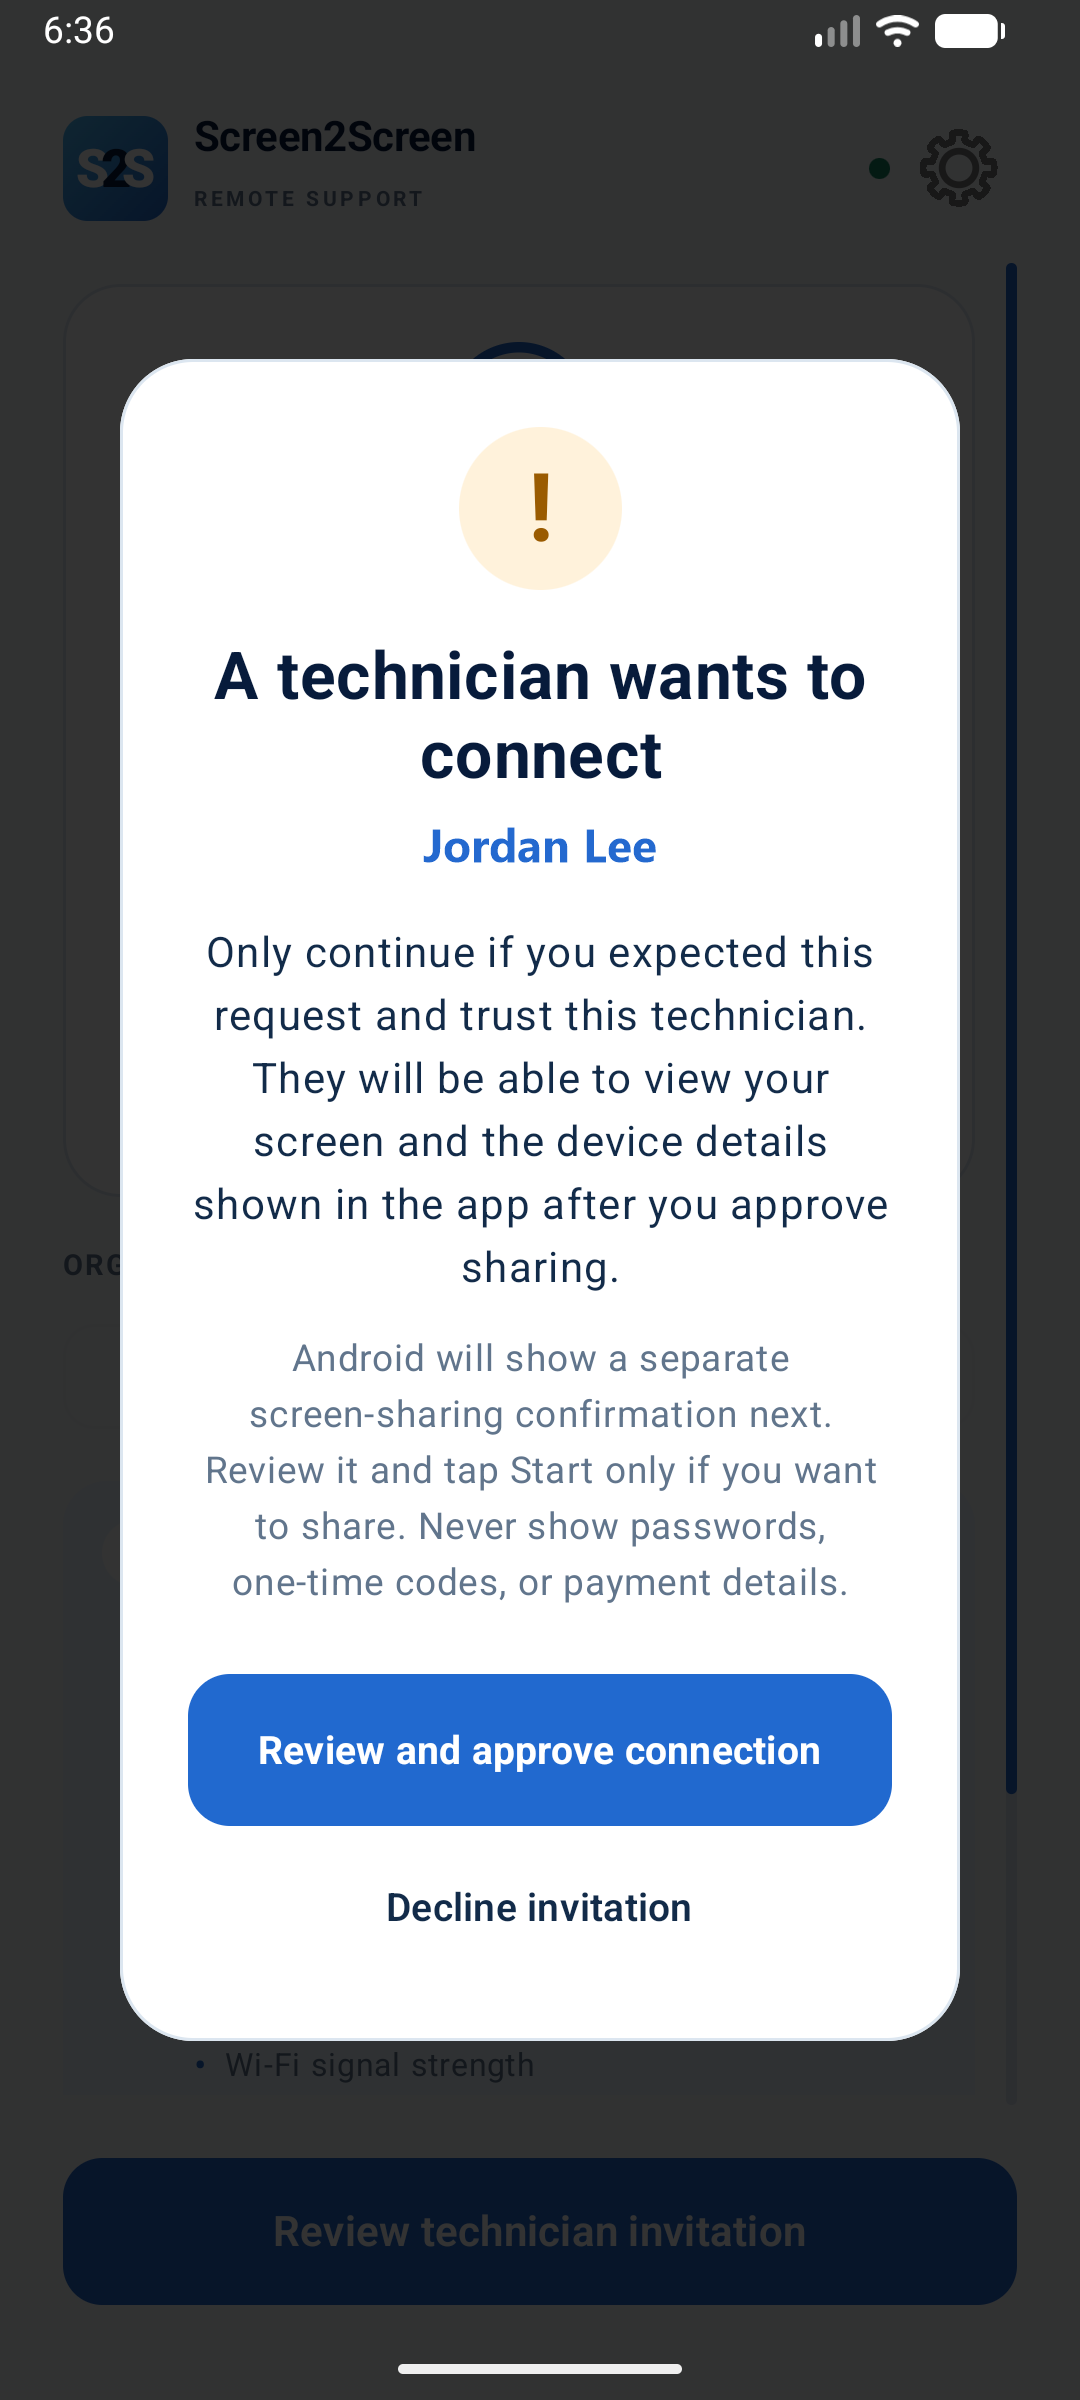
Open full-size screenshot ↗
Recognize an active session and choose your interaction level
The green checkmark and Screen sharing is active card show that sharing has started. You can now open the app or Android setting your technician is helping you with.
- ✓View Only.
The technician sees your approved screen while you perform the actions.
- ✓View and Point.
A visible pointer highlights where to look or tap when Pointer control and Draw over other apps are enabled.
- ✓View and Touch.
When you enable Touch control and its Accessibility service, the assigned technician can perform supported taps, swipes, drags, long presses, navigation, and text entry.
Return to Home Screen takes you out to Android’s home screen so you can open another app. Screen sharing continues until you end the session or stop capture.
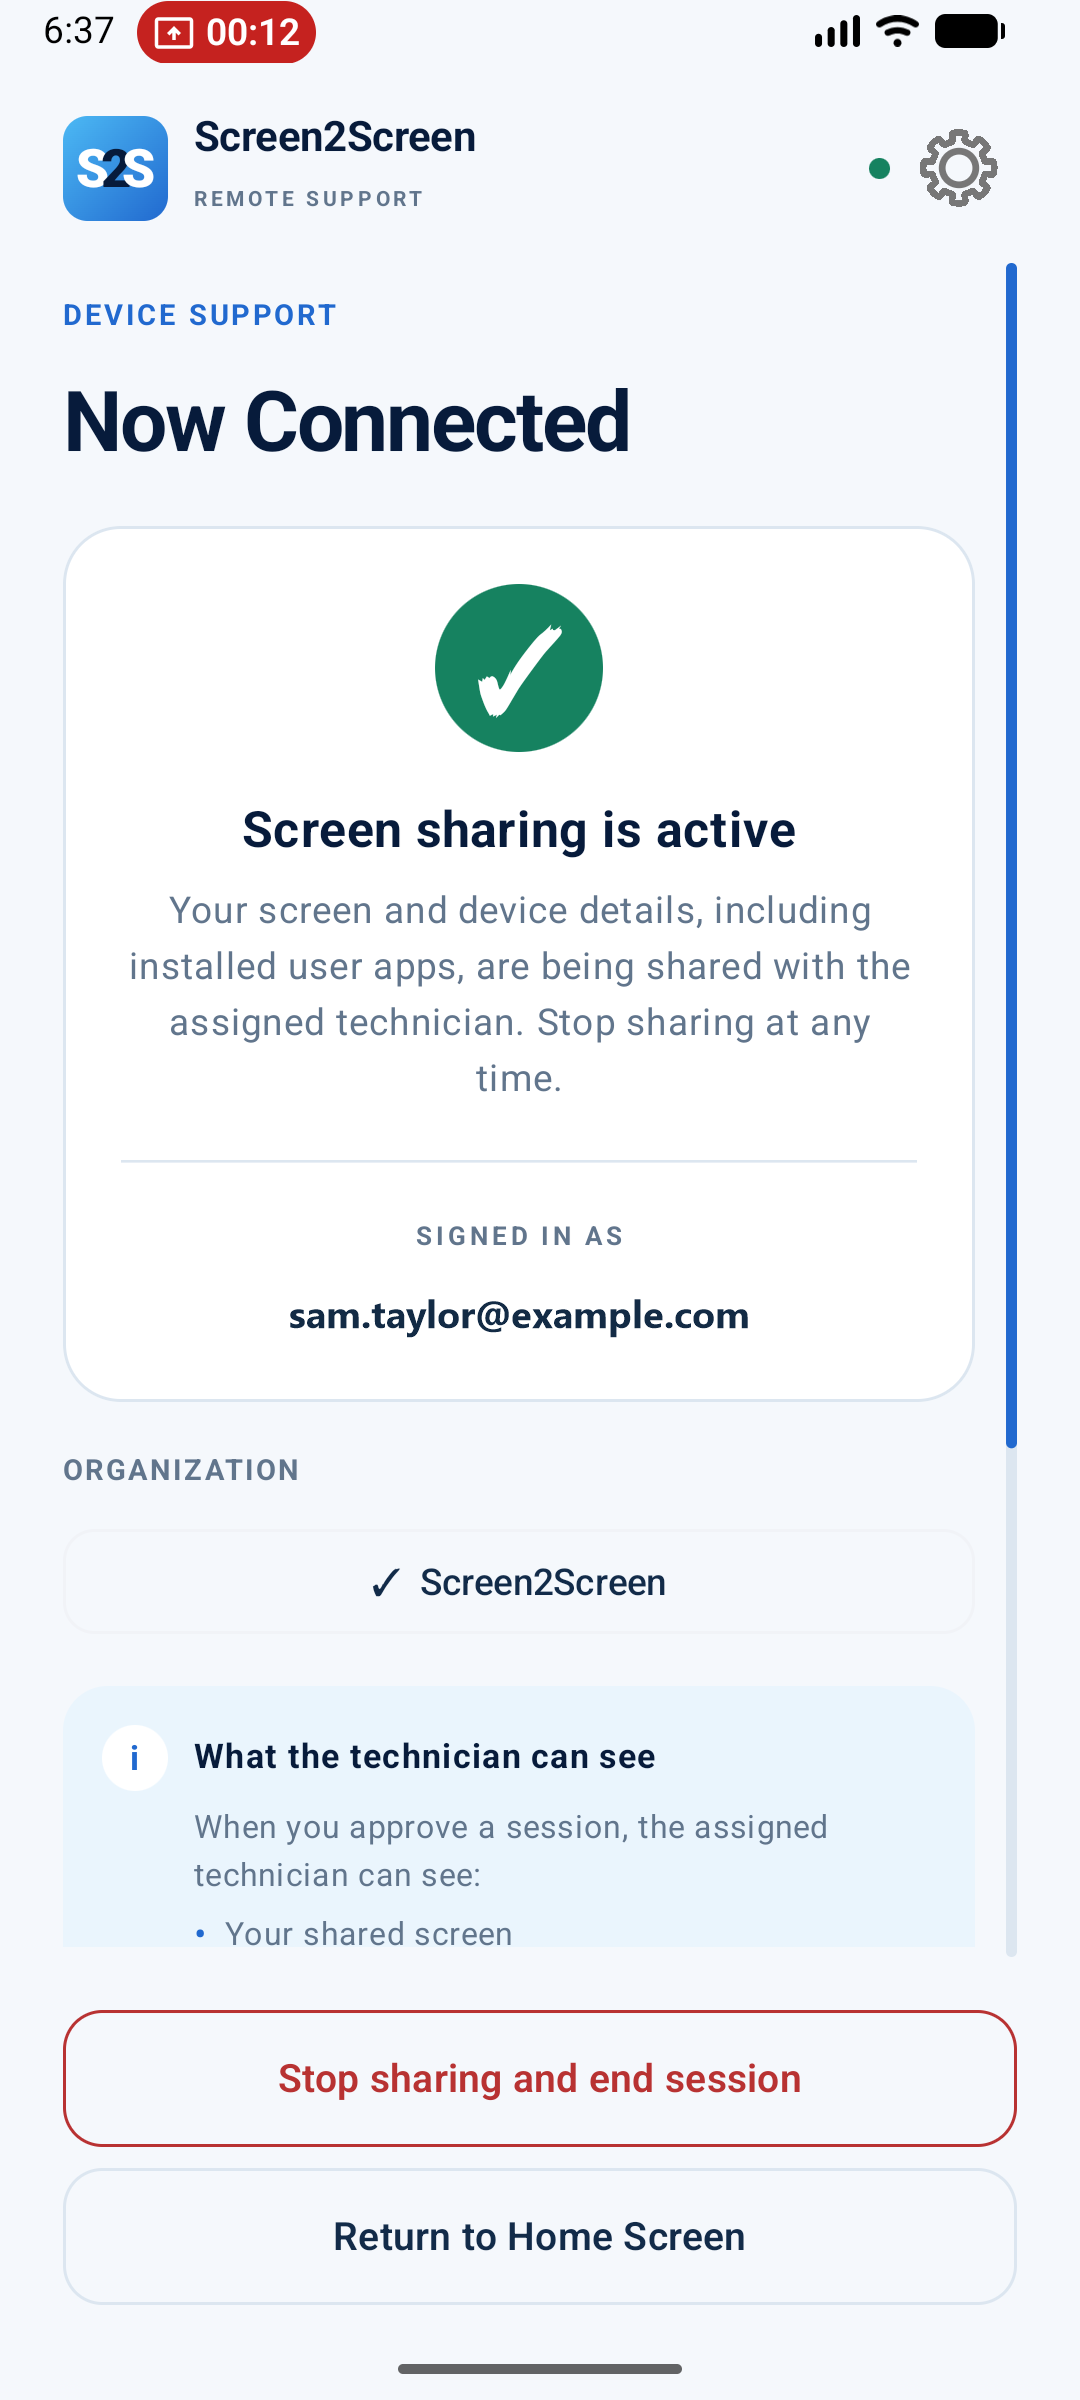
Open full-size screenshot ↗
During an approved session, the technician can also receive device health, Android and app versions, manufacturer and model, language, connection details, Bluetooth status, and installed-app information. Some values depend on your Android version and permissions. Review the app’s information card and the privacy policy for details.
Open Settings from the gear icon
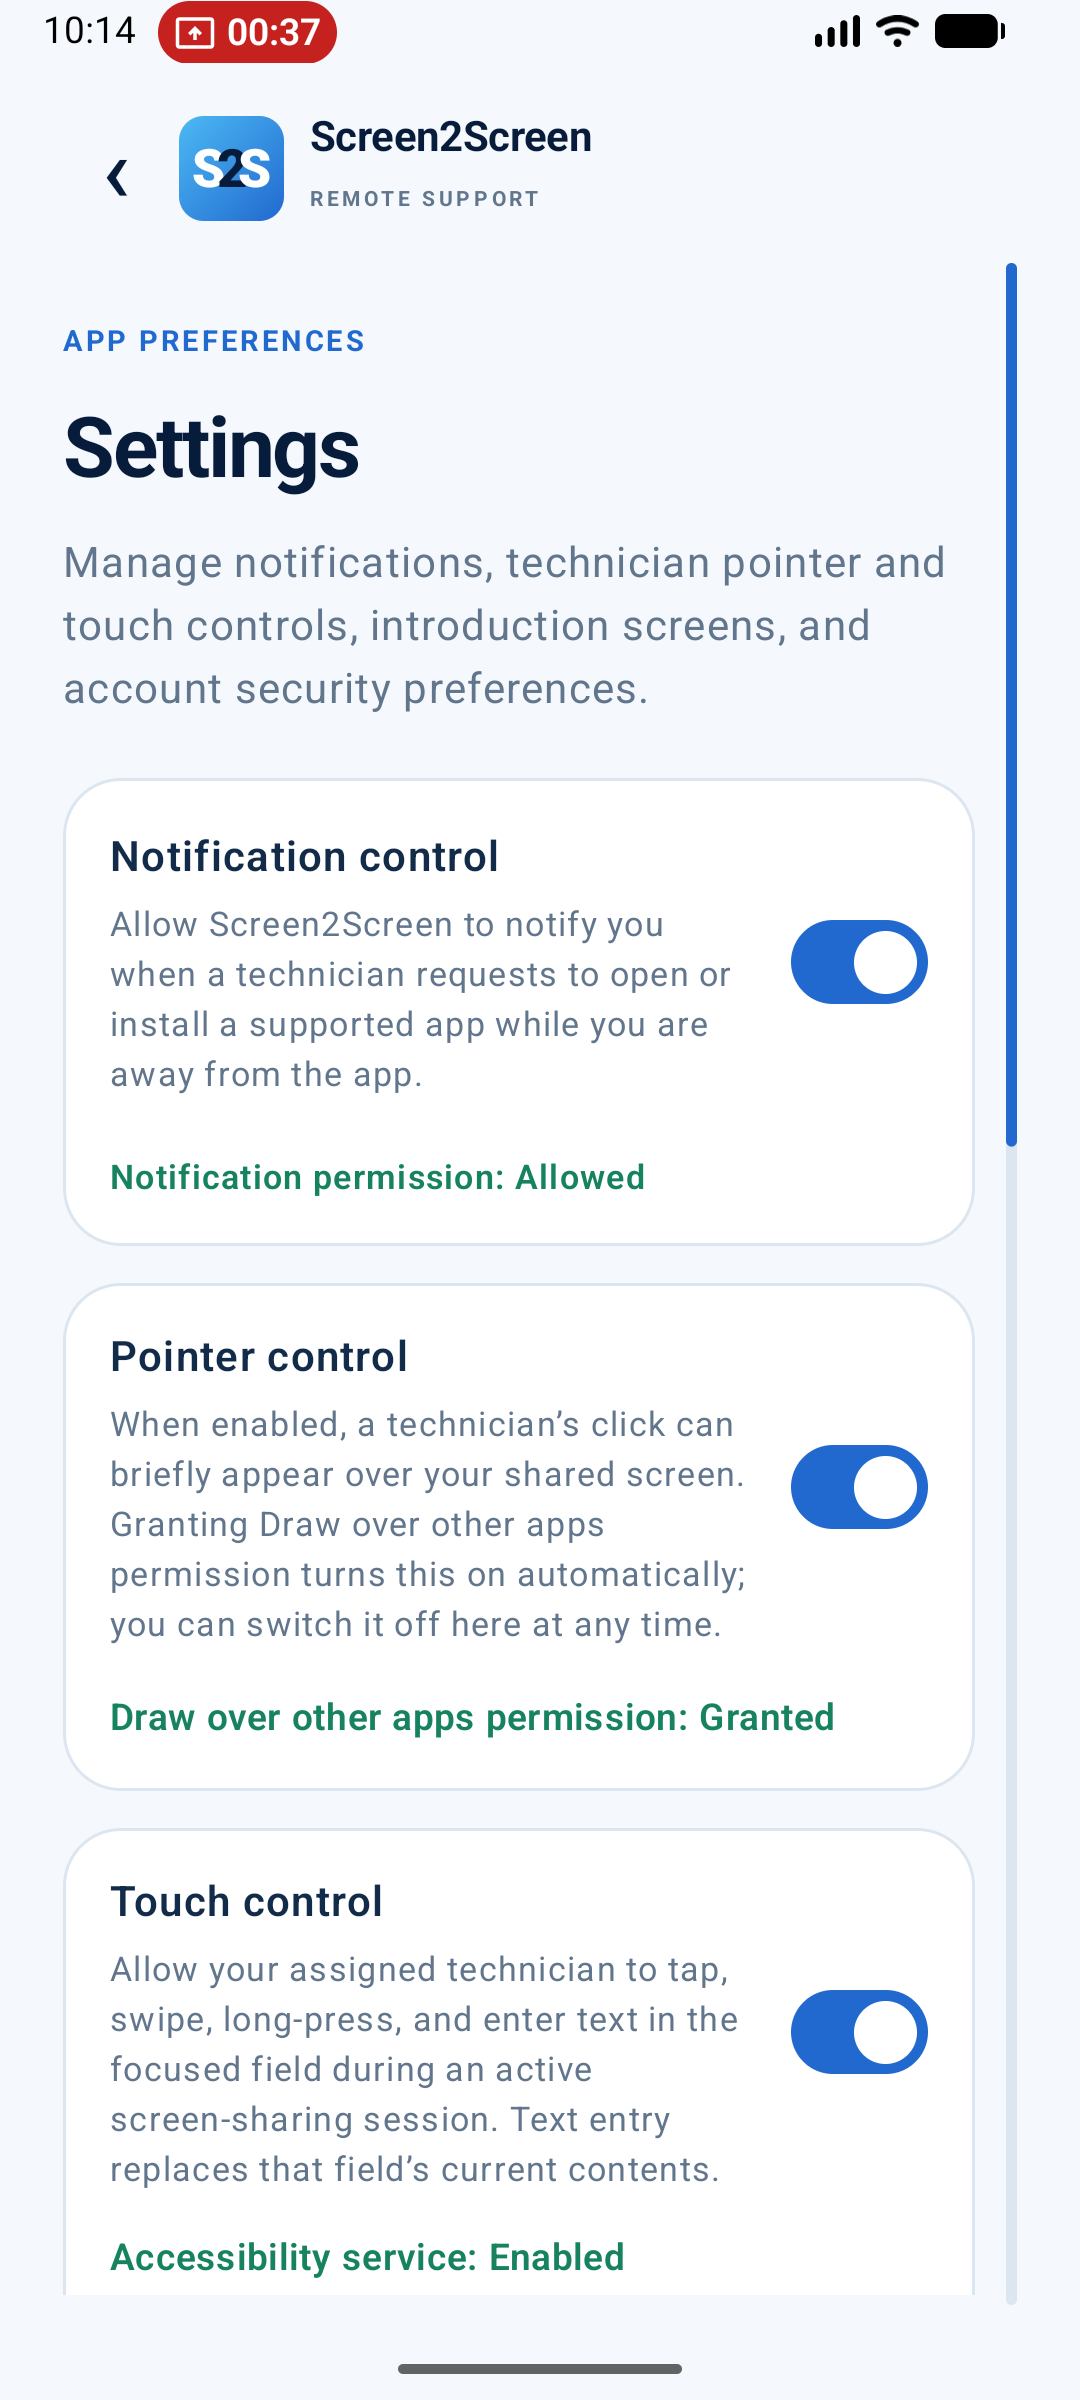
Tap the gear in the app header. Settings contains notification, pointer, touch, Always On, Remote file access, introduction, and authenticator controls. Scroll to reach the lower cards; use the back arrow to return to the app.
Notification control
Enable notifications and approve Android’s permission prompt so technician invitations and supported-app requests can reach you while you are outside Screen2Screen. If Android has already blocked notifications, use the app’s notification-settings control to review the system setting.
Pointer control
- In Pointer control, tap Open permission settings if Draw over other apps is not granted.
- Allow Screen2Screen to draw over other apps, then return to Screen2Screen.
- Check the Pointer control switch. Granting the overlay permission turns it on automatically; you can switch it off whenever you want.
Open full-size screenshot ↗
The pointer highlights a location. Touch actions use the separate Touch control permission described below.
Respond to Open, Install, or Uninstall requests
Your organization can preconfigure workflow apps. During a session, the technician may ask you to open an installed app or visit its store listing to install it. Review the request in Screen2Screen, or tap its notification when you are in another app. Installation still follows the store’s normal process.
Session-related app-request notifications are cleared when the session ends. If requests do not appear outside Screen2Screen, check notification permission first.
Choose a folder for remote file support
A technician can request file access during an approved support session. If you have not authorized a folder, review Allow remote file access? in Screen2Screen and choose Choose shared folder. Away from the app, a notification can bring you back when notifications are allowed.
- In Android’s folder picker, choose only the folder you want to share, including its subfolders. Documents or a dedicated support subfolder is a useful choice. Confirm Android’s folder-access prompt.
- The technician can browse that folder, upload new files, and download individual files up to 20 MB during the approved session. Existing files are not overwritten.
- To pre-authorize access, sign in, open Settings, and choose Remote file access → Authorize a folder.
- Use Change shared folder to select another folder or Turn off file access to revoke it.
The choice is remembered for your Screen2Screen account on this device across organizations. A different account must authorize its own folder. Android protects private app/system folders and can restrict selecting storage or Downloads roots. Folder permission does not approve a screen-sharing session, and revoking it cannot recall files already saved by the recipient.
Review a Wi-Fi request
On supported Android 11+ devices, a technician can send WPA2 or supported WPA3 Personal settings. Review the network name/security in Screen2Screen, choose Review in Android if expected, then decide whether to save it in Android’s dialog. Saving may switch networks and interrupt support briefly. A saved network does not guarantee internet connectivity. You can choose Not now instead.
Review an uninstall request
A technician can request removal of an eligible user-installed app. Review its identity in Screen2Screen or open the request notification, then decide whether to proceed. Android asks you to confirm the uninstall. Removing an app may remove its local data; ask your technician about anything you need to keep. Pending app, Wi-Fi, and file-access requests clear when the session ends.
Enable Touch control when you want hands-on help
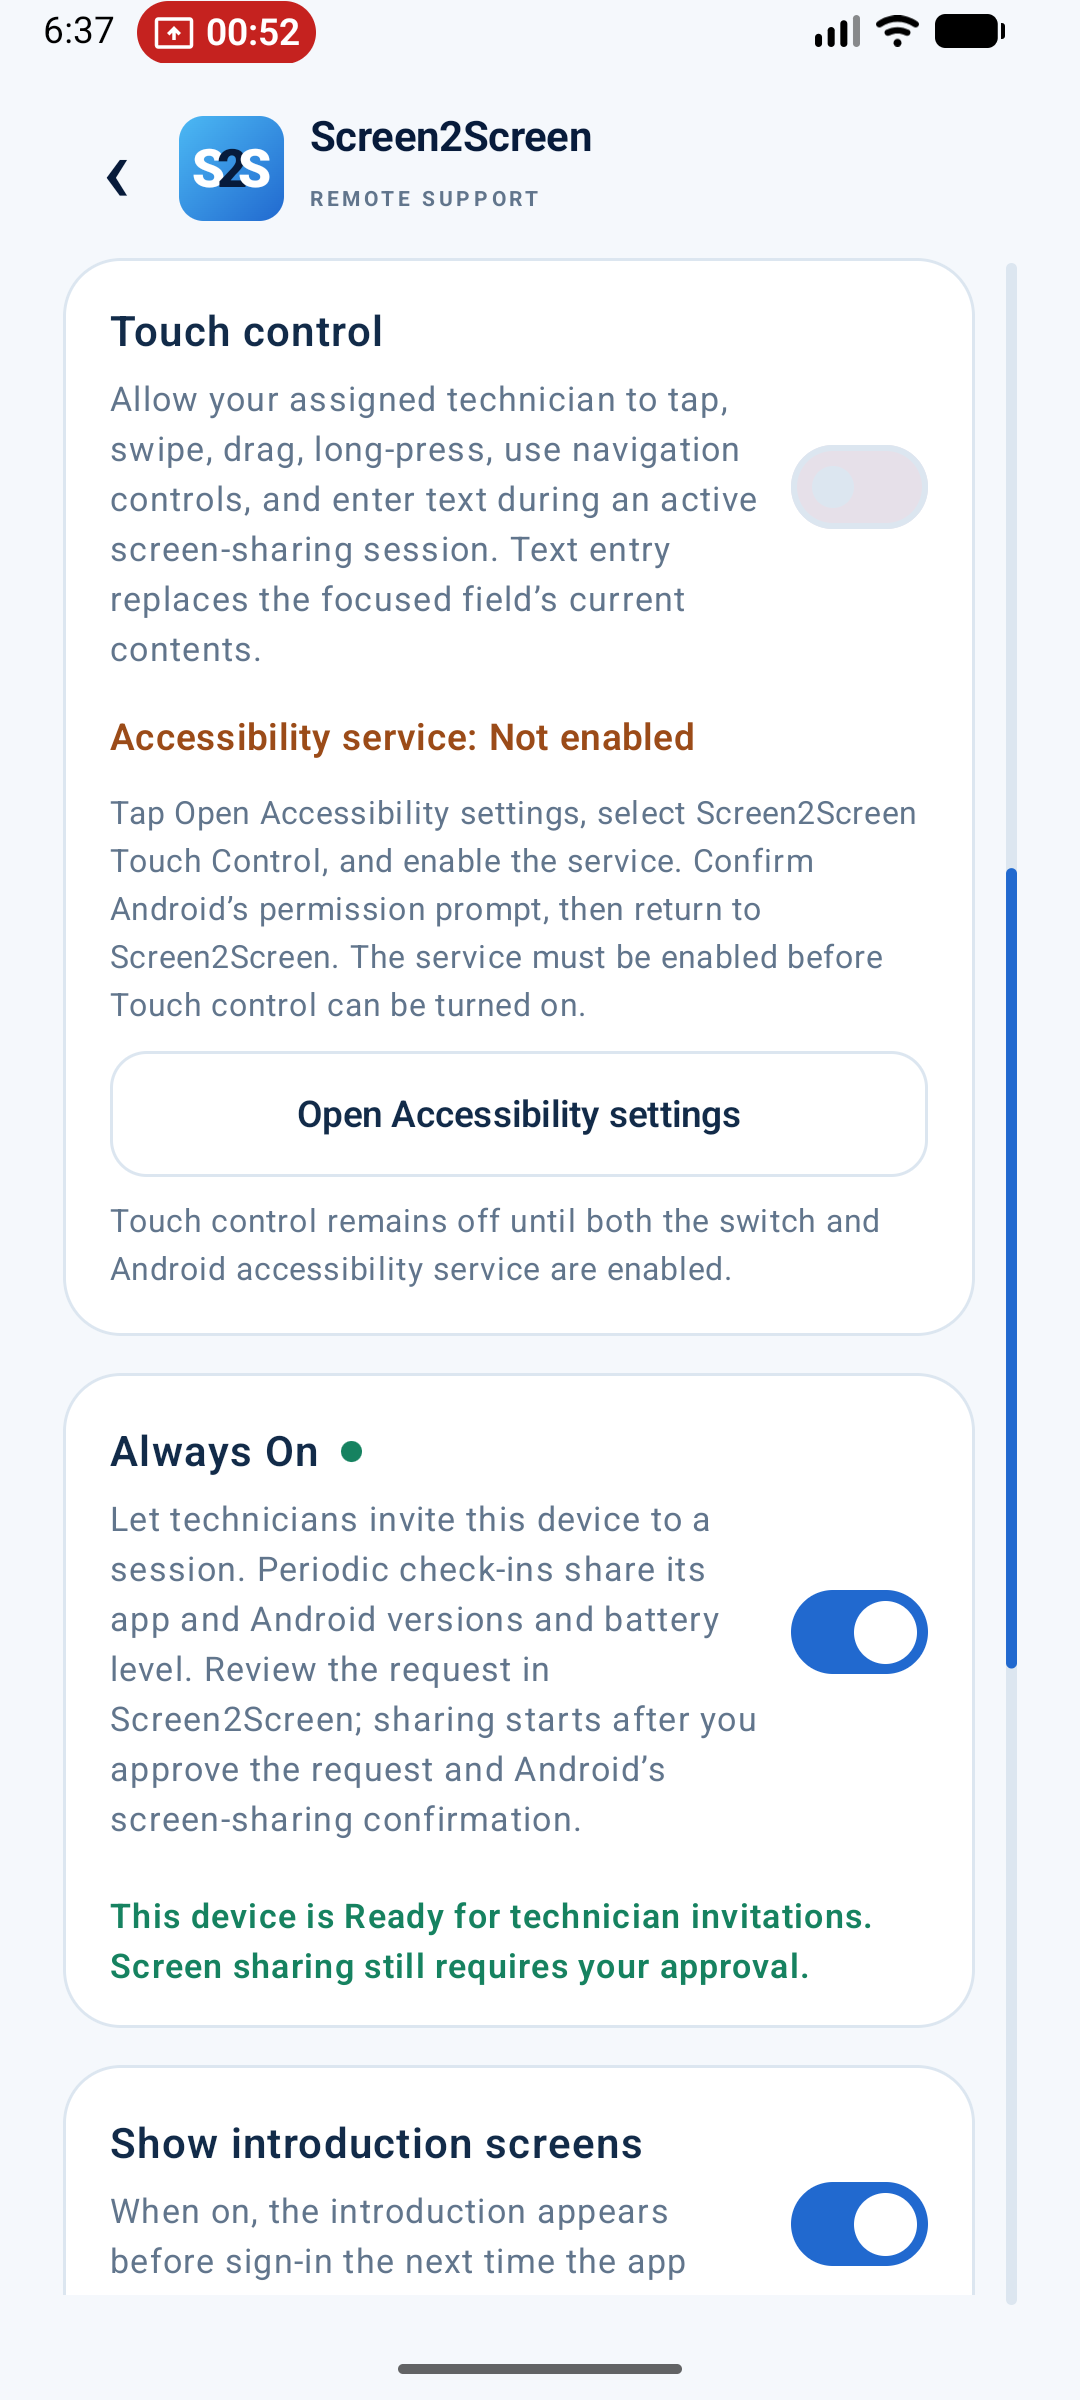
Touch control lets your assigned technician interact with the device during an active, approved session. Both the Android Accessibility service and the app’s Touch control switch must be enabled.
- Open Screen2Screen Settings and find Touch control.
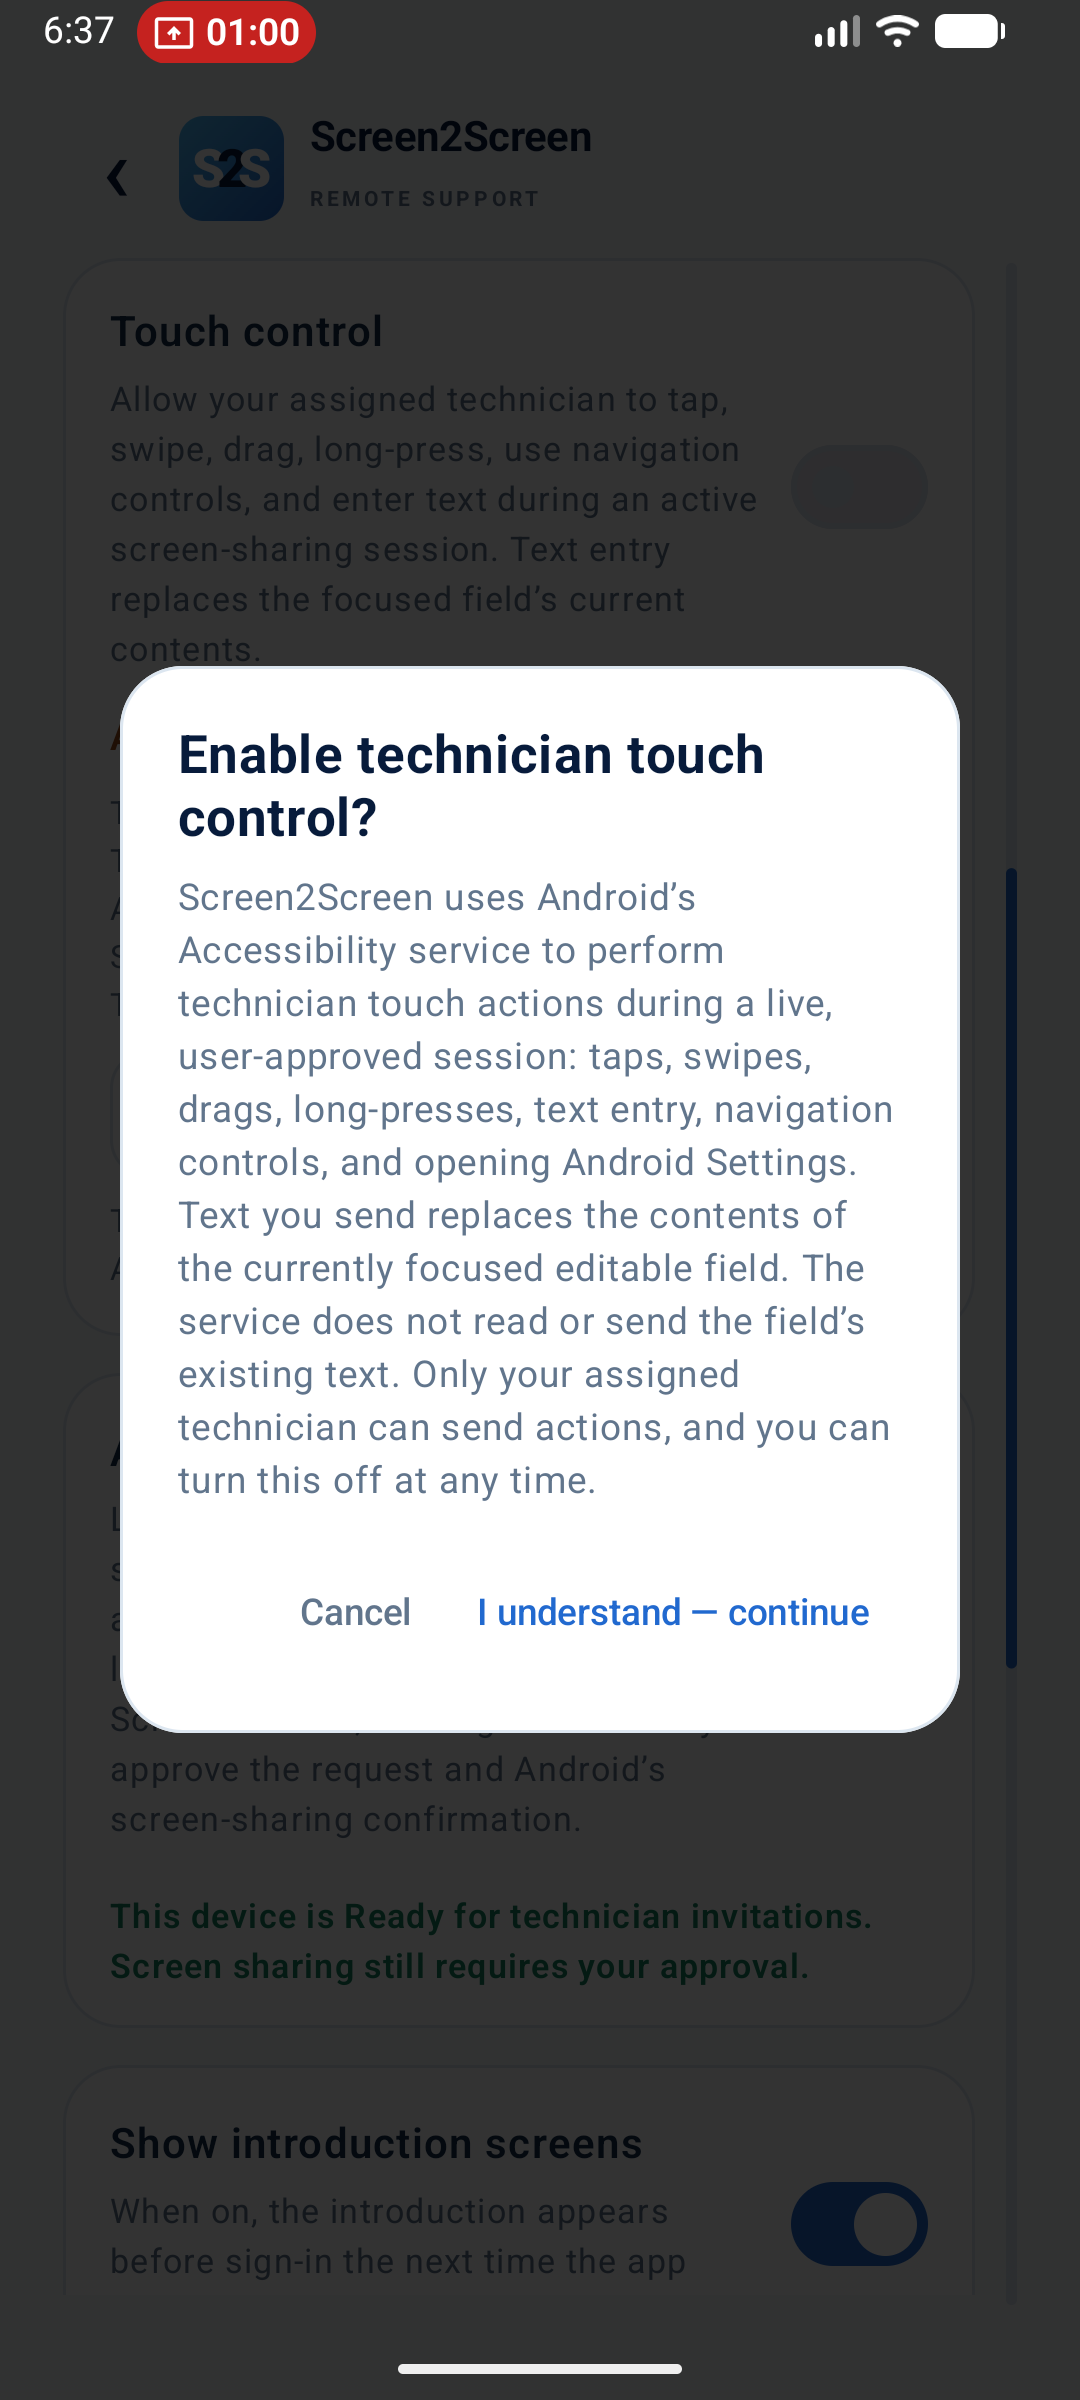
- Tap Open Accessibility settings. Review the app’s explanation of the supported actions and choose I understand — continue if you want this assistance.
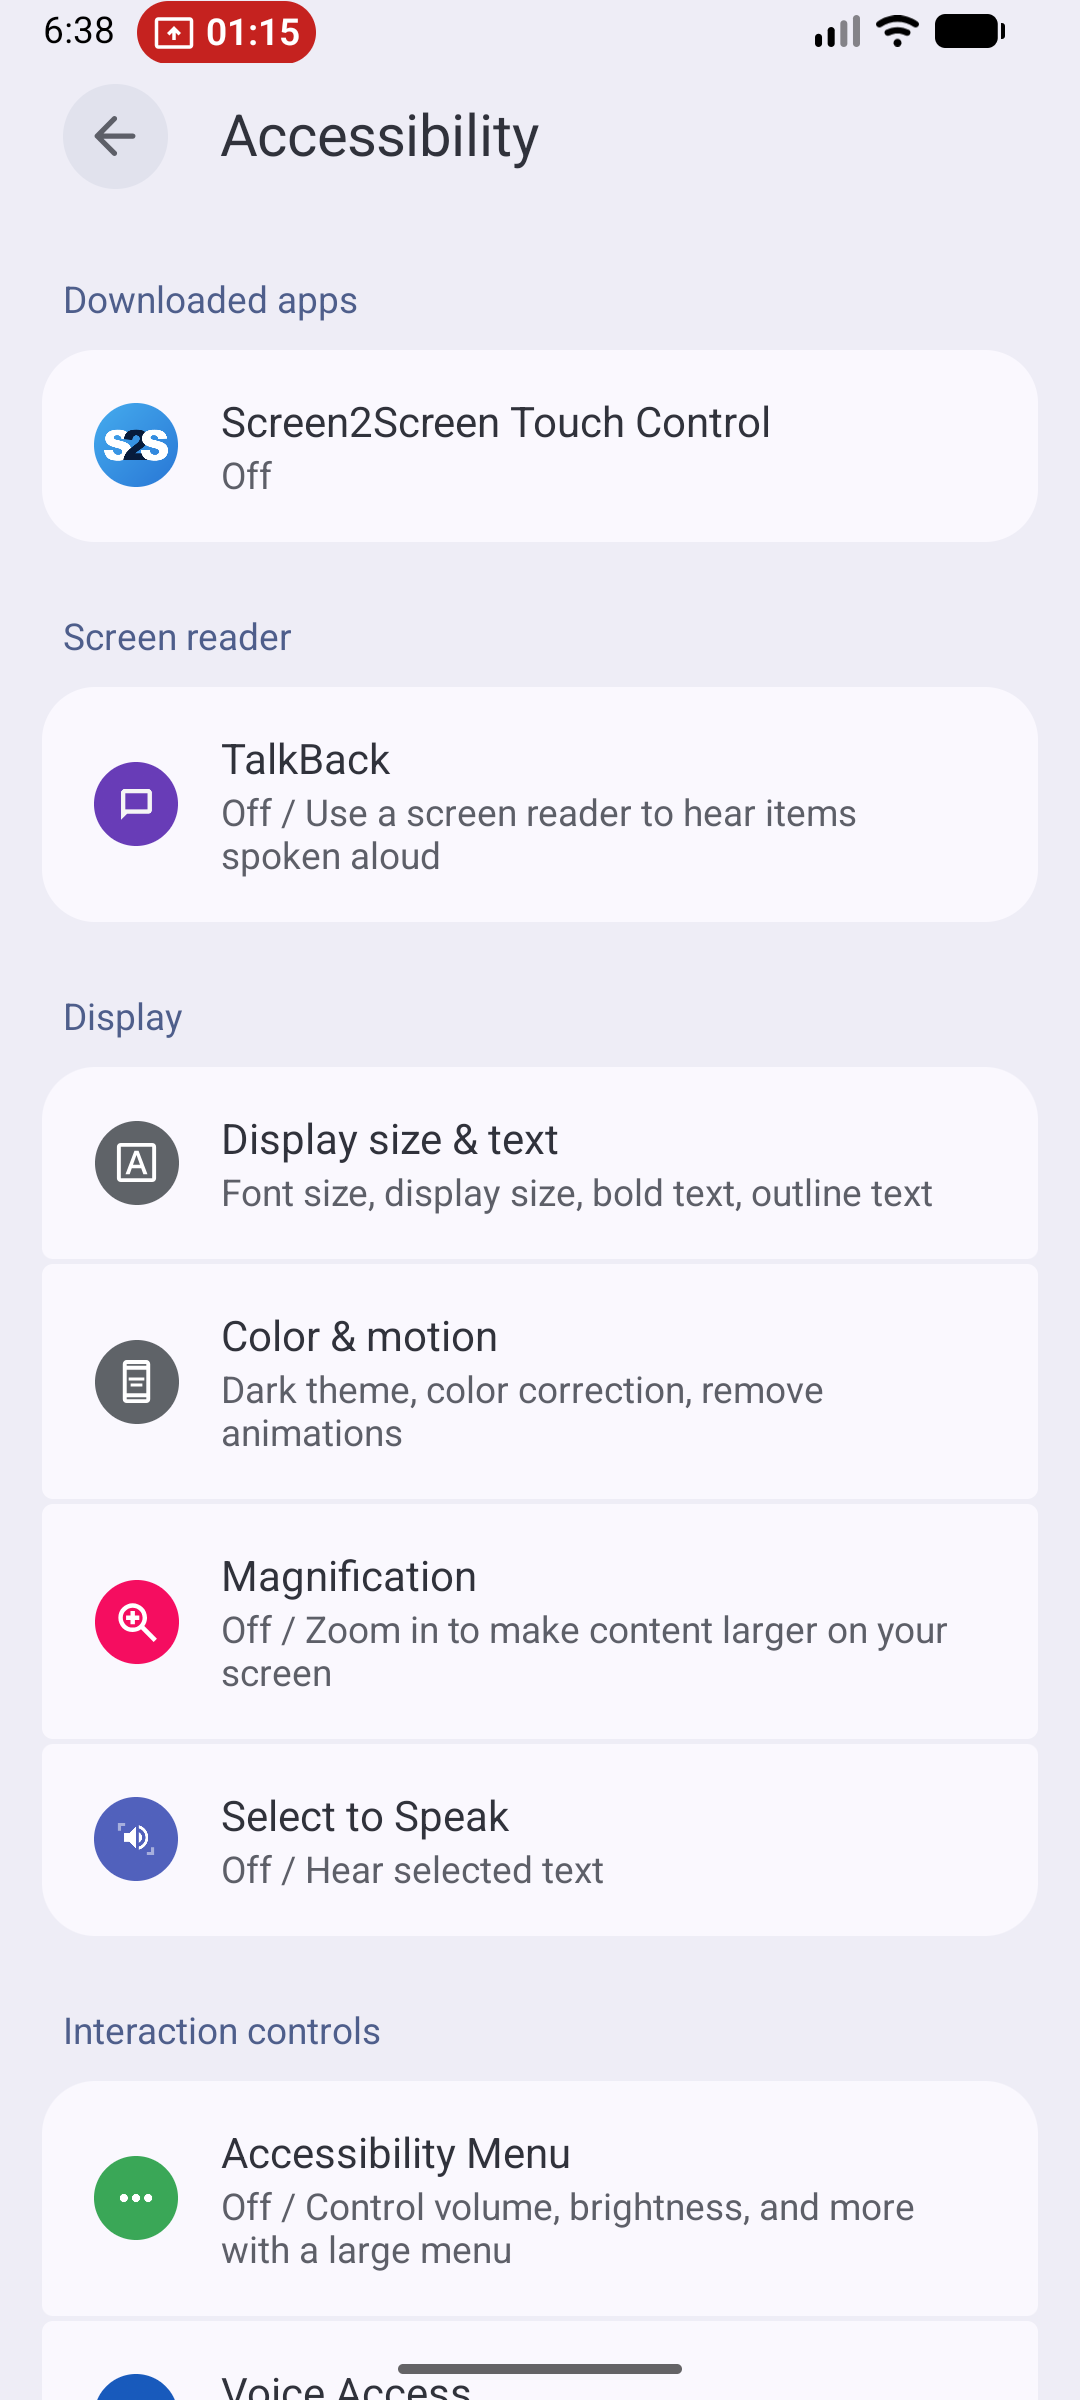
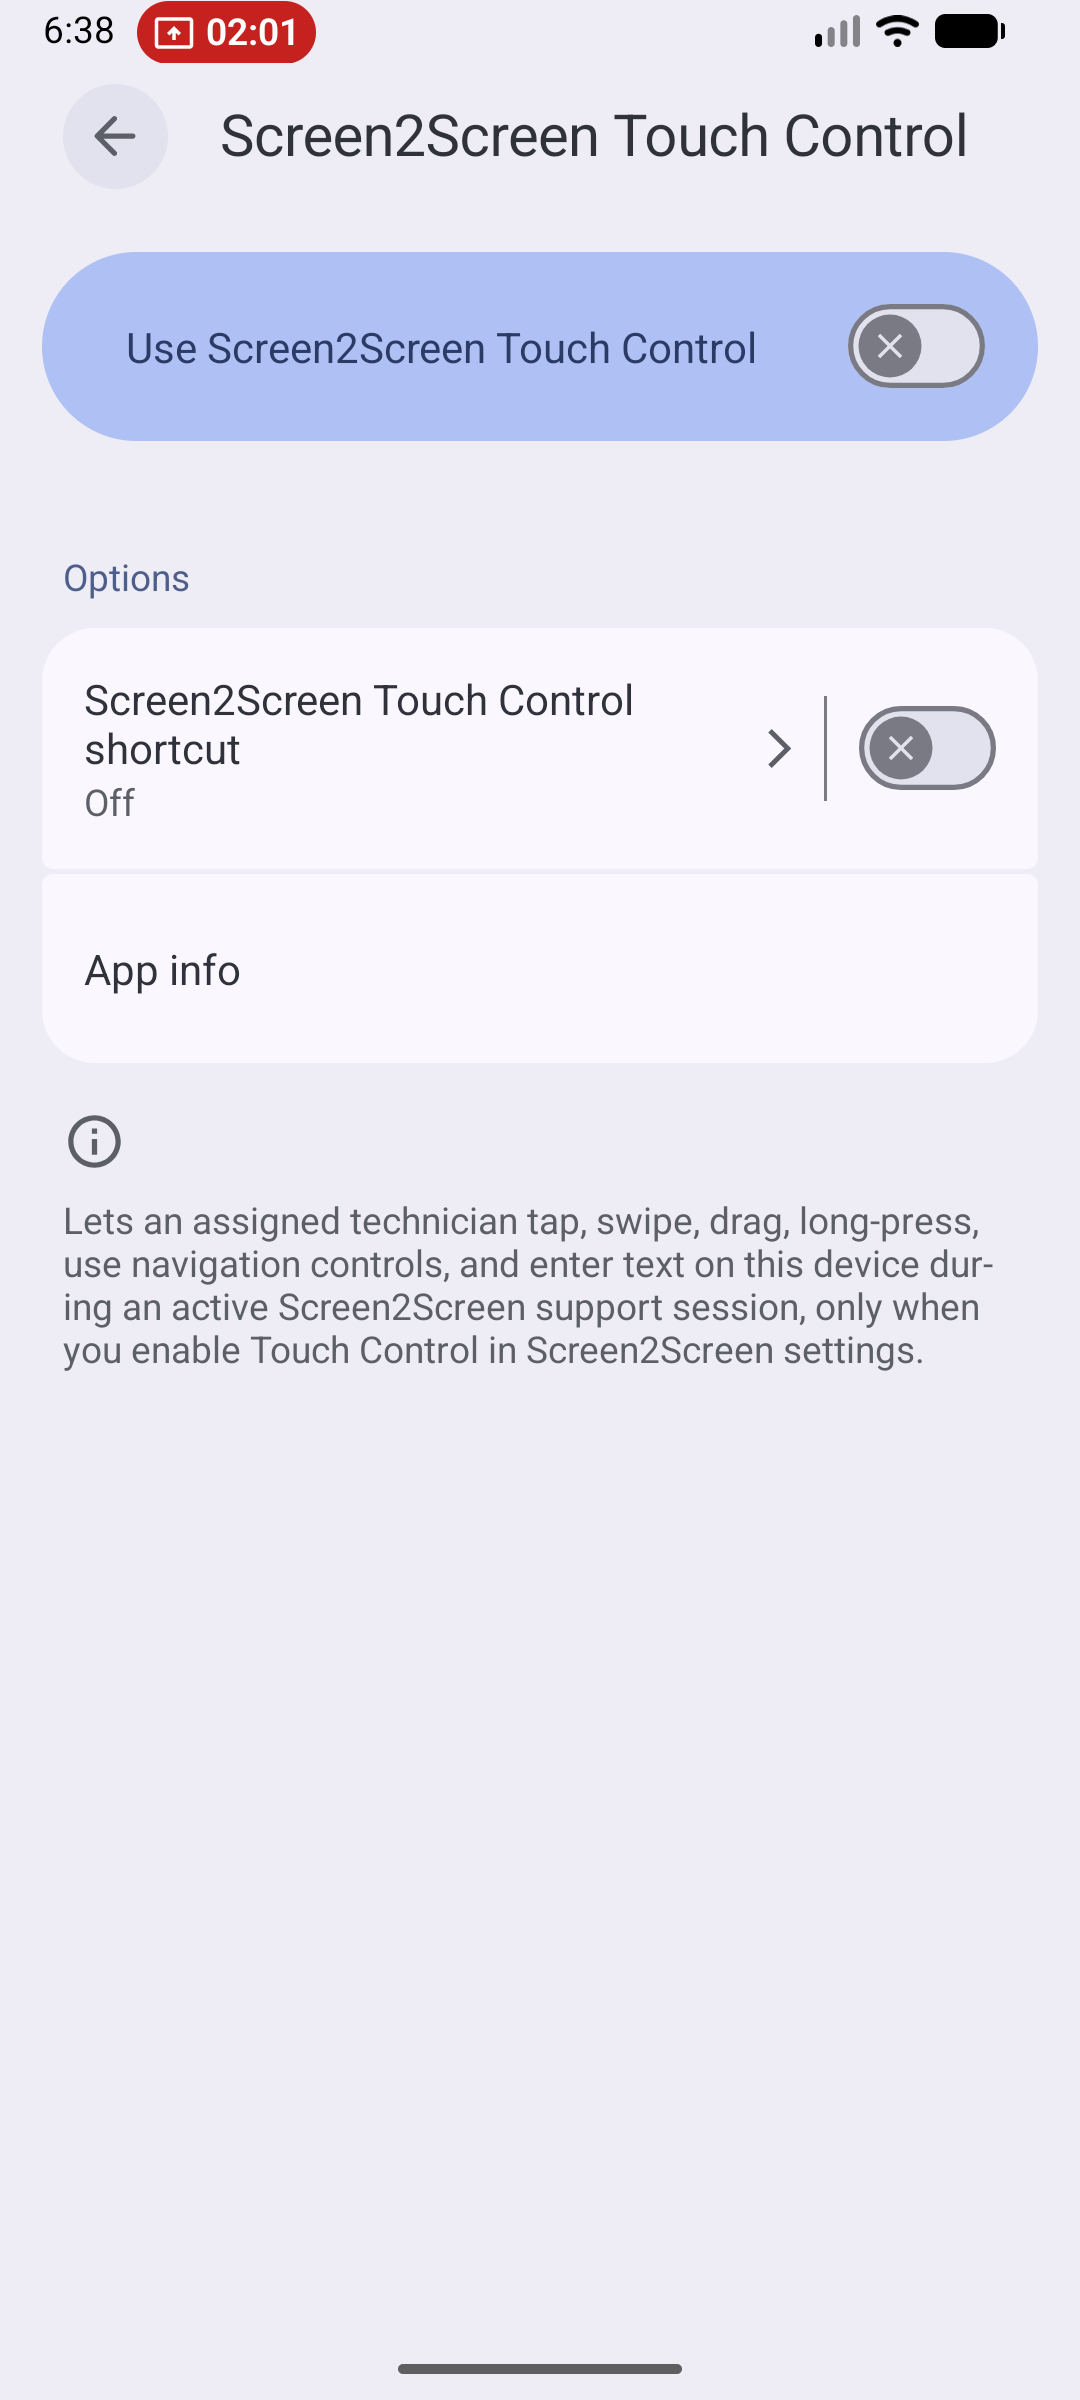
- In Android’s downloaded-apps or installed-services list, select Screen2Screen Touch Control.
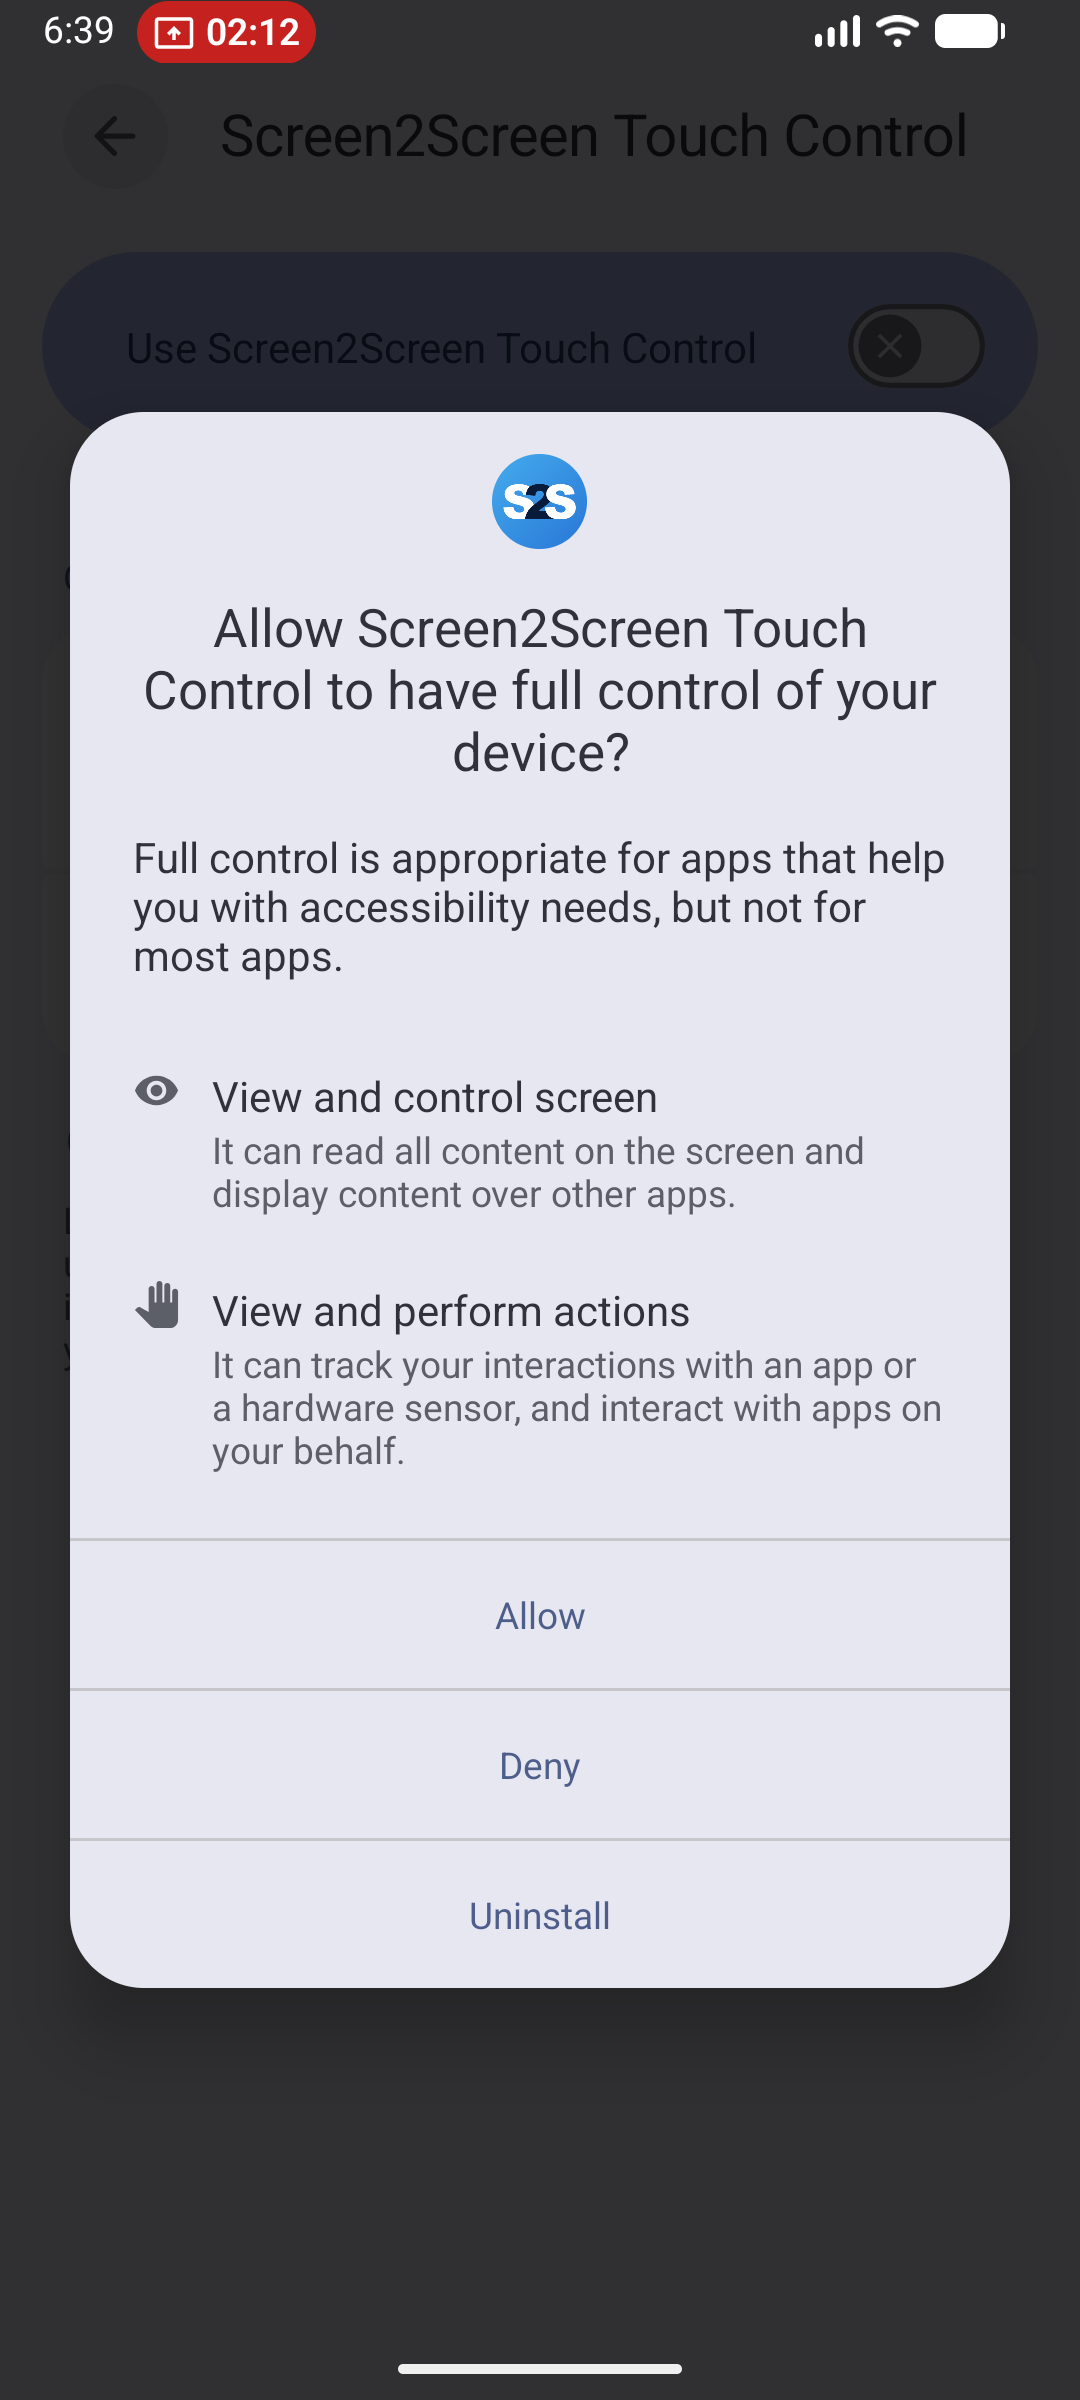
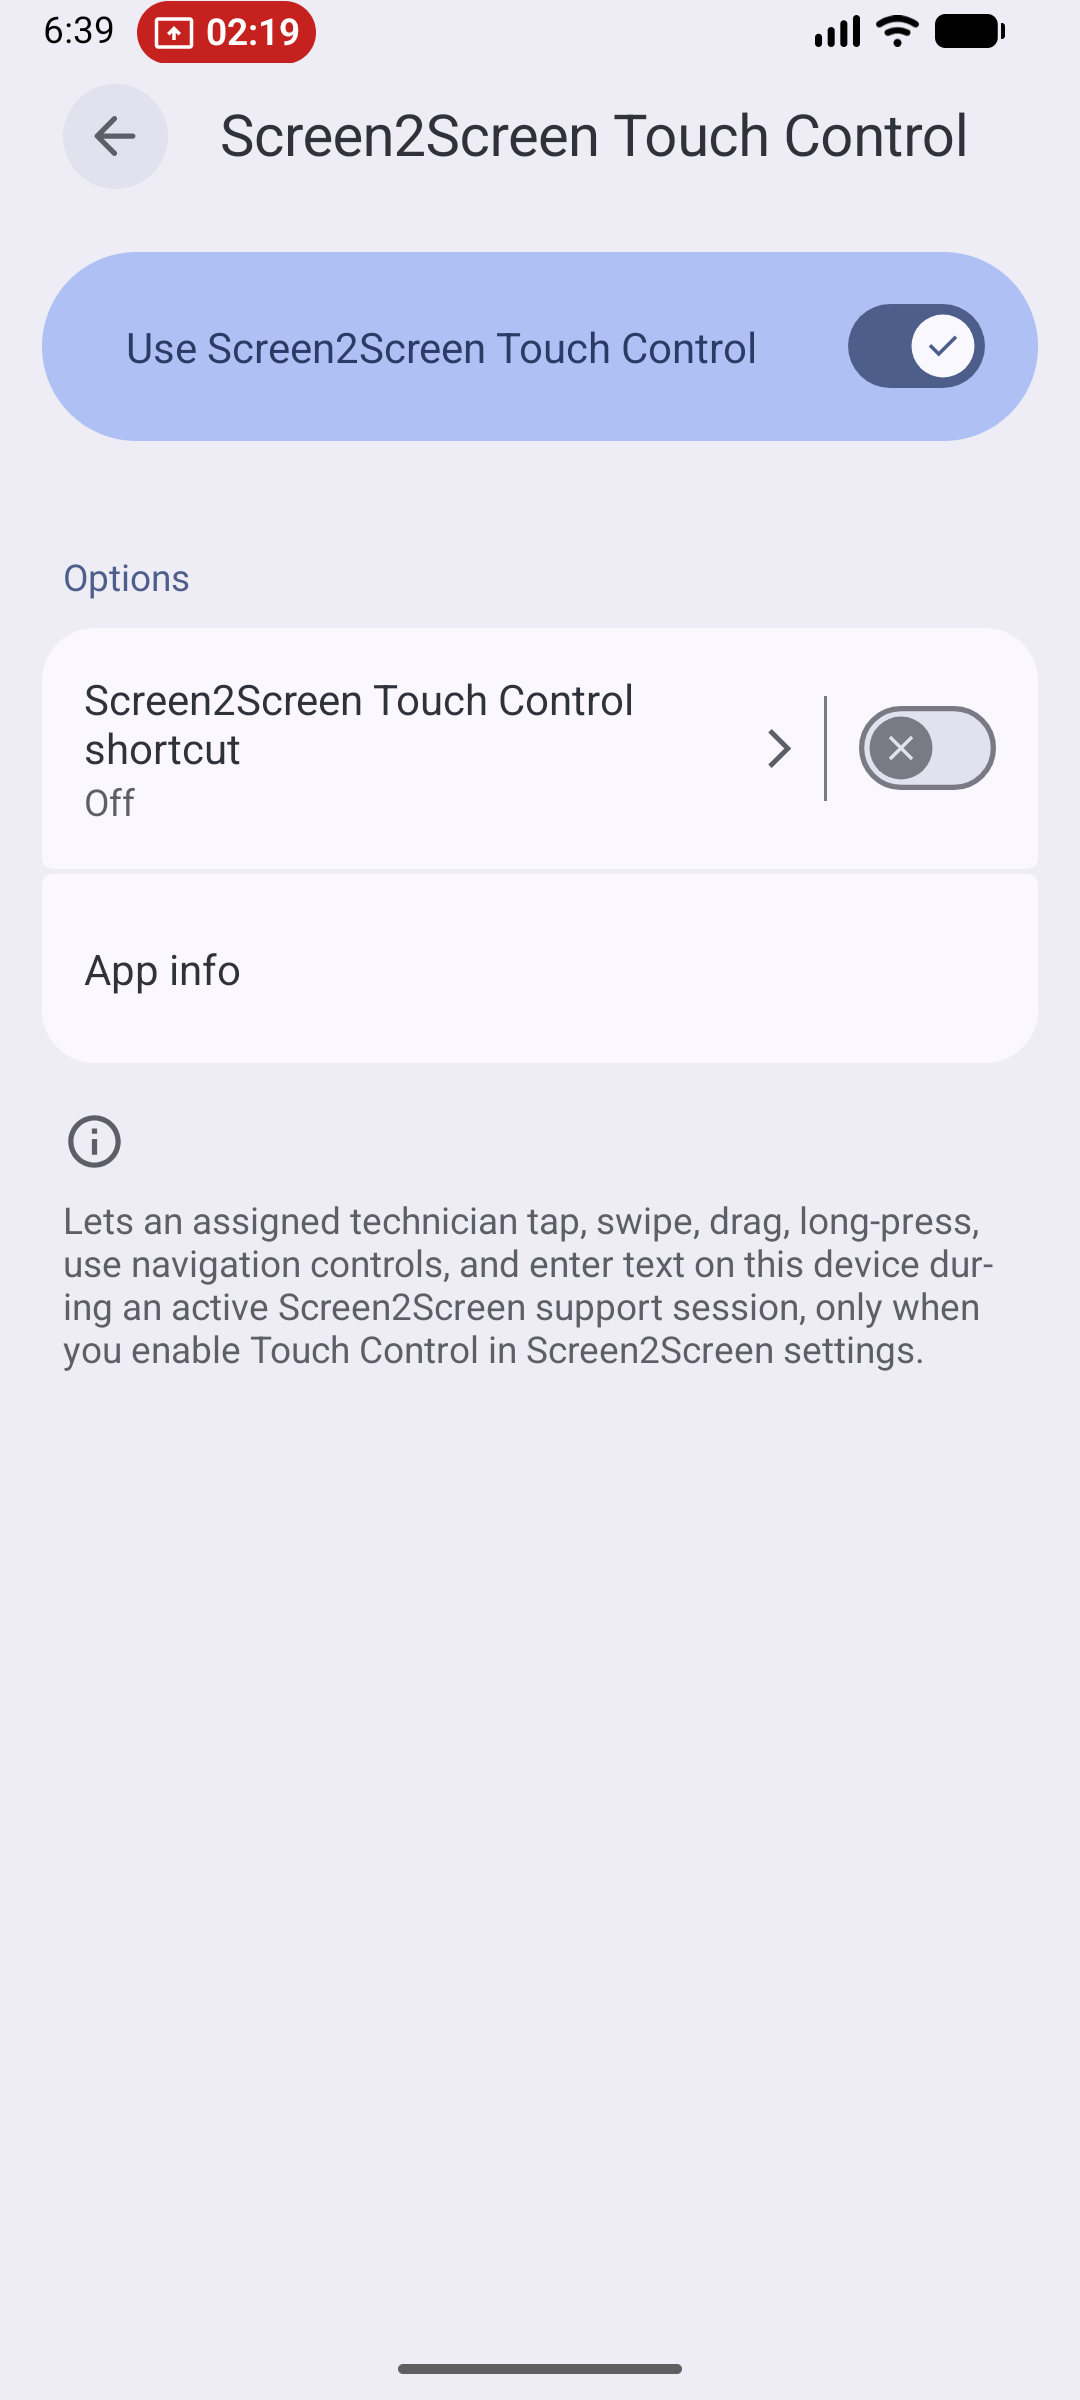
- Turn on Use Screen2Screen Touch Control. Read Android’s permission warning and choose whether to allow the service.
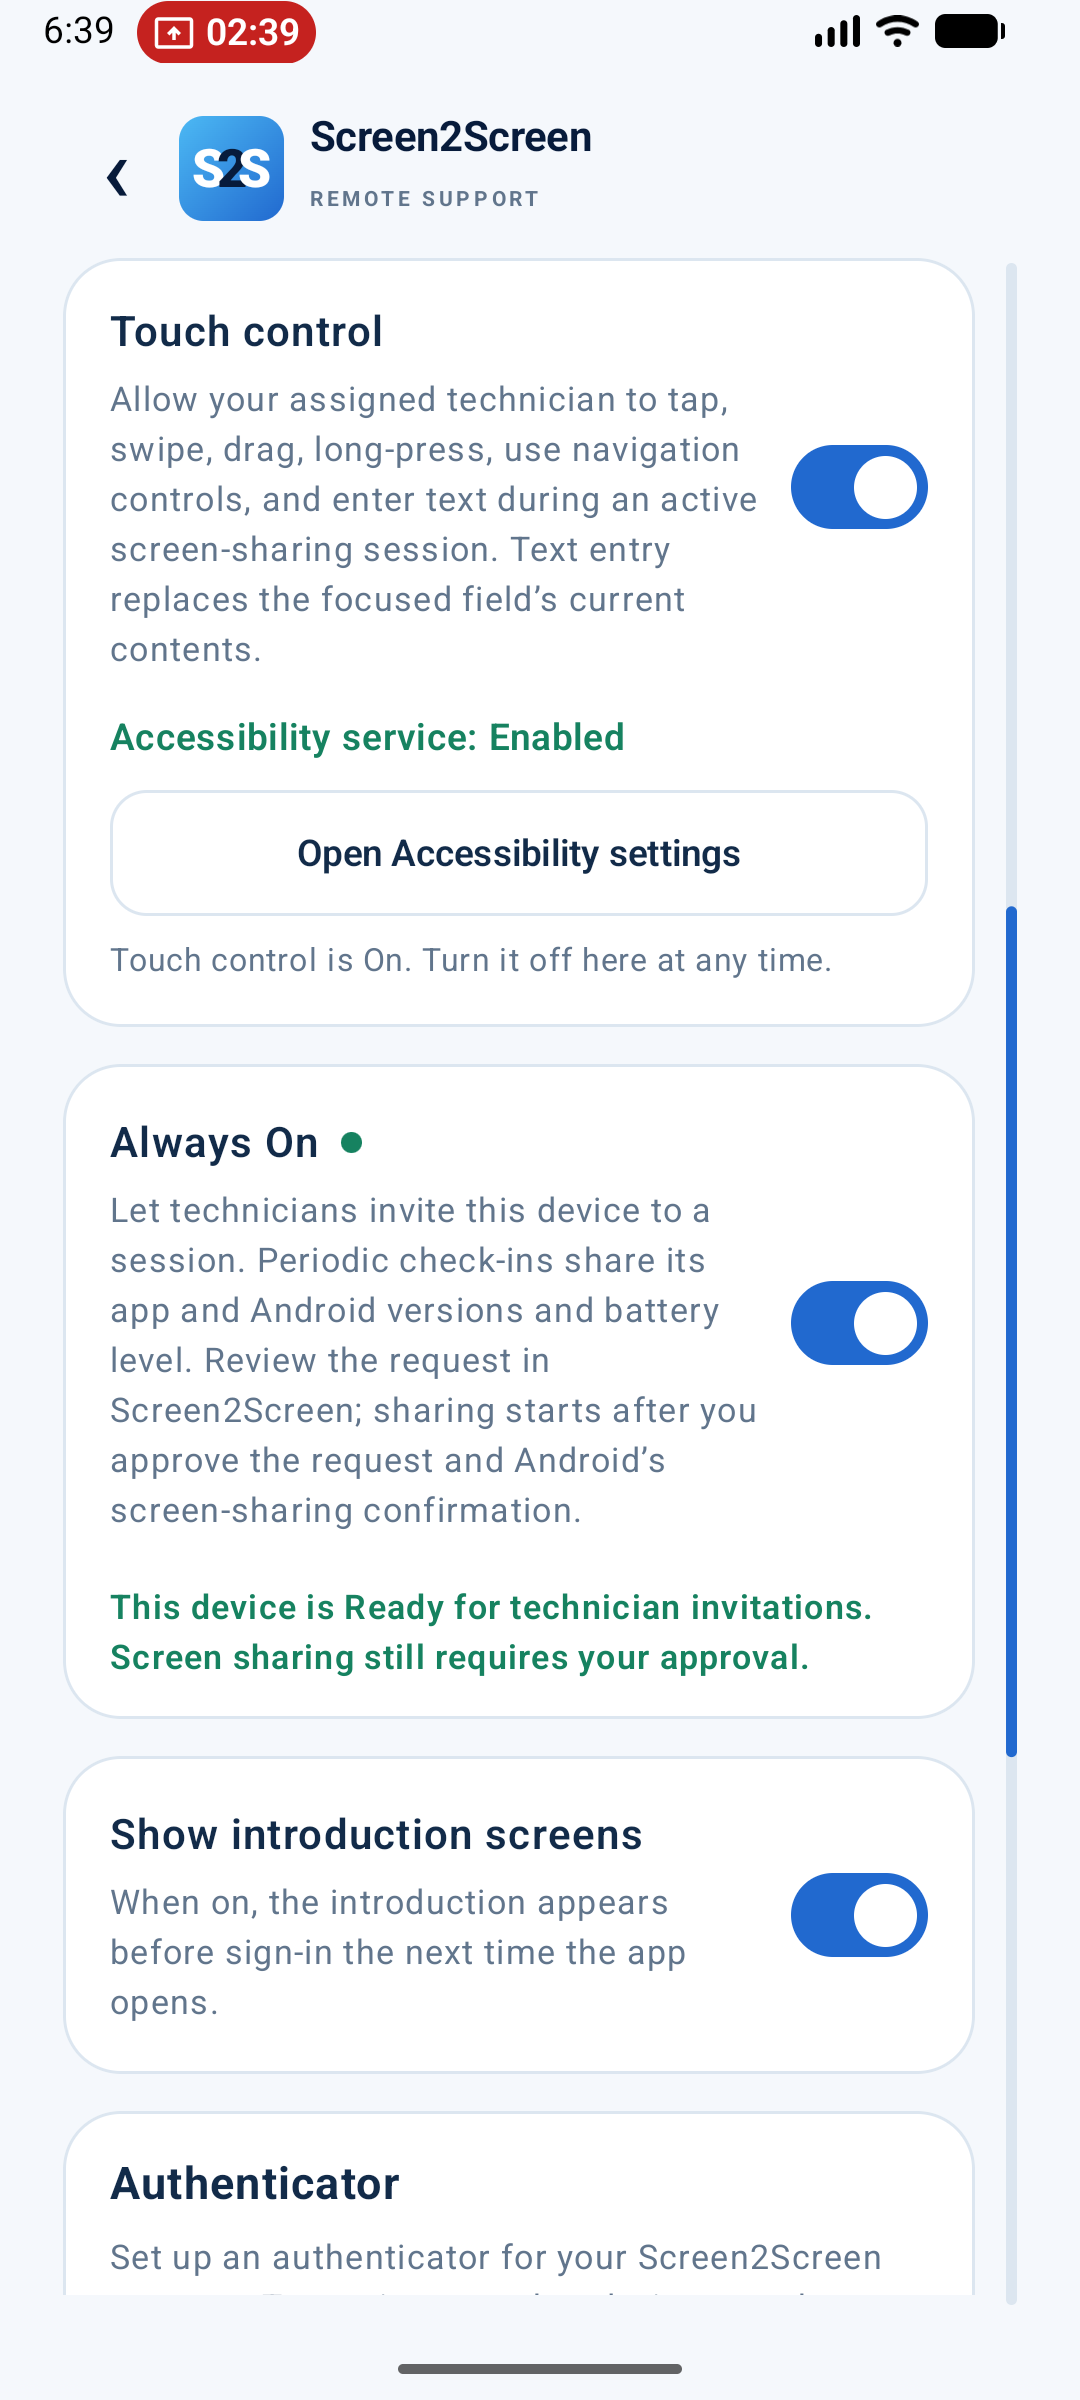
- Return to Screen2Screen. Confirm Accessibility service: Enabled and turn the app’s Touch control switch on.
View Touch control setup step by step (6 screenshots)
Open full-size screenshot ↗
Open full-size screenshot ↗
Open full-size screenshot ↗
Open full-size screenshot ↗
Open full-size screenshot ↗
Open full-size screenshot ↗
Supported actions include tap, swipe, drag, long press, Back, Home, recent apps, opening Android Settings, and text entry. On supported devices, the Tech Workspace automatically selects Control after receiving confirmation that Touch control is on. The technician uses that single mode for gestures and can switch to Pointer when appropriate. Your app switch and Android permissions still determine what is allowed. Sent text replaces the currently focused editable field’s contents. Turn Touch control off in Screen2Screen whenever you want to stop remote touch actions.
If Android’s service is enabled but the app switch is off, touch actions remain disabled. The next screenshot shows both the service and the app switch enabled.
Make this device Ready with Always On
Always On lets your organization’s technicians invite this device into a support session. You still review the technician and approve Android screen sharing for each session.
- Sign in and allow notifications so the app can alert you to an invitation.
- In Settings, turn on Always On. Check the status text confirming that the device is Ready.
- A green dot appears beside Always On and beside the header gear while this preference is enabled.
- When invited, open the notification or Screen2Screen and review the request. Sign in first if the app asks you to.
- Accept only the expected technician, then approve Android’s sharing prompt.
Periodic check-ins report the device’s Screen2Screen version, Android version, and battery level to the organization’s Ready list. Screen sharing begins after your approval.
Open full-size screenshot ↗
Turn Always On off if you no longer want this device to receive invitations. If registration is unavailable, ask your admin to check Android user access and the organization’s Always On allowance. Background delivery can be delayed by the device’s connection or Android power settings.
Set up your authenticator on the same phone
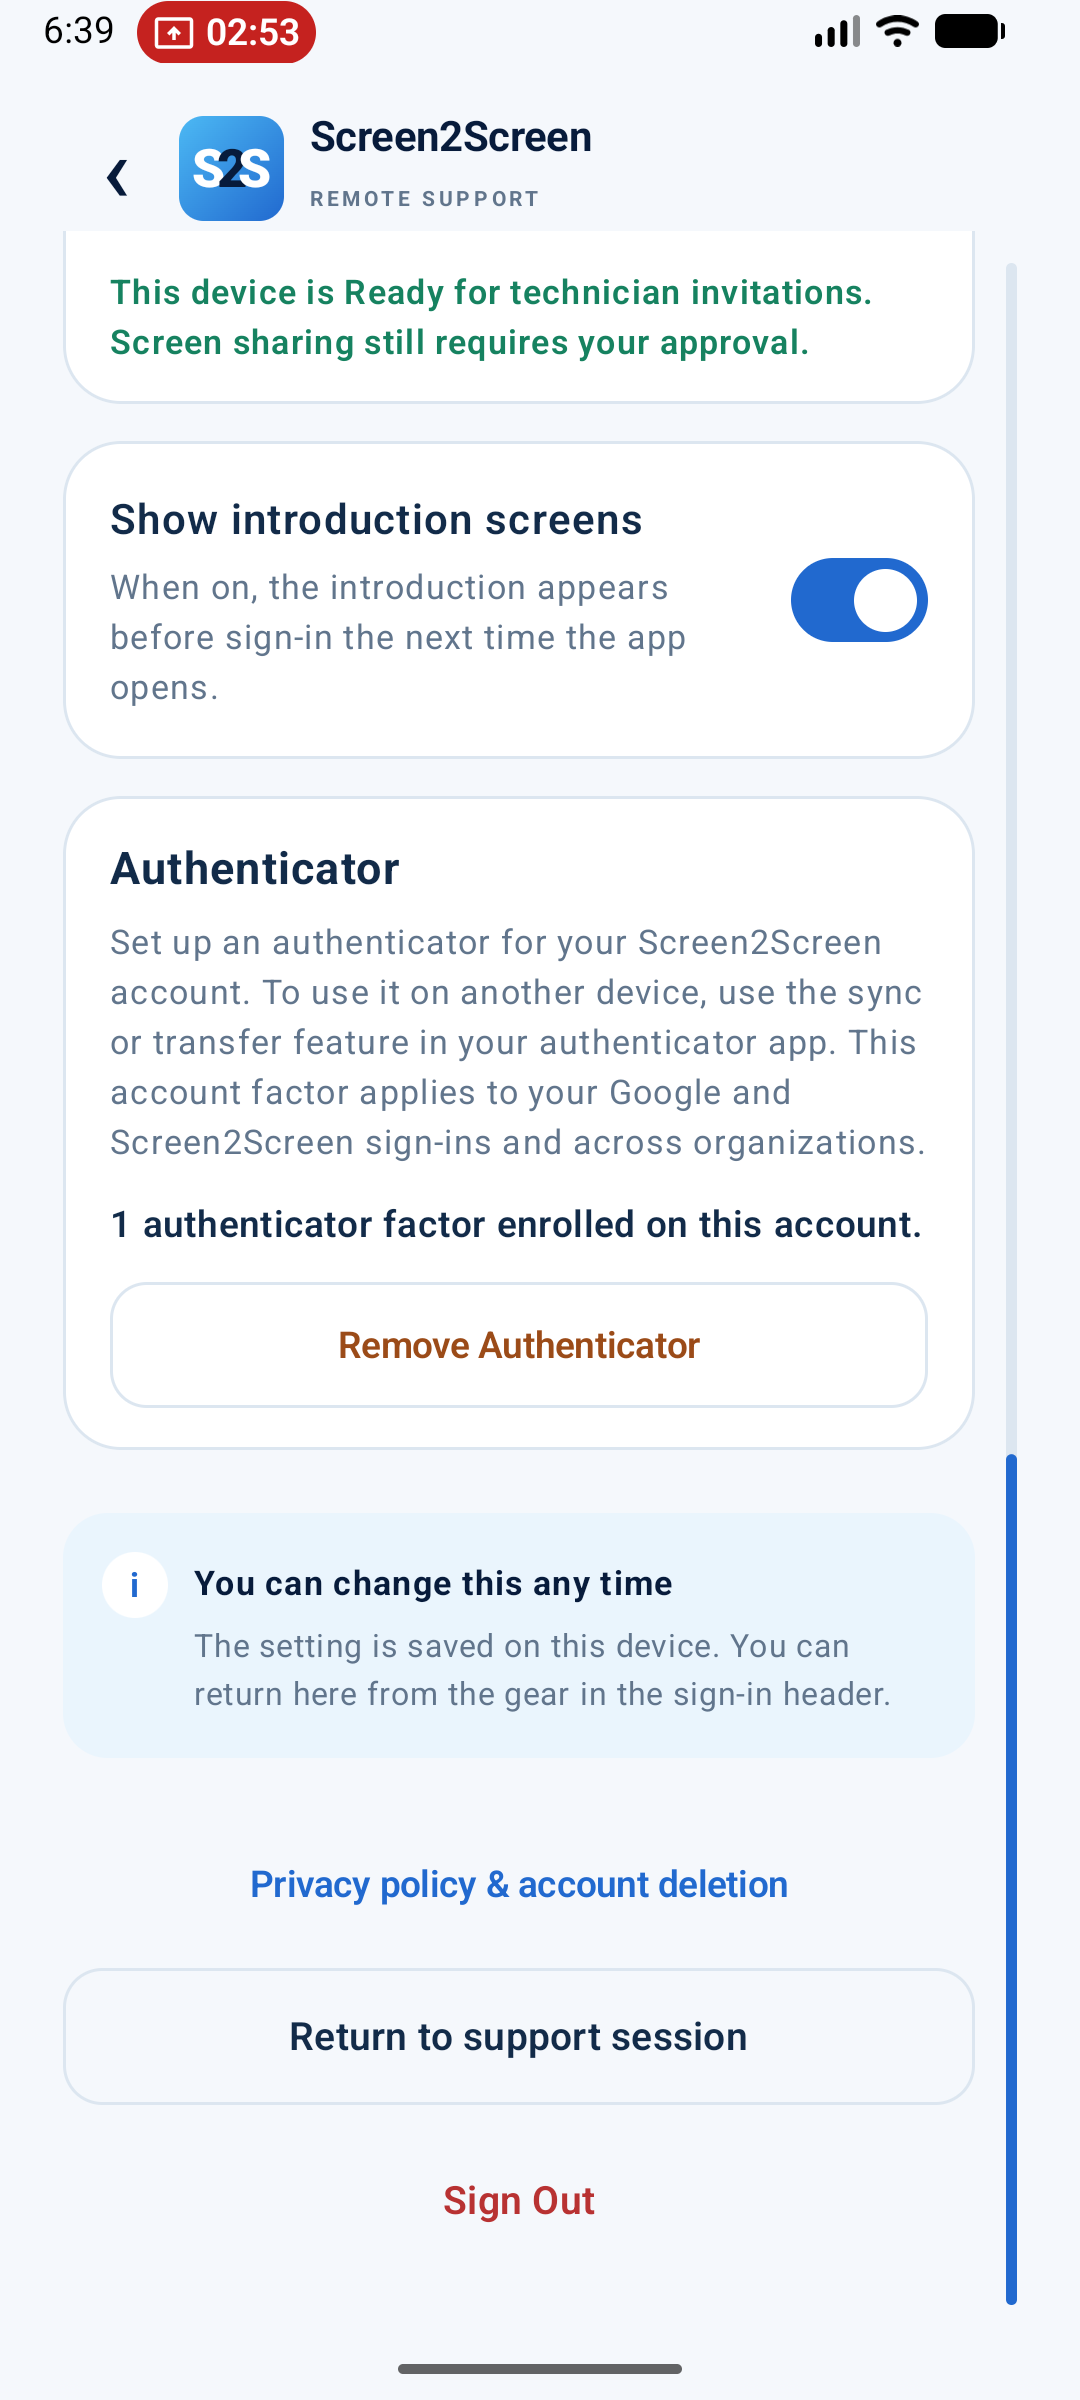
Sign in before managing your authenticator. Scroll to the Authenticator card near the bottom of Settings. You can enroll voluntarily, or your organization may require it before you continue.
- If no authenticator is enrolled, choose Set up authenticator. Confirm your credentials if requested.
- Choose Copy setup key. In your authenticator app, manually add a time-based account using that key.
- Return to Screen2Screen and enter the authenticator app’s current six-digit code.
- Tap Verify and add authenticator. Sign in again if prompted to confirm the new factor.
Keep the setup key private. Future sign-ins use the changing six-digit code from your authenticator app.
Open full-size screenshot ↗
When already enrolled, the card shows Remove Authenticator instead of another setup button. For a new phone, use your authenticator app’s sync or transfer feature, or remove the existing factor before enrolling a replacement. If you are locked out, ask your organization admin to help reset MFA.
Stop sharing, then leave the account when needed
Tap Stop sharing and end session on the connected screen to finish support. You can also stop capture through Android’s system sharing controls. The technician can end the session too.
Sign out of this device
- Open Settings and scroll to the bottom.
- Tap the red Sign Out link.
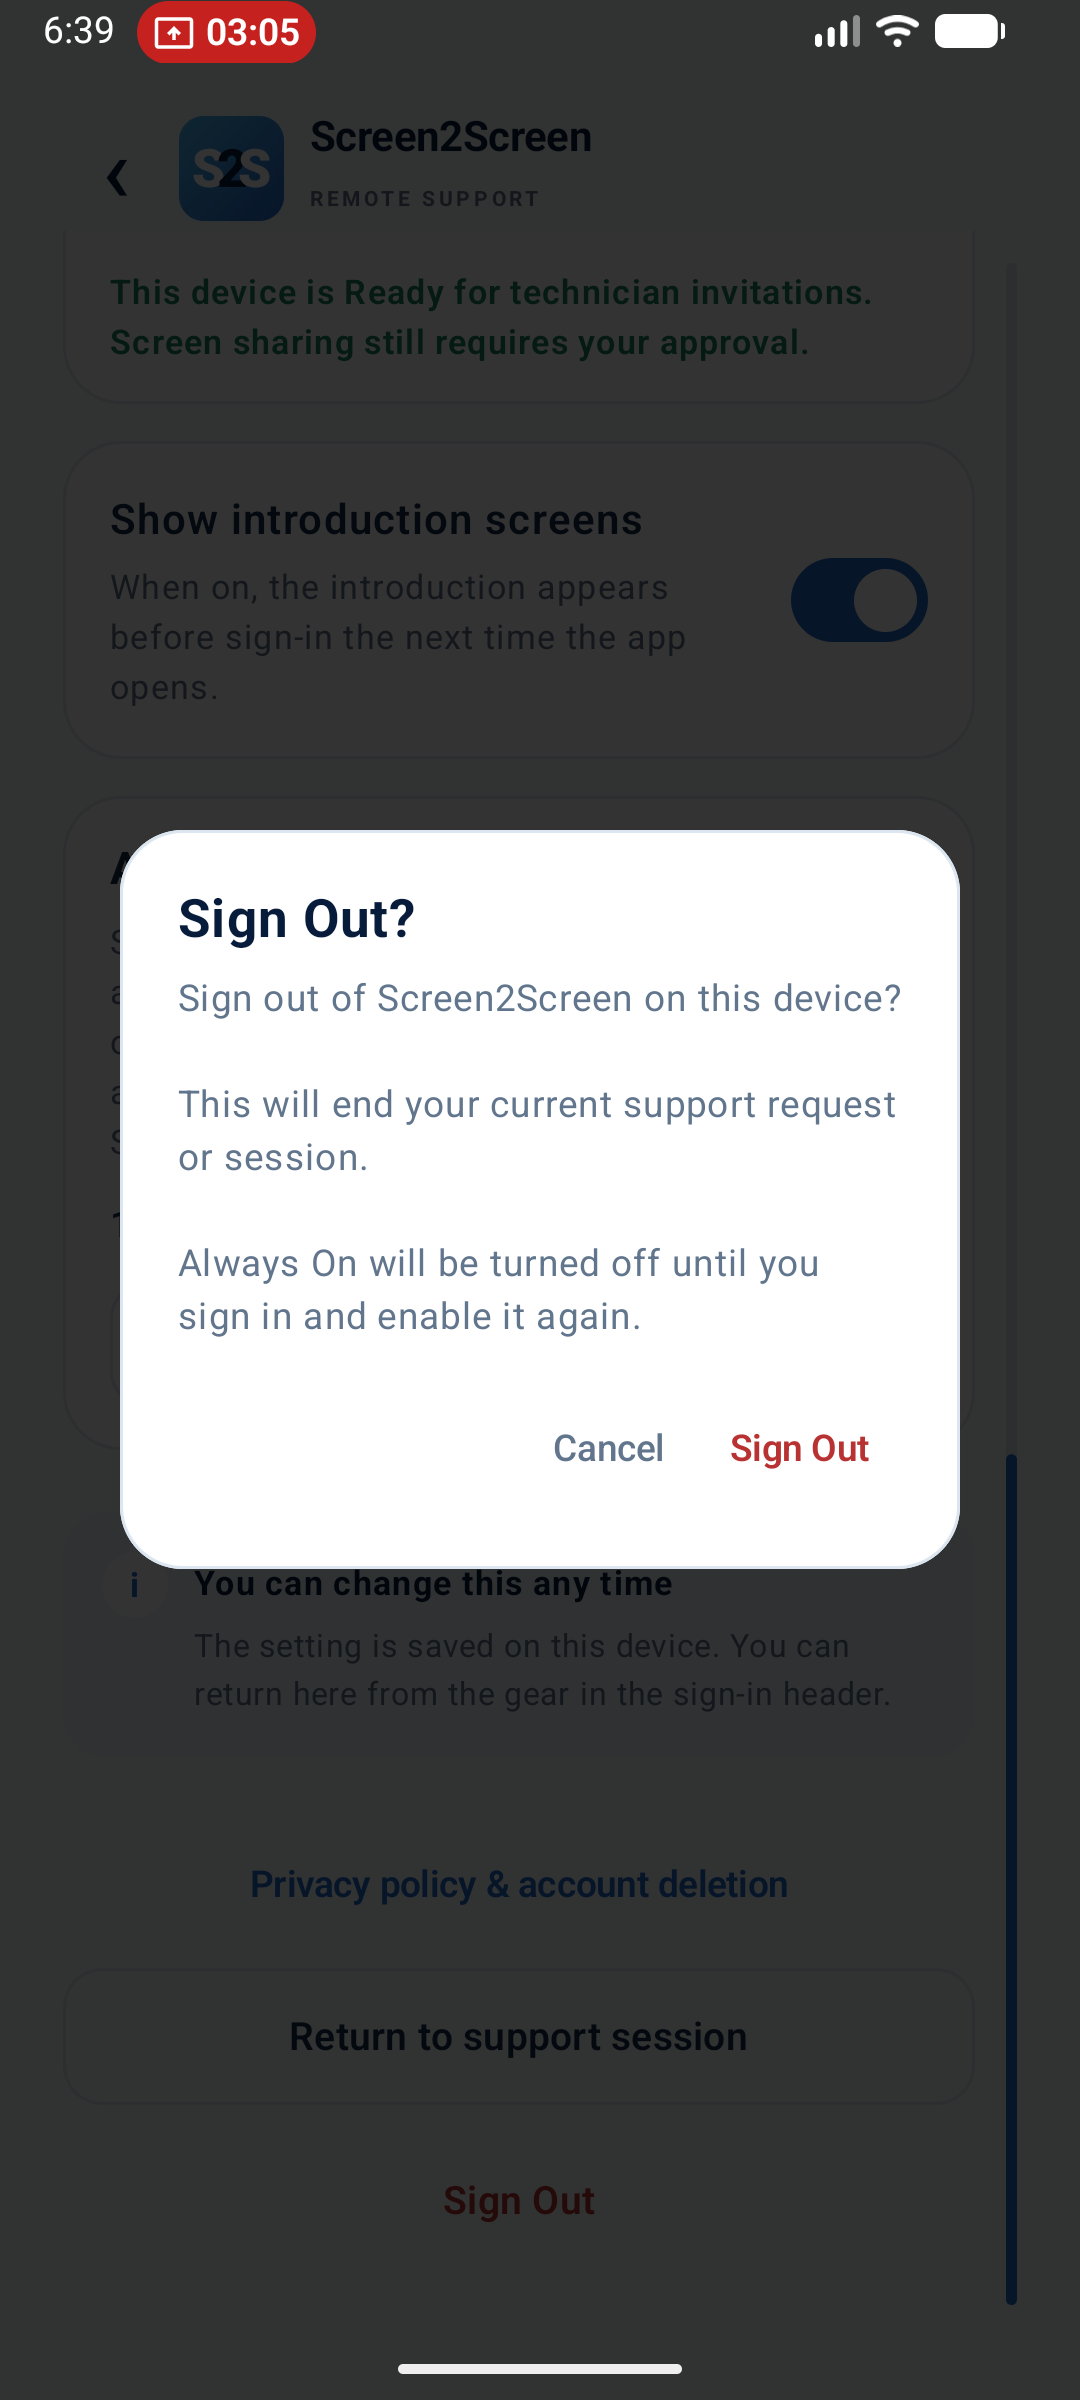
- Read the confirmation and choose Sign Out to continue, or Cancel to stay signed in.
Signing out ends a current request or session and turns off Always On until you sign in and enable it again.
Reopening Screen2Screen attempts to restore a valid sign-in, so closing and reopening the app does not by itself require you to sign out. You may need to sign in again if your session is no longer valid or another security check is required.
Opening another app with Return to Home Screen keeps the current support session available. Use the dedicated Stop sharing control when you want sharing to end.
The Privacy policy & account deletion link in Settings opens information about your data and account-deletion requests.
Open full-size screenshot ↗
If something is not working
- ✓Cannot sign in.
Check your invited email, email verification, password, and current authenticator code. Ask your admin to confirm organization access.
- ✓The technician cannot see the screen.
Confirm you approved Android screen sharing and that the app still shows an active session. If sharing was stopped, start a new request.
- ✓Pointer or touch actions do not work.
Check the relevant app switch and Android permission. Touch control needs both its switch and Accessibility service enabled.
- ✓An invitation or app request is missing.
Open Screen2Screen, check the internet connection and notification permission, and confirm that Always On is enabled if you expect a technician invitation.