This guide is for organization owners and administrators. Your account needs active Owner or Administrator access to the organization. Use the email address your organization invited, and use individual accounts for each person.
Manage from a computer, tablet, or phone. The Admin Workspace runs in modern browsers on Windows, Mac, Linux, Android, and iOS. Manage your Android users, technician access, history, settings, and licensing from your phone while away from your desk. Technicians can use the same range of platforms for live Android support.
Updated November 9, 2026. These screenshots use fictional names and email addresses. Select any screenshot to open it at full size. Screenshots may show an earlier form or tab arrangement; follow the current steps below. Available controls depend on your role, organization plan, and account status.
Sign in and select the organization
- Open the Admin Workspace and choose the Google account matching your invitation, or sign in with your Screen2Screen email and password.
- If you are creating an email/password account, use your invited email and verify it through the message Screen2Screen sends. Then sign in again.
- Accept the pending Administrator invitation for the correct organization. Existing members can proceed to their organization workspace.
- If your account has an authenticator, enter its current six-digit code when prompted. Complete enrollment if an organization policy requires it.
- Use the Organization menu to select the organization you intend to manage. Membership, settings, history, and plan capacity belong to that selected organization.
Try the first session with your own phone
- Open the Tech Workspace on your computer, tablet, or a second phone using the owner account.
- Install Screen2Screen on Android, sign in with the same account, and select your organization.
- For touch assistance, enable both the app’s Touch control switch and its Android Accessibility service. See the Android setup steps.
- Tap Request a technician on Android, accept the request in the Tech Workspace, then review and approve the connection and Android’s sharing prompt on the phone.
- Wait for the video. Control is selected automatically when Touch control is available. End the session when finished.
The owner’s Technician role uses one included technician seat. The test session uses one concurrent connection. Always On is optional for this first user-requested session.
Use the People and access subtabs
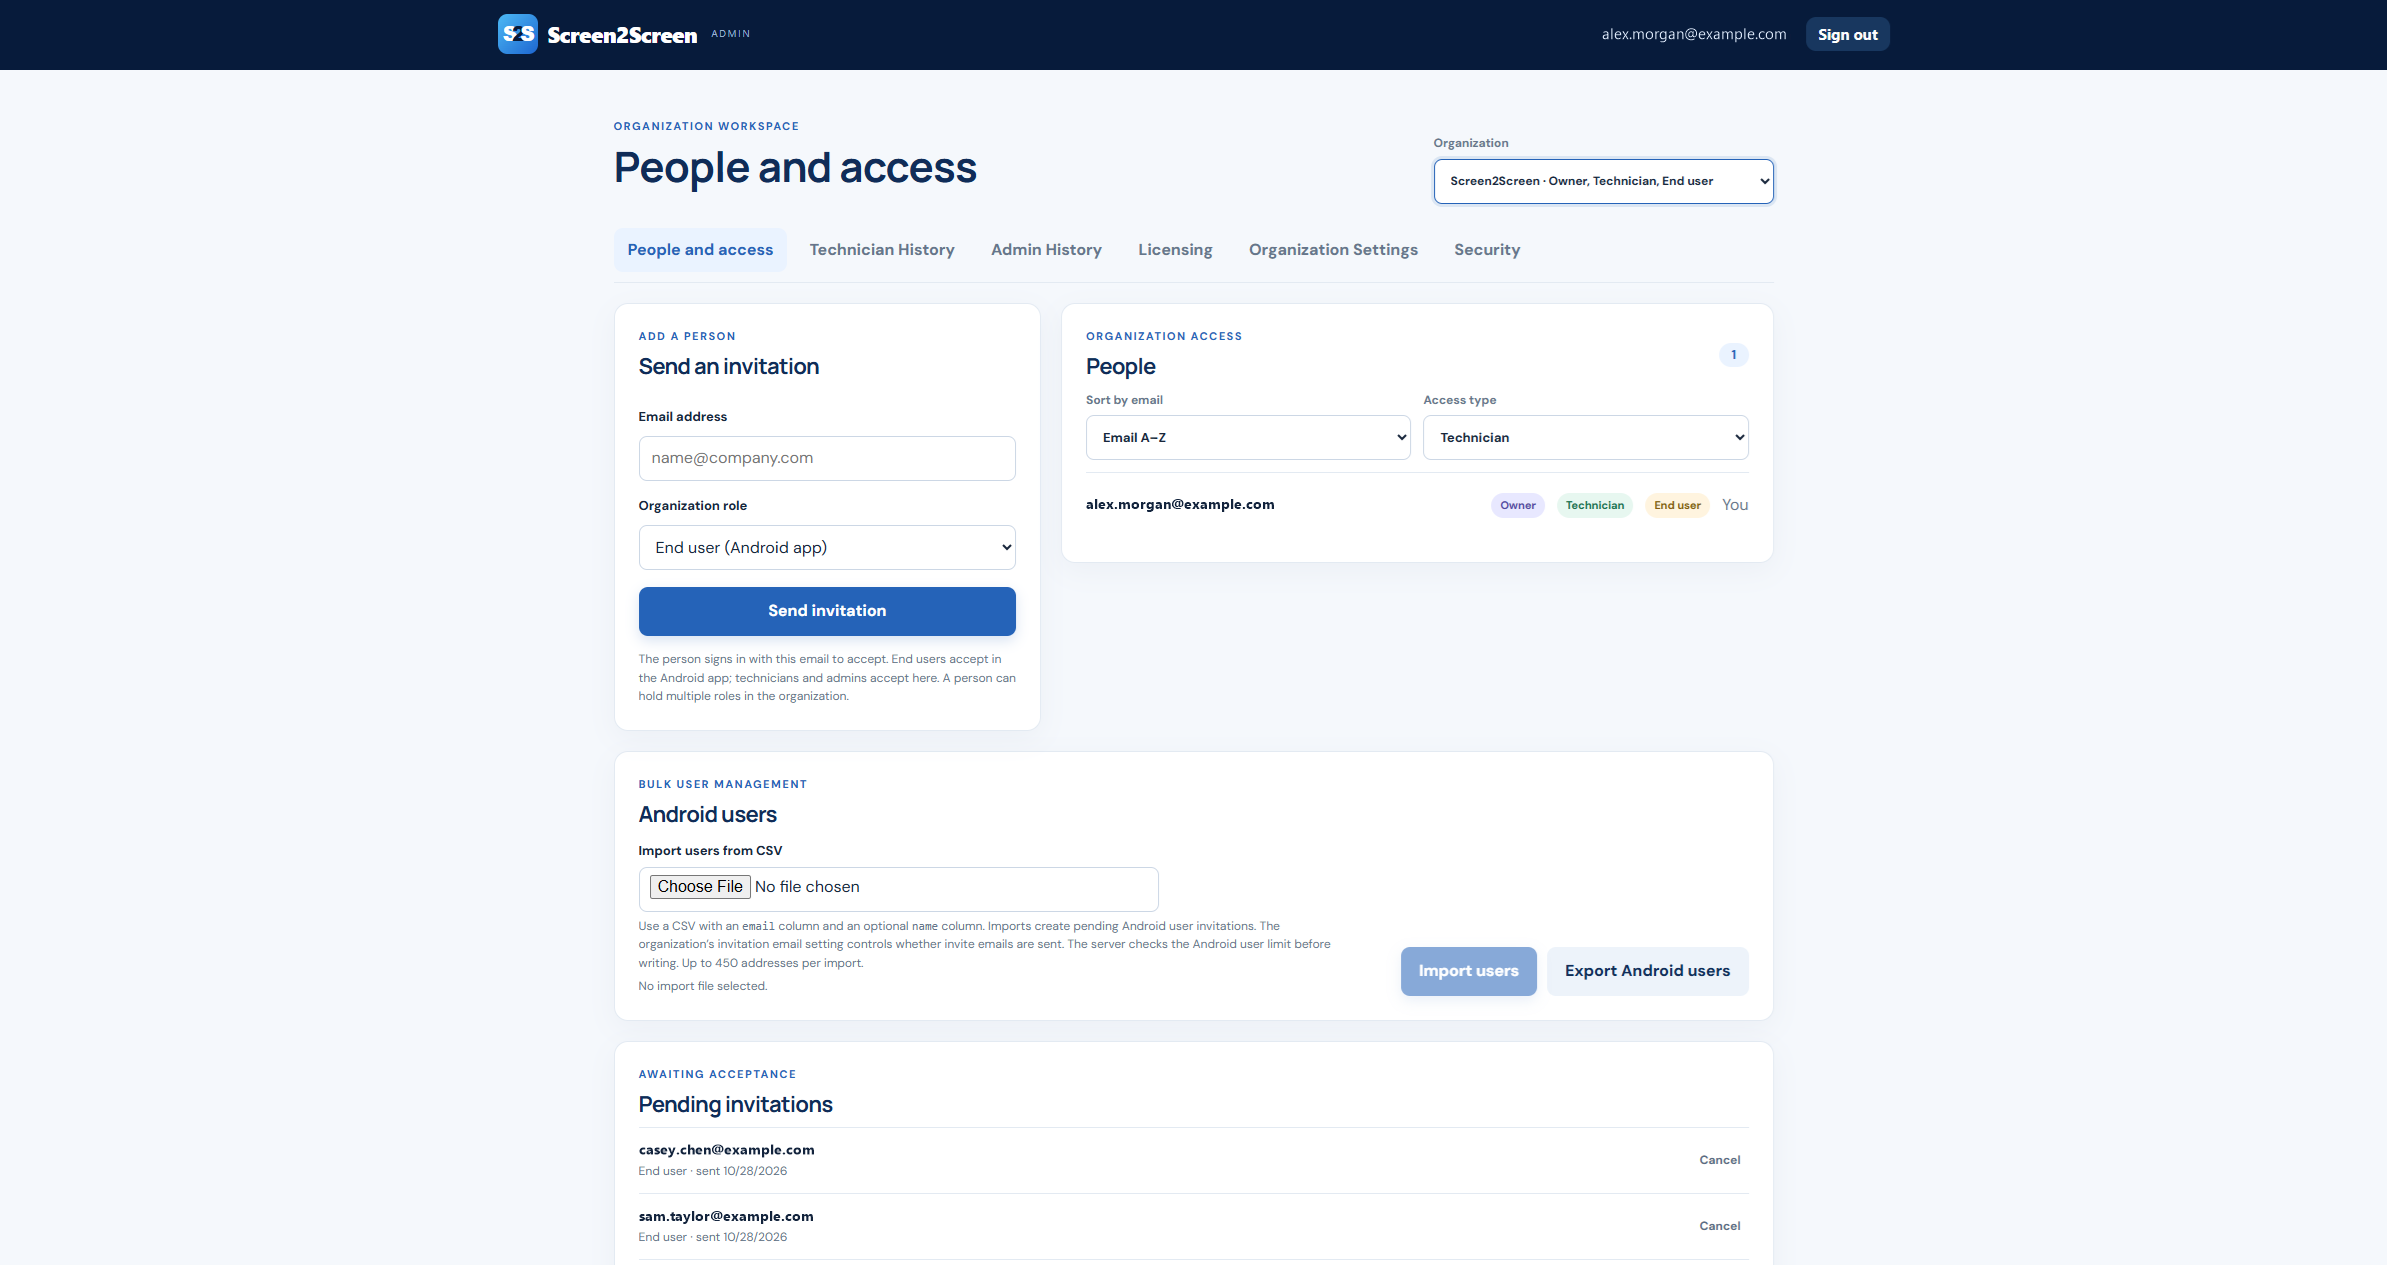
Open People and access and choose People, Invite, Import/Export, or Pending Invites. People is selected when you first open an organization. Import/Export appears only on eligible plans.
Open full-size screenshot ↗
Send an individual invitation
- Open the Invite subtab. In Send an invitation, enter the email address the person will use to sign in.
- Optionally enter a Display name. The same field is available for Administrator, Technician, and End user invitations.
- Choose one role: Administrator, Technician, or End user (Android app).
- Select Send invitation. The invitation appears in the Pending Invites subtab until accepted.
- Ask admins and technicians to sign in to the Admin Workspace to accept. Android users accept through the Android app. Use Cancel on a pending invitation if it is no longer needed.
| Role | What it is for |
|---|---|
| Owner / Administrator | Manage organization members, settings, licensing, and organization history. Owners and administrators count toward the admin allowance. |
| Technician | Use the Tech Workspace to respond to requests and conduct support sessions. |
| End user | Join the organization in the Android app and receive support. |
Review or change existing access
Open the People subtab. Search by display name or email, sort by email, and use Access type to filter the list. Search matches people across the whole organization list before paging. Choose 10, 25, or 50 people per page (10 by default), then use Previous and Next. Changing the search, filter, sort, or page size returns to page 1. Role badges show every role the person holds; a person can be both an admin and a technician without needing a second account.
For another active member, open the three-dot menu. Edit roles lets you select the required combination of Administrator, Technician, and End user. Remove access removes membership from this organization. Owner roles cannot be reassigned through this editor. Your own account does not offer the role-edit, access-removal, or MFA-reset actions.
Set or edit a display name
After the person joins, open their three-dot menu in People and choose Edit display name. Enter the preferred name or leave it blank, then save. You can also edit your own or the owner’s display name.
The name applies to that person’s membership in this organization, including all roles they hold there. For technicians, it is used in future connection names and invitations to devices. It does not change their sign-in email or their name in other organizations; historical session names remain as recorded. The change is recorded in Admin History.
Import or export Android users on Team and above
Bulk User Management is available on Team, Business, Corporate, and Custom plans. The Import/Export subtab is hidden on Solo, Solo+, and Basic; those plans support individual invitations. On eligible plans, open the Import/Export subtab under People and access.
- Prepare a CSV file with an
emailcolumn and, optionally, anamecolumn. Use up to 450 addresses per import. - Choose the file under Import users from CSV. Check the row count and preview before continuing.
- Select Import users. The result reports invitations created and existing or duplicate entries skipped. Imports create pending Android user invitations; they do not create technician or admin roles.
- Use Export Android users for a CSV of the organization’s Android user members, including their names, email addresses, and status. Pending invitations remain listed separately on the page.
email,name
casey.chen@example.com,Casey Chen
sam.taylor@example.com,Sam TaylorRead Technician History across your team
Open full-size screenshot ↗
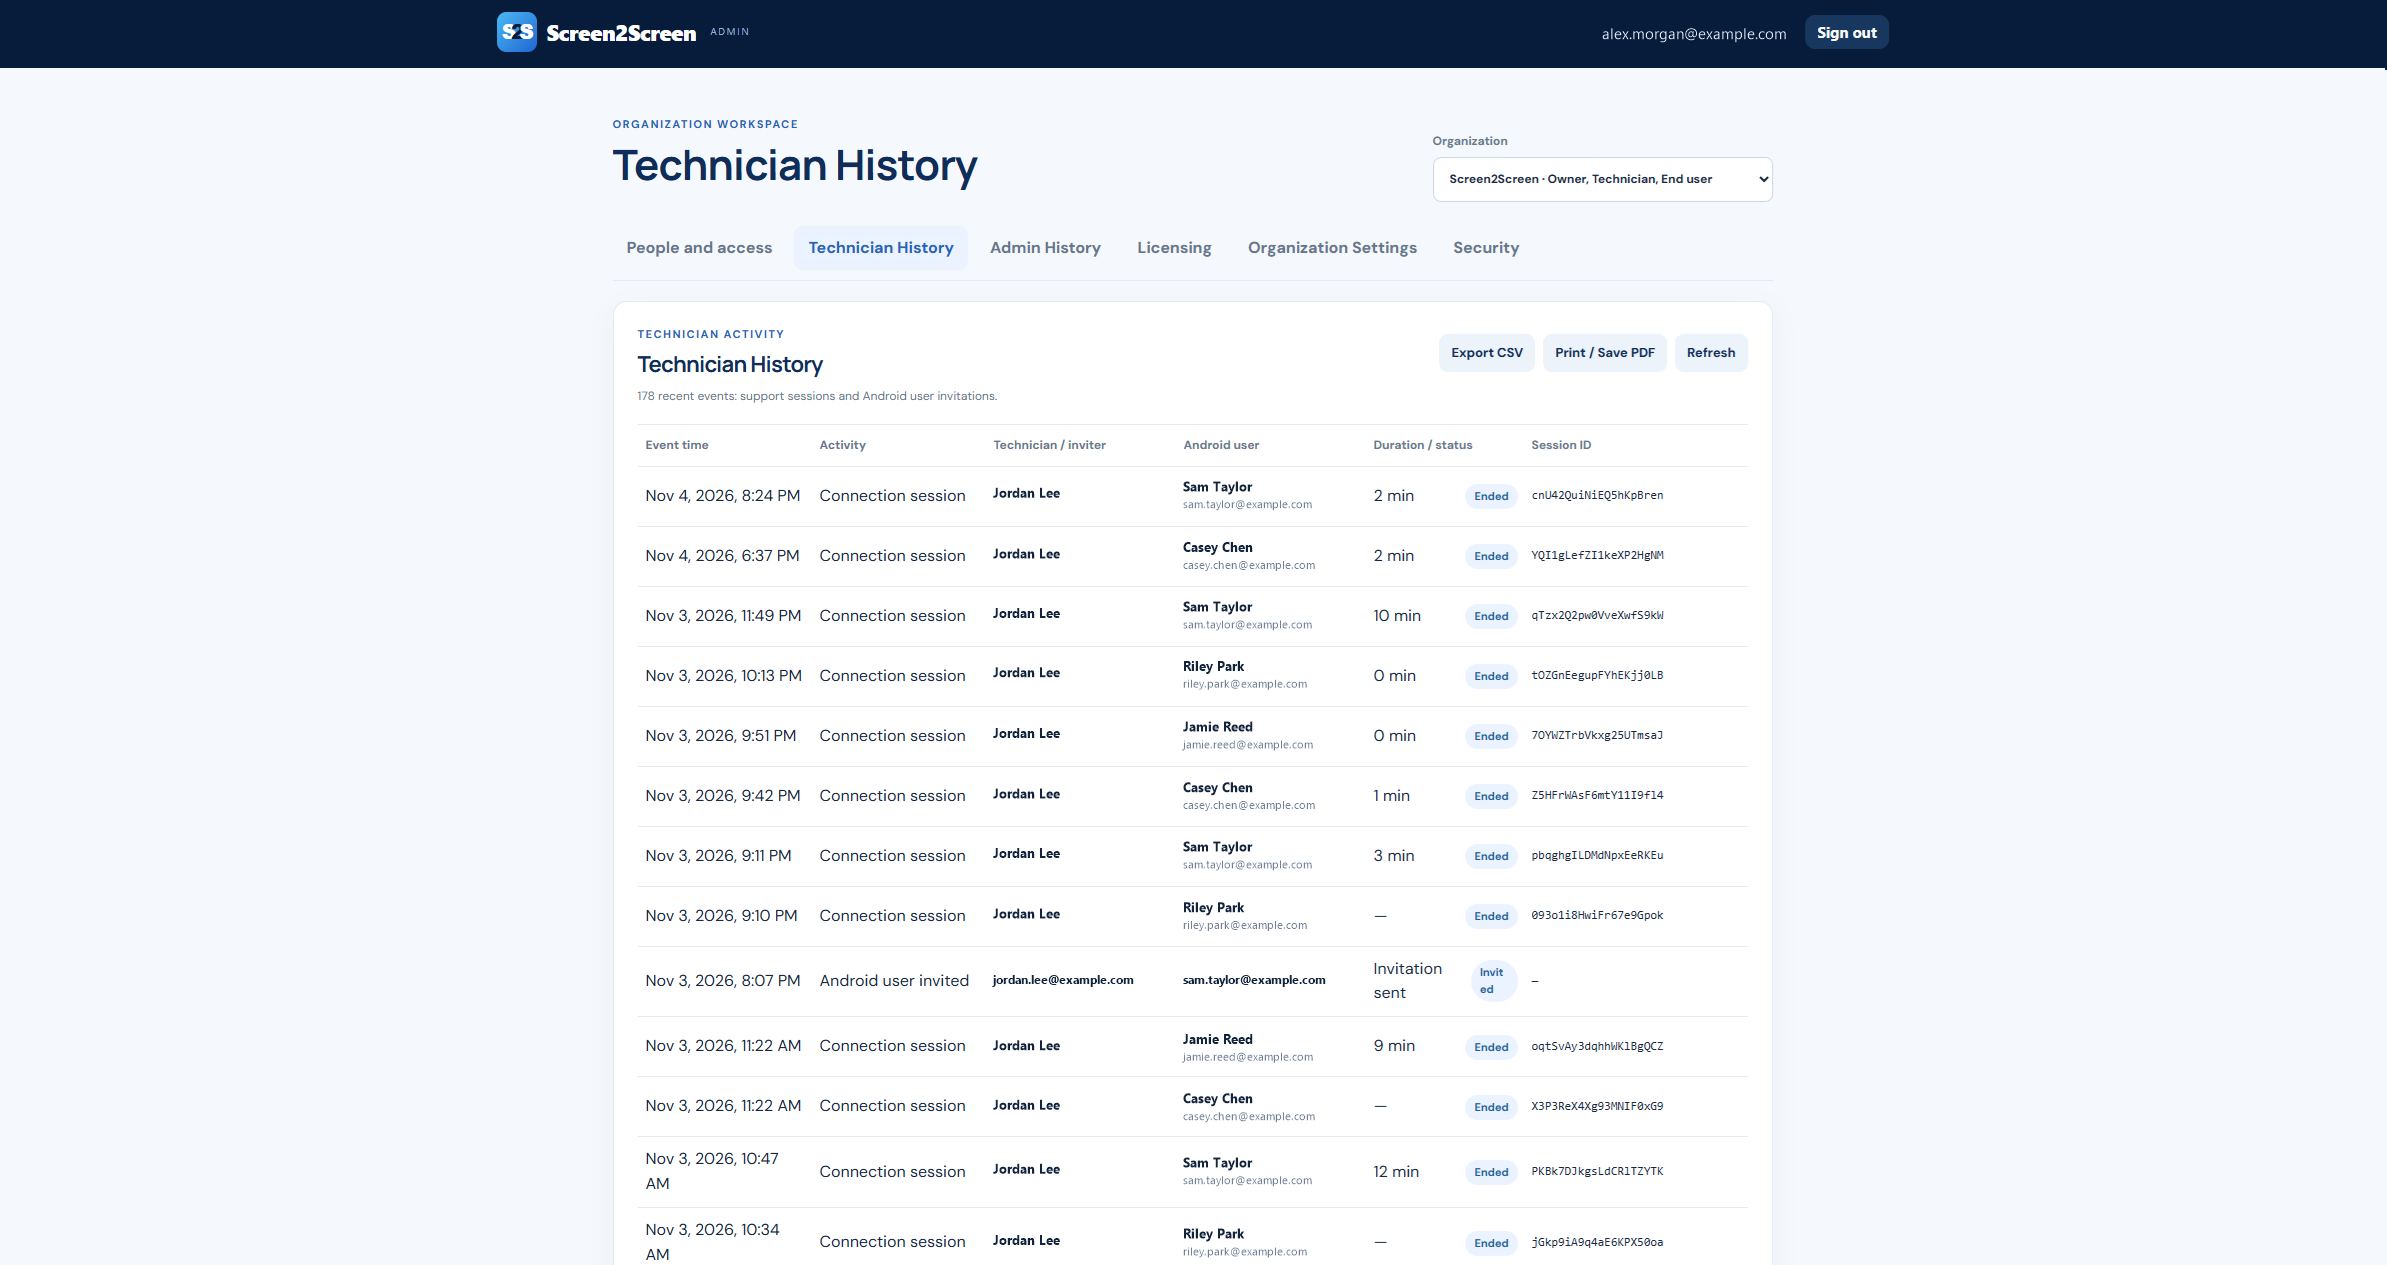
Technician History combines recorded connection sessions and Android user invitations sent by technicians for the selected organization.
- ✓Technician / inviter identifies your team member.
This column shows who conducted the session or sent the invitation.
- ✓Android user identifies the person receiving support.
Use the displayed email to distinguish people with similar names. It is separate from the technician’s identity.
- ✓Session ID identifies a particular connection.
Match it to the request queue or a technician’s personal history. An invitation event may not have a Session ID.
Choose 10, 25, or 50 events per page, then use Previous and Next to browse. The default is 10 events per page. Use Refresh to reload activity and return to page 1. Export CSV creates a spreadsheet-friendly copy; Print / Save PDF opens a print view that your browser can save as a PDF. Exports cover the events currently loaded. Technicians see their own session history in the Tech Workspace.
Use Admin History to understand what changed
Open full-size screenshot ↗
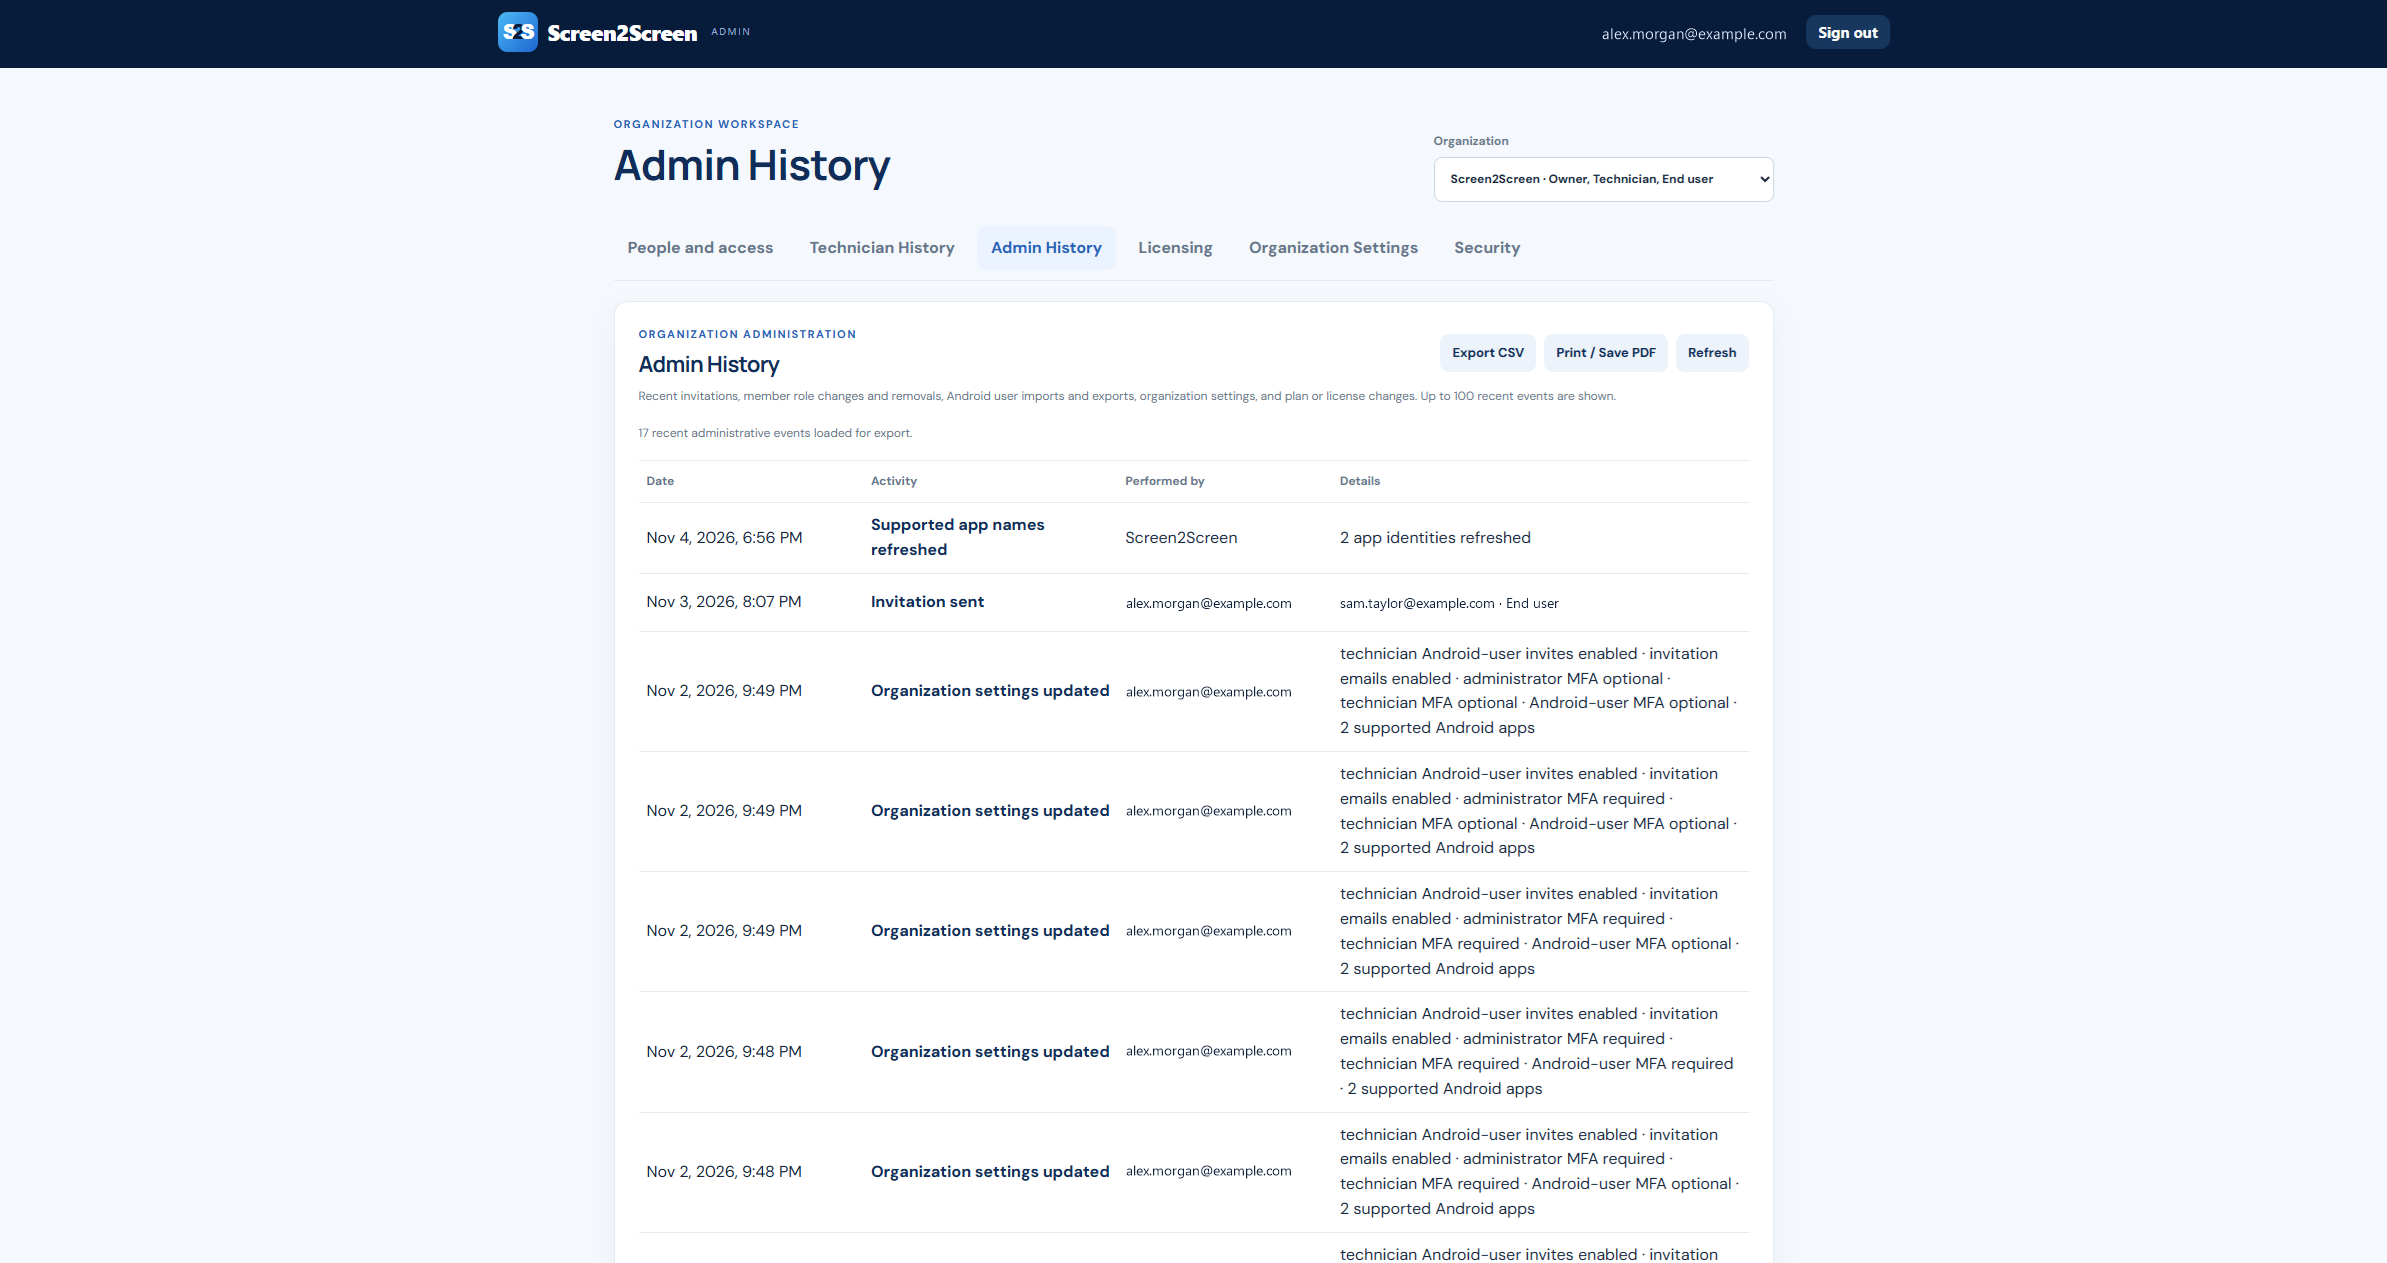
Admin History records key events such as invitations, display-name changes, role changes and access removals, Android user imports and exports, organization settings, supported-app updates, MFA resets, and licensing changes.
Read Date, Activity, Performed by, and Details together. Some automated entries are attributed to Screen2Screen.
Choose 10, 25, or 50 events per page and use Previous and Next. Choose Refresh for the latest entries and return to page 1. Use Export CSV or Print / Save PDF to preserve the loaded events for your organization’s records. Each export contains all loaded entries across pages, with up to 100 recent administrative events.
Understand your capacity before making changes
Open full-size screenshot ↗
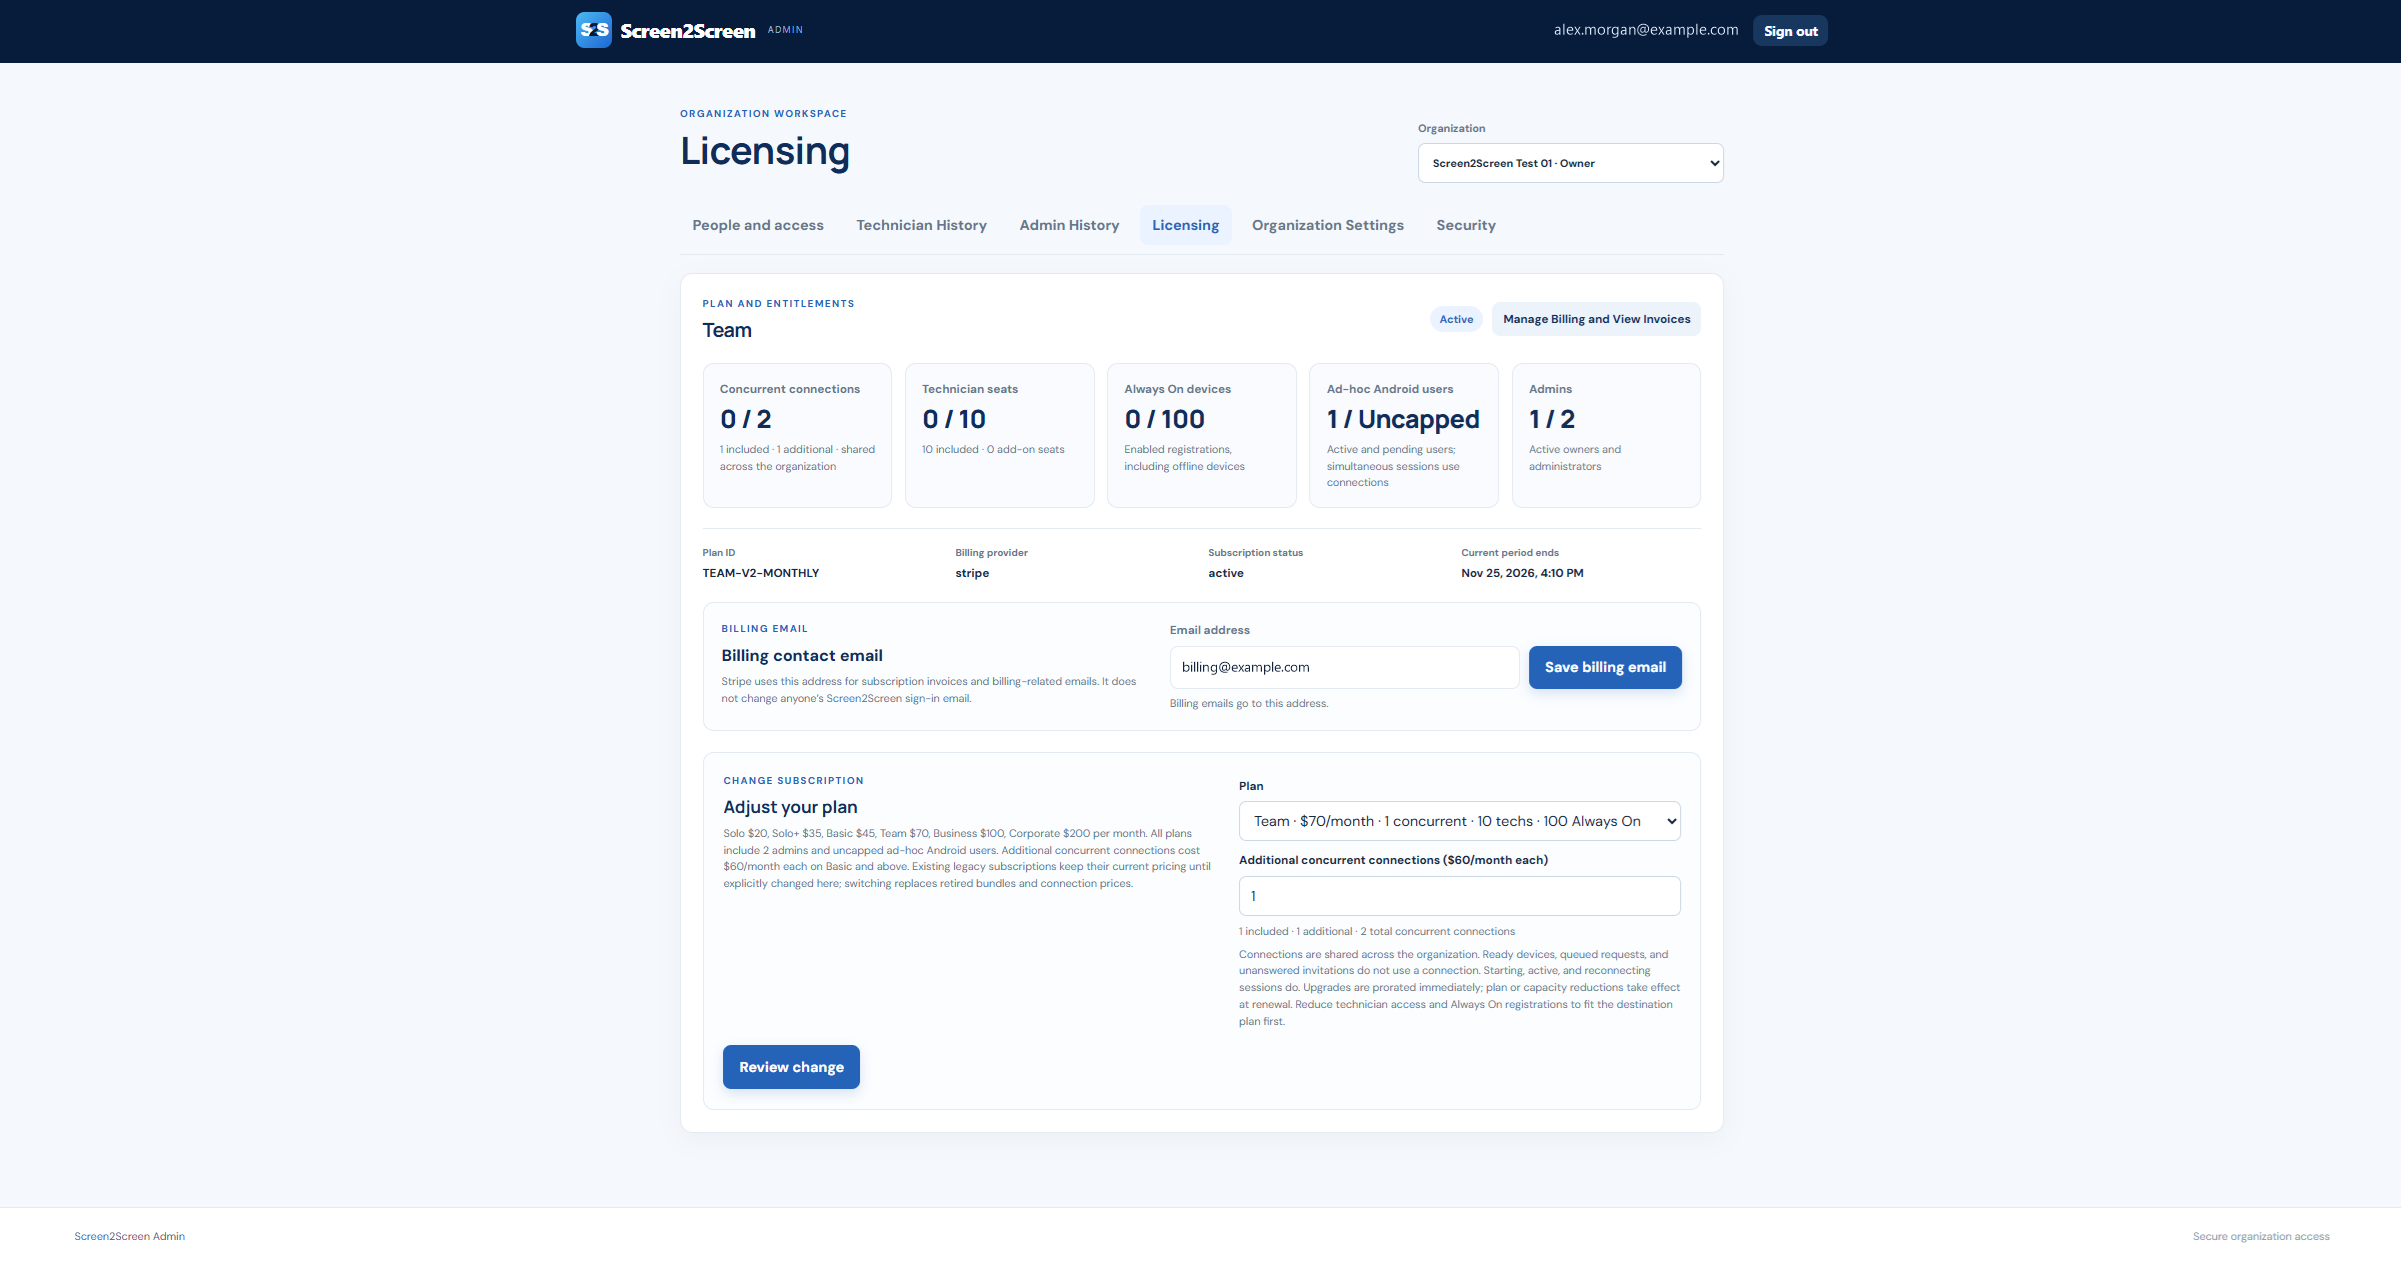
| Allowance | How to read it |
|---|---|
| Concurrent connections | The organization’s shared simultaneous support-session capacity. Starting, active, and reconnecting sessions use a connection. Queue requests, Ready devices, and unanswered invitations do not. |
| Technician seats | Named technician accounts, including an owner who also has Technician access. A technician can sign in and view the queue without consuming a concurrent connection. |
| Always On devices | Enabled device registrations, including registrations that are offline. Disable Always On or remove an unused registration to free a slot. |
| Ad-hoc Android users | Uncapped for ordinary user-initiated support. Their simultaneous sessions still use concurrent connection capacity. |
| Admins | Organization owners and administrators. Each standard plan includes two administrator accounts. |
Change the plan or add connections
- In Adjust your plan, select the desired plan and number of additional connections.
- Choose Review change and read the price, timing, and any prorated amount before confirming.
- Confirm only when the proposed change matches your needs. Upgrades and connection additions apply immediately once the required payment succeeds; downgrades and reductions are scheduled for the next renewal.
- If a change is already scheduled, review its details and cancel it before submitting a replacement adjustment. Current staff access and Always On registrations must fit the destination plan.
Additional concurrent connections are $60/month each on Basic and above. Solo and Solo+ do not offer connection add-ons. For a different mix of capacity, contact us about a Custom plan. Changing plans does not restart the seven-day trial.
Set the billing contact and find invoices
Enter the intended invoice recipient in Billing contact email and select Save billing email. This can be an accounts-payable address; it does not change anyone’s sign-in email.
Manage Billing and View Invoices opens the billing portal in a new tab, keeping the Admin Workspace open. Use it to review invoices, payment details, and available subscription controls. Allow pop-ups if the browser blocks the new tab. Billing controls depend on an associated subscription.
Configure invitations, security policy, and supported apps
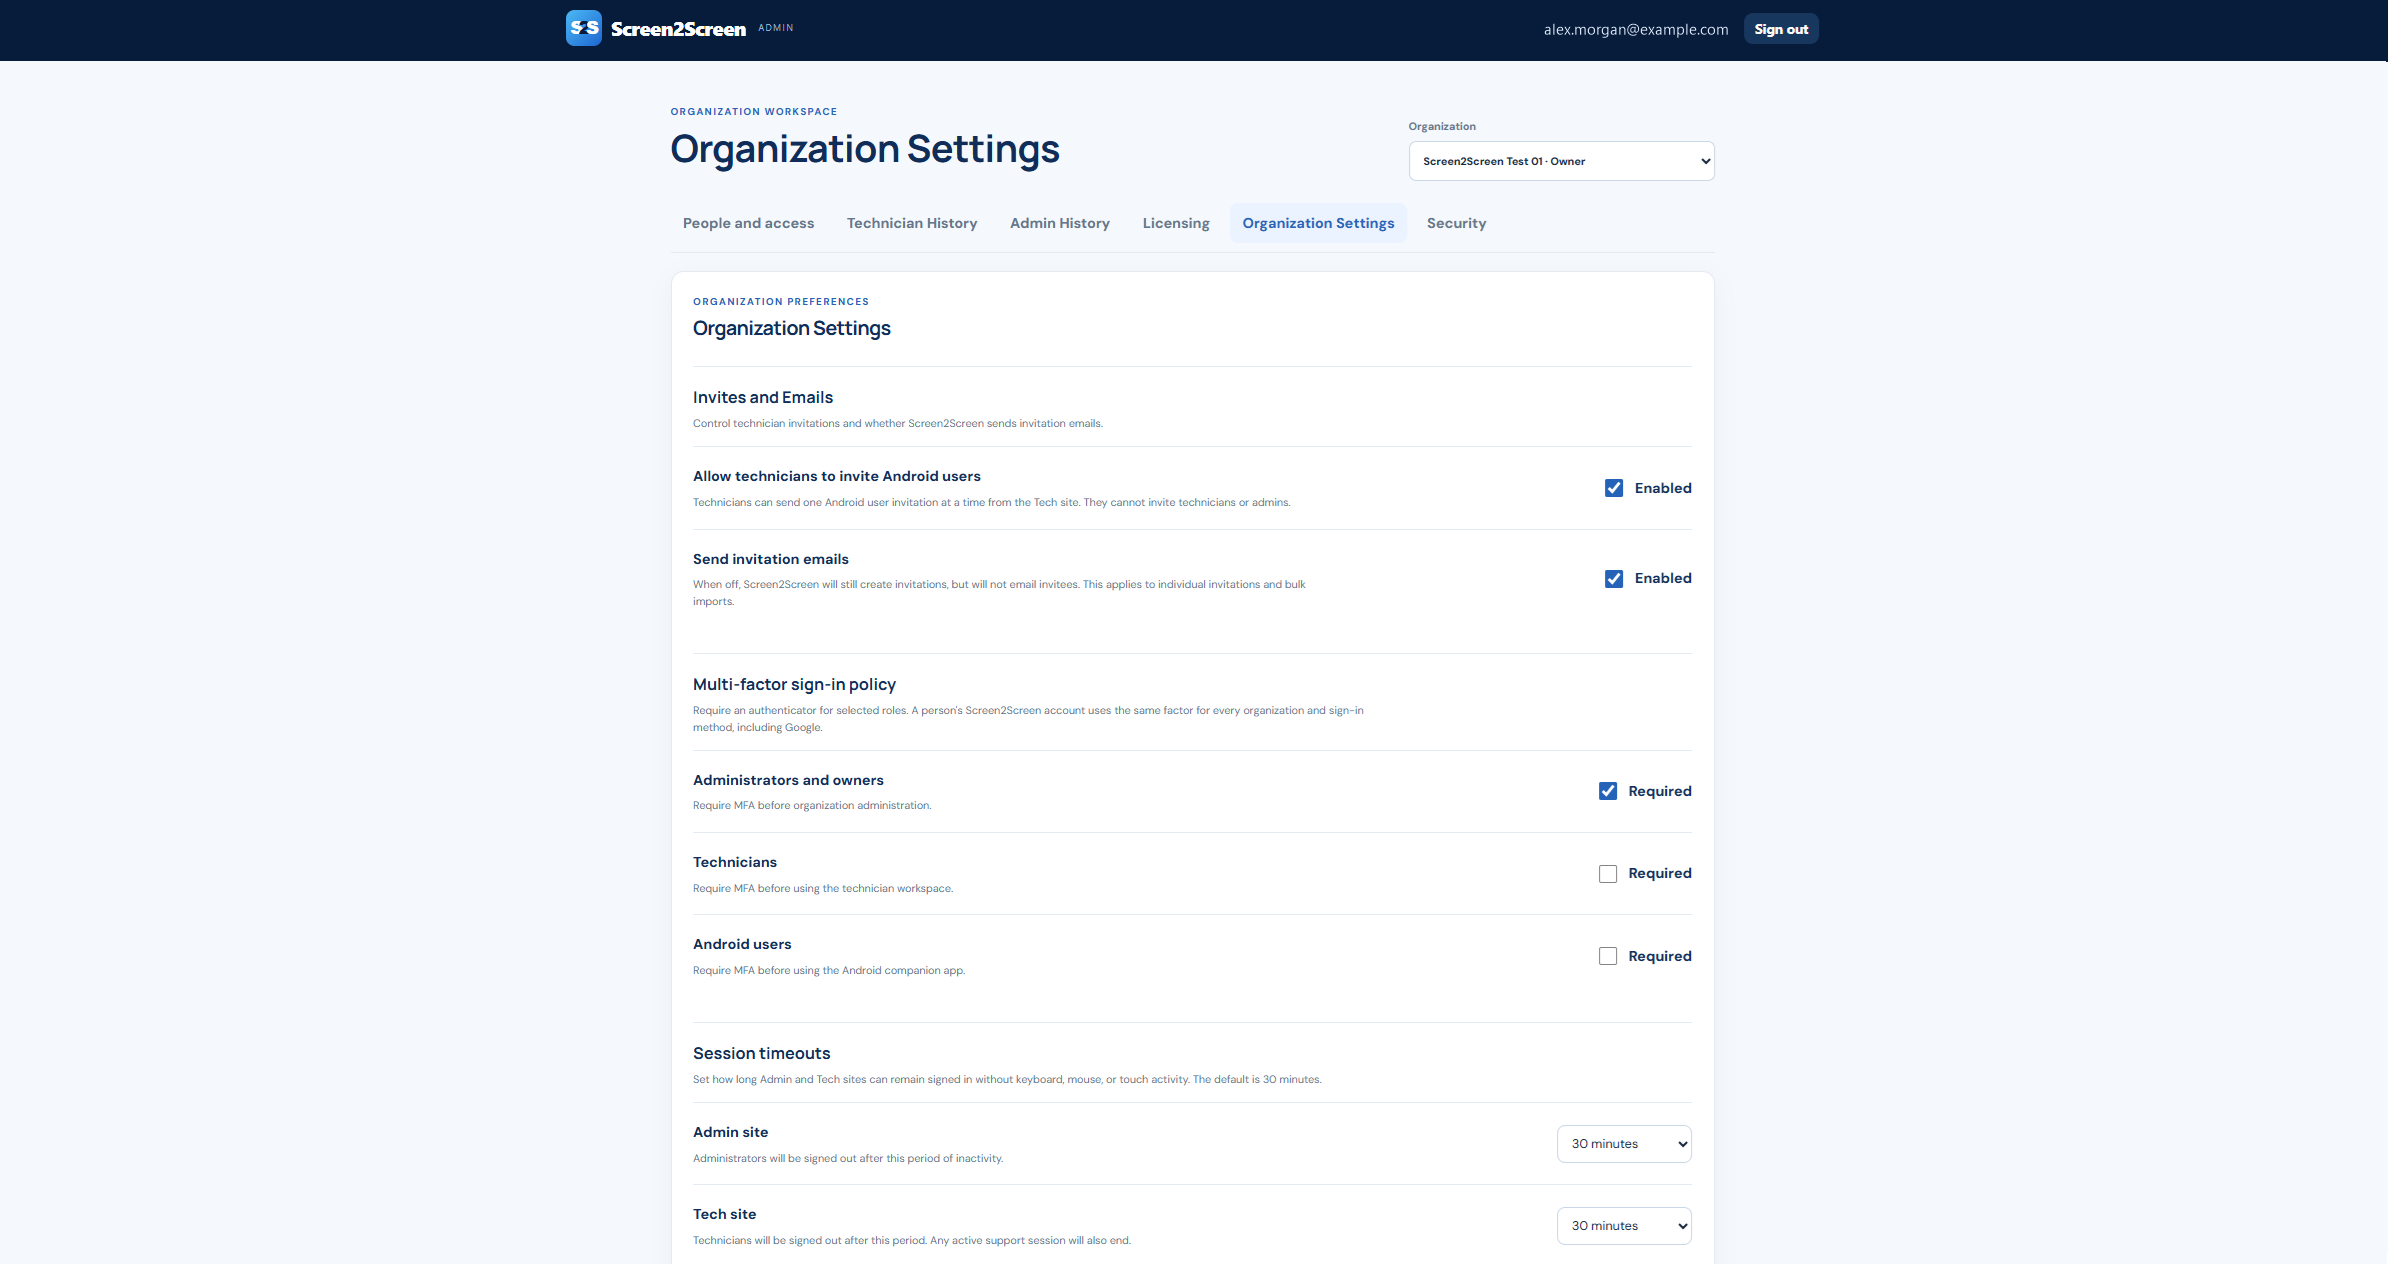
Open full-size screenshot ↗
Organization details
Owners and administrators can change the Organization name at the top of Organization Settings. Enter the new name and select Save name. The organization selector updates when saved; other members see the new name when they reload their organization list. Name changes appear in Admin History with the previous and new names.
Invites and Emails
Allow technicians to invite Android users controls the Tech Workspace’s Invite User form. When enabled, technicians can invite one Android user at a time; it does not let them invite technicians or administrators.
Send invitation emails controls automated invitation emails, including bulk-import invitations. Turning it off leaves invitation creation available. Both invitation preferences are enabled by default. If you handle messages yourself, share the appropriate Technician guide or Android user guide.
Multi-factor sign-in policy
Choose whether an authenticator is required for Administrators and owners, Technicians, and Android users. These policy switches are separate from enrolling your own authenticator in Security. Set up your own factor and explain the requirement to your team before enforcing it.
Session timeouts
Set separate inactivity timeouts for the Admin site and Tech site: 15 minutes, 30 minutes, one hour, or two hours. The default is 30 minutes. Inactivity signs the person out; a technician’s active session also ends when their timeout expires.
Supported Android apps
Scroll below the timeout controls to maintain your organization’s workflow-app list. Google Play Store is included as a fixed reference example.
- Enter the app’s exact Android package name, such as
com.example.inventory. Use the package identifier, not a store page title. - Choose Look up app and review the returned identity, then select Add app. App names and publishers are looked up from Google Play and cannot be freely edited. Private or unavailable listings use the package name; installed devices can report their local label.
- Use Refresh app names when the stored listing information needs updating, or Remove to stop tracking an optional app.
During support, technicians see installation status and reported versions in Device details, then can request Open or Install. The user reviews those requests; adding an app here does not install it or permit unattended access. The separate Installed user apps list supports user-reviewed uninstall requests for eligible apps, with Android confirmation.
Prepare devices for file and Wi-Fi support
Share the Android file-access instructions with your team. Users can authorize a shared folder in the app’s Settings or choose it when a technician first requests access. That authorization belongs to the account on that device across organizations; adding a supported app does not grant file access. Technicians can also send WPA2 or supported WPA3 Personal configurations to supported Android 11+ devices for user approval through Android.
The Technician guide explains file limits, Wi-Fi results, and one-viewer session handoff. Ready-device check-in freshness and invitation receipt help with support scheduling; neither bypasses the user’s screen-sharing approval.
Preference changes save as you adjust the controls. Wait for the saved confirmation before leaving the page.
Manage your authenticator and help locked-out members
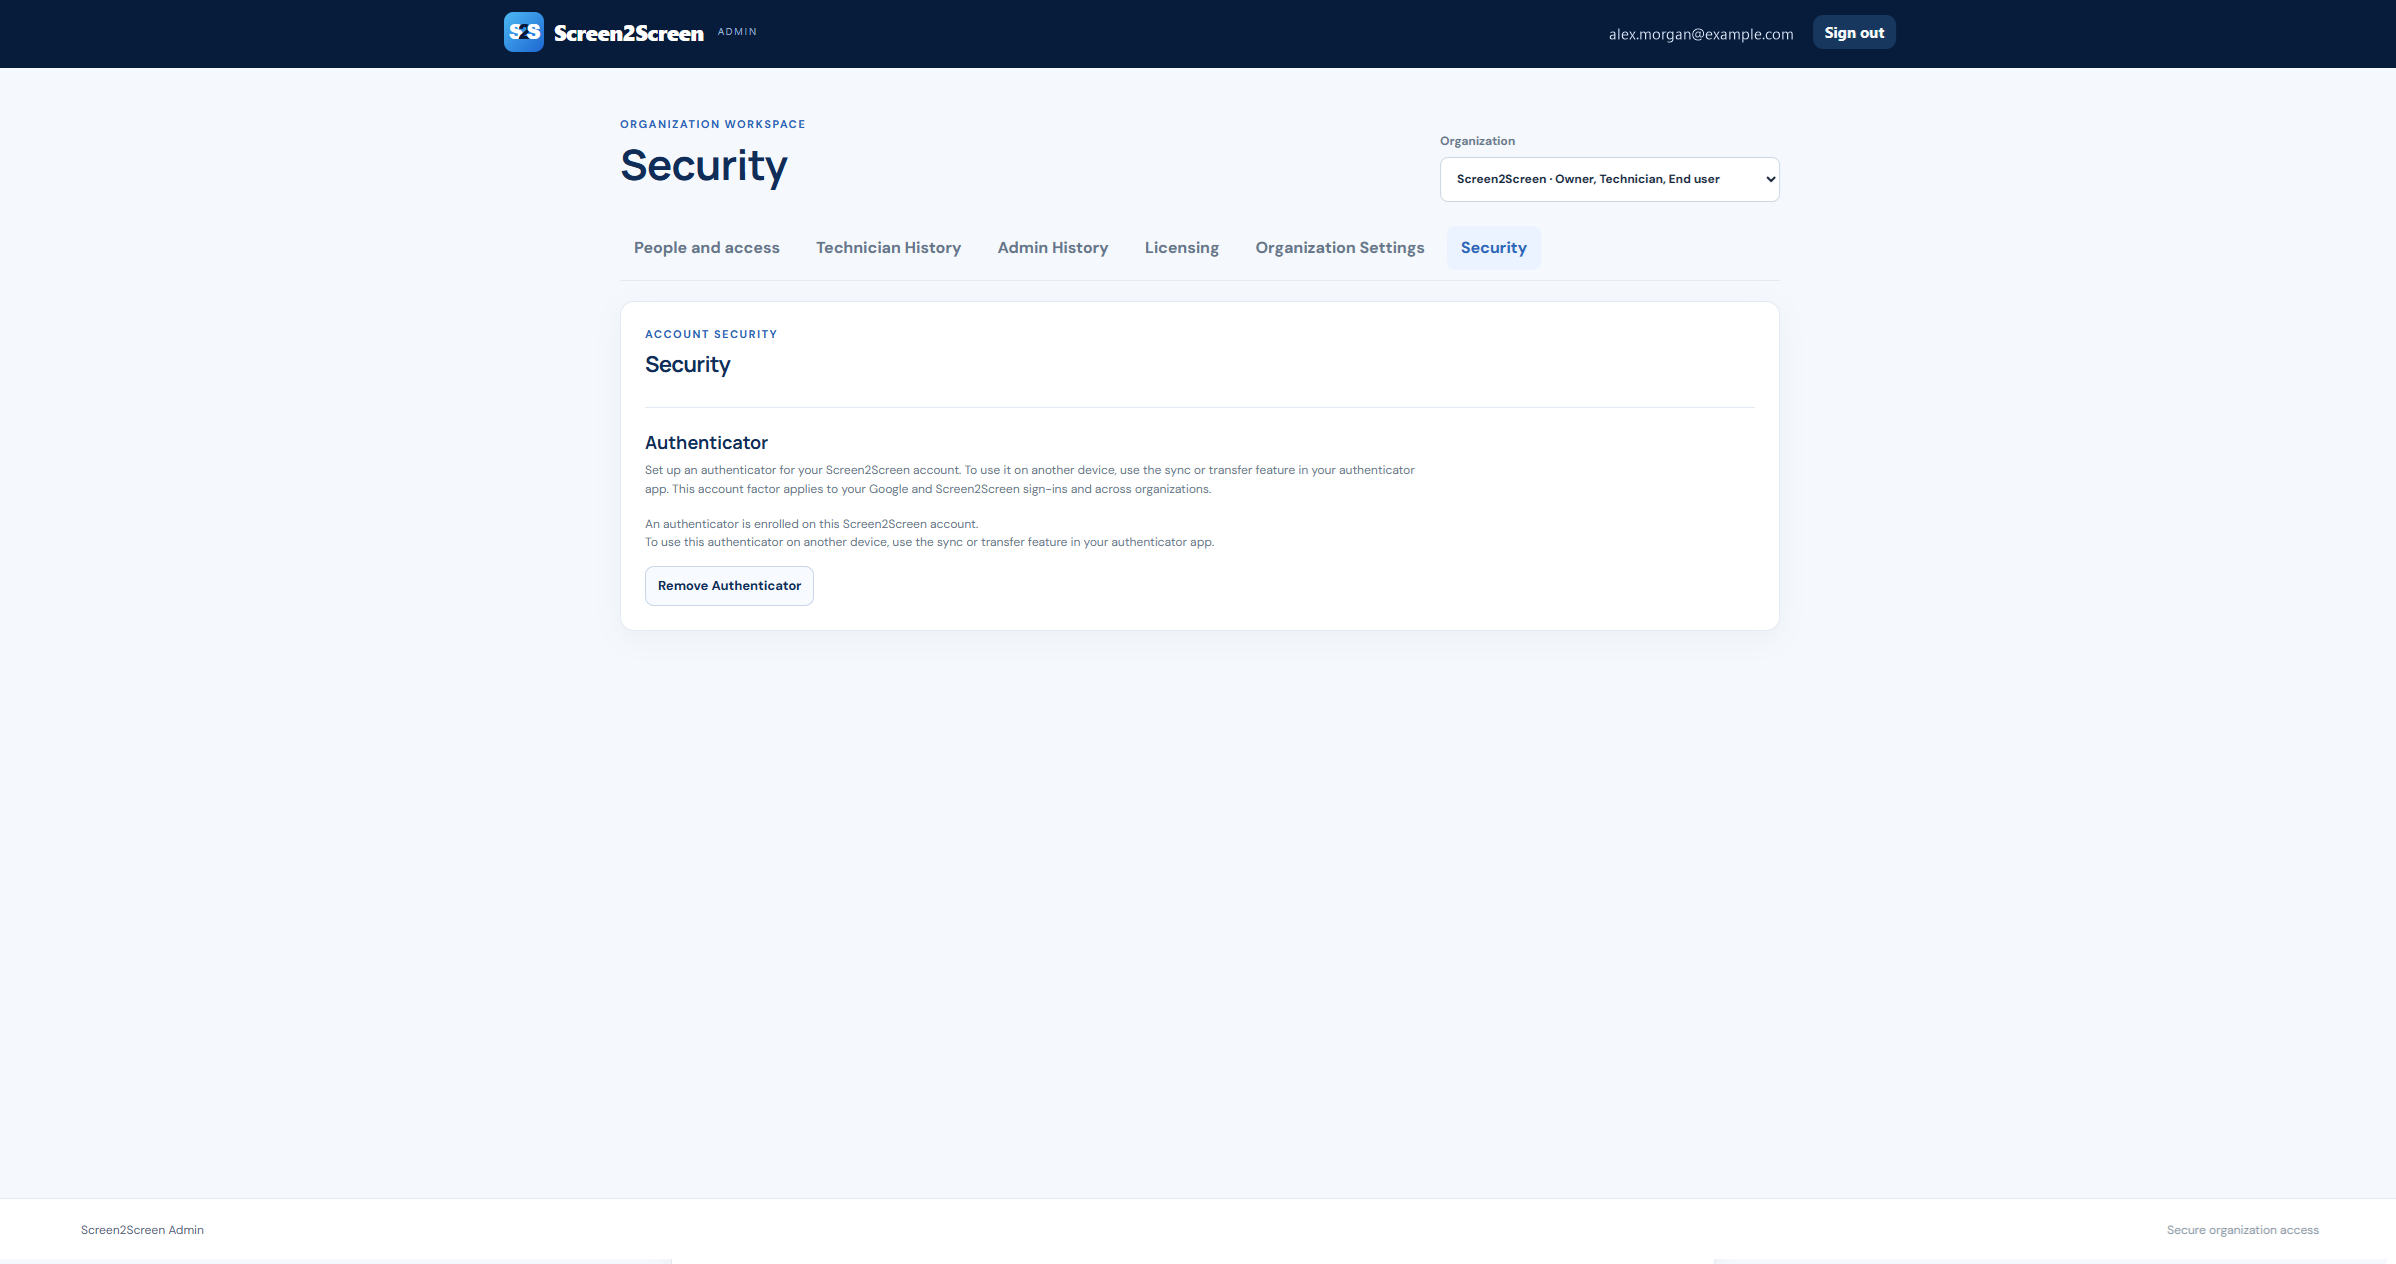
Open full-size screenshot ↗
The Security tab manages your own account. You can enroll voluntarily even if no organization requires MFA. Choose Set up authenticator, scan the QR code or use the setup key, then enter the current six-digit code to finish.
When a factor is already enrolled, the page shows Remove Authenticator rather than offering a second enrollment. For another phone, use your authenticator app’s sync or transfer feature, or remove the existing factor before enrolling a replacement. The factor applies across your organizations and sign-in methods.
Reset another member’s MFA
If a member loses access to their authenticator, confirm their identity using your organization’s established process. In People and access, open that person’s three-dot menu and choose Reset MFA, then review the confirmation.
Reset MFA clears the member’s enrolled factors for Screen2Screen, including Google and email/password sign-ins in other organizations. It does not remove roles or change the organization’s MFA policy. If MFA is required, the person must enroll again before regaining protected access. The reset is recorded in Admin History.
You cannot use the member reset action on yourself. If you are locked out, ask another authorized organization administrator or contact Screen2Screen support.
Send a help request from the Support tab
- Select the affected organization, then open Support.
- Review the account and organization details included with the request.
- Describe the problem in How can we help?, including what you expected and how to reproduce it. Add a Session ID and approximate time if the issue concerns a connection.
- Select Submit support request. Wait for the success message and retain its reference.
The form includes your signed-in email, organization roles, organization name, and Organization ID automatically. Do not include passwords, authenticator setup keys or codes, or payment card details. If you cannot sign in to use the form, contact support@screen2screen.net.
A practical organization setup checklist
- ✓Confirm access and capacity.
Check the selected organization, technician roles, administrator count, Always On registrations, and concurrent connection allowance.
- ✓Choose invitation delivery.
Decide who can invite Android users and whether Screen2Screen sends the invitation emails before adding people in bulk.
- ✓Prepare support.
Add the workflow apps your technicians need to check and share the relevant onboarding guide with each role.
- ✓Keep access current.
Review roles and pending invitations when people change jobs or leave. Use Admin History and Technician History for follow-up, and sign out when finished on a shared computer.